Last updated on June 27, 2025
These No Bake Orange Creamsicle Truffles are like little bites of sunshine—sweet, creamy, and bursting with nostalgic orange-vanilla flavor. If you grew up loving creamsicle popsicles in the summer (I definitely did), this easy citrus treat brings all that goodness back in a fun, grown-up way.
I made a batch of these on a whim for a weekend gathering, and they disappeared faster than I expected. The best part? No oven needed. Just a few simple ingredients, a little mixing and rolling, and you’ve got a batch of creamy orange truffles that taste like summer wrapped in a soft candy shell.
Whether you’re planning a dessert tray, a sweet snack, or just want to treat yourself to something bright and fun, this no bake truffle recipe checks every box. If you’re craving a summery no-bake sweet that’s easy to prep and even easier to love—this is the one.
Table of Contents
Why You’ll Love This No Bake Orange Creamsicle Truffles
These truffles are not only delicious but also offer a wonderful textural contrast, with a smooth, creamy center encased in a sweet white chocolate coating. You can customize them with colorful sprinkles or extra orange zest to add a touch of personality. They are quick to prepare, making them a fantastic go-to recipe when you’re short on time but still want to impress.
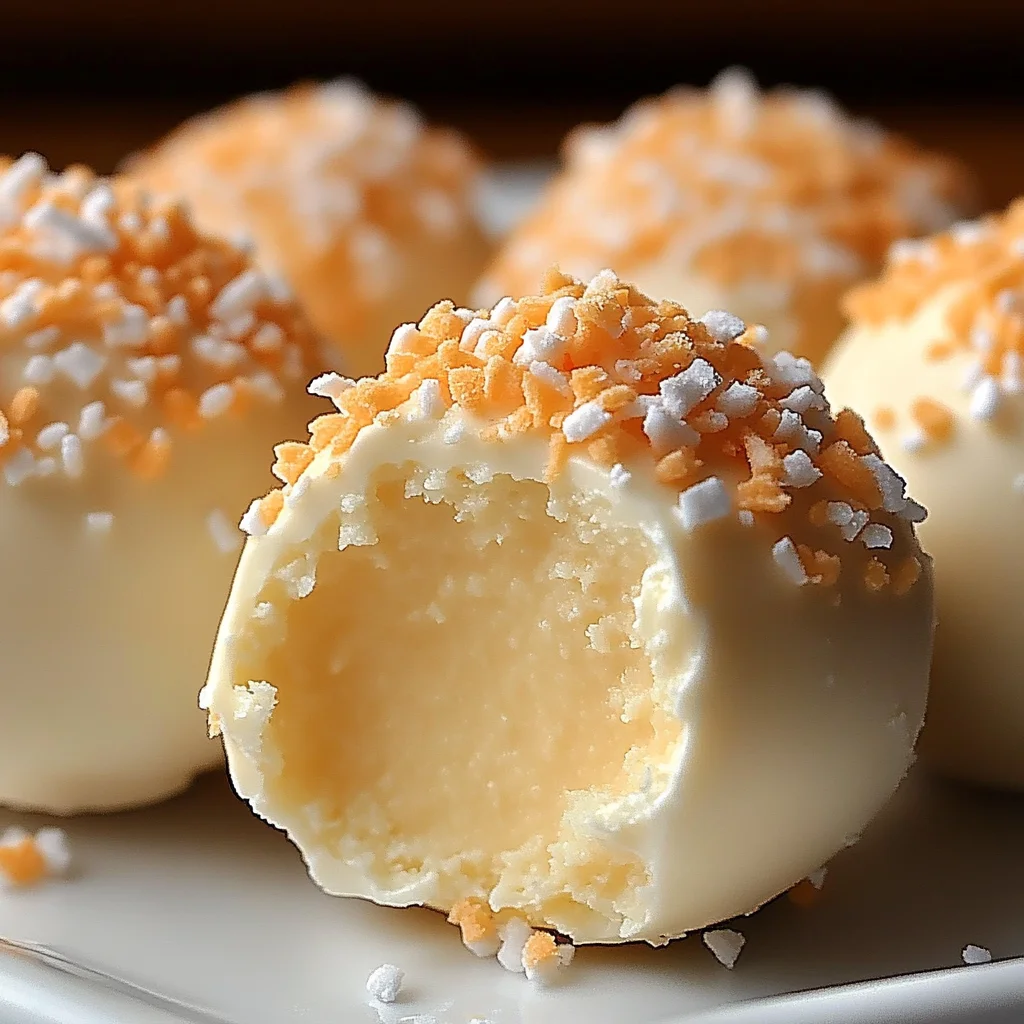
If you’re a fan of refreshing, sweet treats that evoke memories of sunny days and warm breezes, then you’ll absolutely adore these No Bake Orange Creamsicle Truffles. Combining the tangy taste of orange with the creamy richness of white chocolate, these delightful bites take a beloved childhood treat and transform it into a decadent dessert. Perfect for parties, gatherings, or a special afternoon treat at home, these truffles are simple to make and require no baking, making them an ideal choice for any home cook.
Print
No Bake Orange Creamsicle Truffles
- Total Time: 1 hour 5 minutes
- Yield: 24 truffles 1x
- Diet: Vegetarian
Description
These No-Bake Orange Creamsicle Truffles are bursting with citrusy orange flavor and creamy vanilla sweetness. Made with crushed vanilla wafers, orange juice concentrate, and a luscious white chocolate coating, they’re perfect for summer treats, parties, or anytime you crave something nostalgic and sweet.
Ingredients
Essential Ingredients:
- 1 1/2 cups (180 g) powdered sugar
- 1/2 cup (115 g) unsalted butter, softened
- 2 cups (120 g) finely crushed vanilla wafers
- 1/4 cup (60 ml) frozen orange juice concentrate, thawed
- 1 tsp orange zest (optional, for extra flavor)
- 1/2 tsp vanilla extract
- 1 cup (200 g) white chocolate chips or candy melts (for coating)
Optional Add-Ons:
- Colorful sprinkles (for decoration)
- Extra orange zest (for garnish)
Instructions
- Mix the Base: In a large bowl, beat softened butter and powdered sugar together until smooth and creamy.
- Add Flavor: Stir in thawed orange juice concentrate, orange zest (if using), and vanilla extract. Mix well until fully combined.
- Incorporate Wafers: Gradually mix in the finely crushed vanilla wafers until a soft dough forms.
- Form Truffles: Roll tablespoon-sized portions of the mixture into smooth balls using your hands.
- Chill: Place truffle balls on a parchment-lined tray and refrigerate for 30 minutes to firm up.
- Melt Chocolate: While truffles chill, melt white chocolate in a microwave-safe bowl in 20-second intervals, stirring in between, until smooth.
- Coat Truffles: Dip each chilled truffle into melted white chocolate using a fork. Let excess chocolate drip off before placing on parchment paper.
- Decorate: Immediately sprinkle with optional decorations like sprinkles or extra zest while the coating is still soft.
- Final Chill: Refrigerate coated truffles for at least 15–20 minutes until the chocolate sets completely.
- Serve: Enjoy straight from the fridge or at room temperature. Store leftovers in an airtight container.
Notes
- Use a cookie scoop for even-sized truffles.
- If the dough is too soft to roll, chill it for 10 minutes before shaping.
- Store in the fridge for up to 1 week or freeze for longer storage.
- Prep Time: 20 minutes
- Cook Time: undefined
- Category: Dessert, Snack
- Method: No-Bake
- Cuisine: American
Nutrition
- Serving Size: 1 truffle
- Calories: 120
- Sugar: 12g
- Sodium: 20mg
- Fat: 6g
- Saturated Fat: undefined
- Unsaturated Fat: undefined
- Trans Fat: undefined
- Carbohydrates: 15g
- Fiber: 0g
- Protein: 1g
- Cholesterol: undefined
Keywords: orange creamsicle truffles, no bake truffles, citrus dessert, white chocolate truffles, summer treat
Ingredients You’ll Need for No Bake Orange Creamsicle Truffles:
Essential Ingredients:
- 1 1/2 cups (180 g) powdered sugar: This gives sweetness and helps bind the mixture.
- 1/2 cup (115 g) unsalted butter, softened: Softened butter adds creaminess and richness to the truffle mixture.
- 2 cups (120 g) finely crushed vanilla wafers: These provide the perfect texture and a hint of vanilla flavor.
- 1/4 cup (60 ml) frozen orange juice concentrate, thawed: This brings the zesty orange flavor that makes the truffles so delightful.
- 1 teaspoon orange zest (optional, for extra flavor): Zest adds an intense burst of orange aroma and flavor.
- 1/2 teaspoon vanilla extract: Vanilla enhances the overall flavor profile, adding warmth and depth.
- 1 cup (200 g) white chocolate chips or candy melts (for coating): This makes the truffles sweet and decadent.
Optional Add-Ons:
- Sprinkles: A vibrant touch that adds both color and a fun texture.
- Extra orange zest: If you love the taste of orange, feel free to sprinkle more on top for an additional zing.
How to Make No Bake Orange Creamsicle Truffles: Step by Step

Making these delightful truffles is as easy as gathering your ingredients. Here’s a detailed breakdown of each step you’ll need to take:
Step 1: Prepare the Truffle Mixture
Begin by taking a large mixing bowl. Add the softened unsalted butter and powdered sugar. Using a hand mixer or a spatula, beat these together until you achieve a smooth and creamy consistency. This step is crucial as it forms the base of your truffle mixture.
Step 2: Add Flavorings
Next, stir in the frozen orange juice concentrate, orange zest (if you’re using it), and vanilla extract. Mix until everything is well combined and the mixture is smooth. The orange juice concentrate will provide that refreshing citrus flavor while the vanilla adds a comforting warmth.
Step 3: Incorporate the Vanilla Wafers
Gradually add the finely crushed vanilla wafers into the bowl. Mix well until a dough forms. The crushed cookies create the perfect structure for your truffles, providing both flavor and texture.
Step 4: Shape the Truffles
Scoop out small portions of the dough, about one tablespoon each. Roll these into smooth balls between your palms. This step can get a bit messy, but don’t worry—it’s part of the fun!
Step 5: Chill for Firmness
Place the truffle balls on a parchment-lined baking sheet. Put them in the refrigerator for about 30 minutes. This will help the truffles firm up, making them easier to coat later.
Step 6: Melt the White Chocolate
While the truffles chill, prepare the white chocolate coating. In a microwave-safe bowl, melt the white chocolate chips or candy melts. Do this in 20-second intervals, stirring after each interval until the chocolate is completely melted and smooth. Be careful not to overheat, as chocolate can burn easily.
Step 7: Coat the Truffles
Once the truffle balls are firm, it’s time to coat them. Using a fork or a special dipping tool, dip each chilled truffle into the melted white chocolate. Allow any excess chocolate to drip off before placing them back on the parchment-lined sheet.
Step 8: Place Coated Truffles Back
After dipping, be sure to lay the coated truffles back onto the parchment paper. Make sure they are spaced apart so they don’t stick together as the chocolate hardens.
Step 9: Decorate (Optional)
While the chocolate is still warm and soft, sprinkle the top of each truffle with colorful sprinkles or a touch of extra orange zest. This step adds a lovely touch visually and enhances the flavor.
Step 10: Chill and Serve
Refrigerate the coated truffles for another 15-20 minutes to allow the chocolate to set completely. Once they’re ready, you can serve them chilled or let them sit at room temperature for a while.
Serving Suggestions for No Bake Orange Creamsicle Truffles
These No Bake Orange Creamsicle Truffles can be served in various delightful ways. Consider placing them in small, colorful cupcake liners for an attractive presentation. You can also arrange them on a serving platter with decorative touches like slices of orange or mint leaves for a fresh look.
For gatherings, presenting these truffles alongside some fresh fruit or a light fruit salad creates a cohesive theme. They also make an excellent addition to a dessert table, alongside other treats like brownies or cookies.
Pro Tips for Perfecting Your No Bake Orange Creamsicle Truffles
To truly elevate your truffle-making skills, keep these pro tips in mind:
- Use Fresh Ingredients: Make sure your orange juice concentrate is fresh and properly thawed. Fresh ingredients deliver the best flavor.
- Chill Thoroughly: Don’t skip the chilling steps. Proper chilling ensures the truffles hold their shape when coated in chocolate.
- Controlled Melting: When melting chocolate, be patient. Stirring frequently helps prevent burning and ensures a smooth end product.
- Flavor Adjustments: Feel free to adjust the amount of orange juice concentrate based on your taste preference. Testing a small amount can help you get just the right flavor.
- Taste Test: Before shaping the truffles, take a little taste of the mixture. Make adjustments to sweetness or flavor if necessary.
Easy Variations for No Bake Orange Creamsicle Truffles
While the original recipe is fantastic on its own, you might want to try these variations:
- Chocolate Coating: Instead of white chocolate, use semi-sweet or dark chocolate for a richer flavor contrast.
- Nut Butter Additions: Mix in a little peanut butter or almond butter for a creamier texture and a nutty flavor.
- Coconut Touch: Add shredded coconut to the mixture for a tropical twist.
- Citrus Blend: Experiment with other citrus fruits, like lemon or lime, to create unique flavored truffles.
Storage Tips to Store No Bake Orange Creamsicle Truffles
These truffles keep well, making them great for prepping ahead of time. Here are some storage tips:
- In the Refrigerator: Store your truffles in an airtight container in the refrigerator for up to two weeks. They taste even better after a few days as the flavors meld.
- Freezing: If you want to store them longer, they can be frozen. Just layer them between parchment paper in an airtight container. Thaw in the refrigerator before serving, and they’ll taste just as fresh.
- Avoid Humidity: Keep them in a cool, dry place. Excess moisture can affect the chocolate coating.
Conclusion
Creating No Bake Orange Creamsicle Truffles is not just about enjoying decadent, sweet bites; it’s about bringing joy to those around you. These truffles serve as a reminder of childhood treats, reminiscent of summers filled with popsicles and laughter. Their creamy orange flavor and delightful texture make them a hit wherever they are served.
Whether it’s a backyard barbecue, a casual gathering of friends, or a simple dessert after dinner, these truffles add a touch of sweetness to any occasion. And with their easy preparation and customizable options, they’re bound to become a favorite in your dessert repertoire.
FAQs About No Bake Orange Creamsicle Truffles
Can I use regular oranges instead of orange juice concentrate?
While fresh orange juice can work, it may alter the consistency of the mixture. It’s best to stick with orange juice concentrate for the truffles.
How do I prevent the white chocolate from hardening too much?
To keep the white chocolate workable, only melt small amounts at a time and ensure you’re working quickly when coating the truffles.
Can I make these truffles vegan?
Yes! Substitute the unsalted butter with vegan butter and use dairy-free chocolate chips or candy melts.
How do I know when my truffles are fully chilled?
They should be firm to the touch and not stick to your fingers. If they’re soft, give them a bit more time in the refrigerator.
What can I do if my truffle mixture is too wet?
If the mixture is too wet, gradually add more crushed vanilla wafers until you achieve a firmer consistency suitable for rolling.
With this simple, straightforward recipe, you’ll be well on your way to creating a delightful dessert that will impress everyone. Happy cooking!
Looking for more delicious recipes? Follow us on Pinterest and Facebook!