Last updated on May 21, 2025
Red Velvet Crinkle Cookies are a delightful twist on the classic red velvet cake. With their vibrant red color, soft texture, and a beautiful powdered sugar coating, these cookies are not only eye-catching but also incredibly delicious. Perfect for any occasion, from birthday parties to holiday gatherings, they add a fun pop of color and flavor to your dessert table. Whether you’re a seasoned baker or a beginner, this recipe is straightforward and rewarding. Let’s get started on bringing these irresistible treats to life!
Table of Contents
Why You’ll Love This Red Velvet Crinkle Cookie
You’ll adore the Red Velvet Crinkle Cookie for numerous reasons:
- Easy to Make: With simple ingredients and easy steps, even novice bakers will feel confident whipping up this treat.
- Stunning Appearance: The rich red color contrasted with the white powdered sugar creates a visually striking dessert that impresses anyone.
- Soft and Chewy Texture: These cookies balance a soft, chewy interior with that slight crunch from the powdered sugar exterior.
- Versatile for Any Occasion: Be it Valentine’s Day, Christmas, or just a casual get-together, these cookies fit beautifully into any event.
- Delicious Flavor: The combination of cocoa powder and vanilla gives a complex flavor profile that is both sweet and satisfying.
Let’s dive into the ingredients you’ll need!
Ingredients You’ll Need for Red Velvet Crinkle Cookie
Essential Ingredients
- 1 1/2 cups all-purpose flour: This provides the structure for your cookies.
- 1/2 cup unsweetened cocoa powder: Gives the cookies a rich chocolate flavor.
- 1 teaspoon baking powder: Essential for helping the cookies rise.
- 1/4 teaspoon salt: Enhances the overall flavor of the cookies.
- 1/2 cup unsalted butter, softened: Adds richness and a soft texture.
- 1 cup granulated sugar: Sweetens the cookies and helps create that crinkle effect.
- 2 large eggs: Binds the ingredients together and provides moisture.
- 1 teaspoon vanilla extract: Enhances the flavor of the cookies.
- 1 tablespoon red food coloring: Gives the cookies their signature vibrant red hue.
Optional Add-Ons
While the base recipe is fantastic on its own, you can customize your cookies with some optional ingredients:
- White chocolate chips or chunks: For an extra sweet surprise in each bite.
- Chopped nuts: Walnuts or pecans could add a nice crunch and nutty flavor.
- Cream cheese frosting drizzle: Adds a tangy sweetness that pairs wonderfully with the cookies.
How to Make Red Velvet Crinkle Cookie: A Step-by-Step Guide
Creating these stunning cookies is a fun and engaging process. Follow these detailed steps to ensure perfect results:
Step 1: Preheat the Oven
Begin your baking adventure by preheating your oven to 350°F (175°C). While your oven heats up, take two baking sheets and line them with parchment paper. This will prevent the cookies from sticking and make clean-up easier.
Step 2: Mix the Dry Ingredients
In a medium-sized bowl, whisk together the all-purpose flour, cocoa powder, baking powder, and salt until well combined. This step ensures that the leavening agents are evenly distributed throughout the flour, contributing to a uniform texture in the final cookies.
Step 3: Cream Butter and Sugar
In a large mixing bowl, add the softened butter and granulated sugar. Using a hand mixer or a stand mixer, cream the butter and sugar together on medium speed until the mixture is light and fluffy. This process usually takes about 2-3 minutes. The air incorporated here helps create a soft texture in your cookies.
Step 4: Add Eggs and Flavorings
Next, add the eggs, one at a time, mixing well after each addition. Follow this by stirring in the vanilla extract and red food coloring until fully combined. The mixture should now be a vibrant red color.
Step 5: Combine the Ingredients
Gradually mix the dry ingredients into the butter and sugar mixture. Continue stirring until everything is just combined. Be careful not to over-mix, as this can lead to tougher cookies. The dough will be slightly sticky, which is perfectly okay!
Step 6: Chill the Dough
To give your cookies their signature crinkle, chill the dough for at least 30 minutes in the refrigerator. This step makes it easier to handle the dough and helps prevent the cookies from spreading too much while baking.
Step 7: Form the Cookies
Once chilled, scoop out the dough into 1-inch balls. Roll each ball in powdered sugar until fully coated. This not only adds sweetness but also creates a beautiful surface texture.
Step 8: Bake the Cookies
Place the sugar-coated dough balls on the prepared baking sheets, spacing them about two inches apart. Bake them in the preheated oven for 10-12 minutes. You want them to be set around the edges but still soft in the center. Remove them from the oven and allow them to cool on the baking sheets for a few minutes before transferring them to a wire rack to cool completely.
Serving Suggestions for Red Velvet Crinkle Cookie
These cookies can be enjoyed in numerous delicious ways:
- Gift from the Heart: Present these cookies in a beautiful tin or gift box for a thoughtful homemade gift.
- Dessert Platter: Serve on a platter alongside other cookies for a stunning dessert table.
- Milk Pairing: Enjoy with a glass of cold milk for the classic cookie experience.
- Toppings: Consider drizzling with cream cheese frosting or melting white chocolate on top for an extra indulgent treat.
Pro Tips for Perfecting Your Red Velvet Crinkle Cookie
To level up your baking game, consider these helpful tips:
- Chill Overnight: For even better flavor and texture, consider chilling the dough overnight.
- Measure Accurately: Being precise in measuring your ingredients will lead to consistently excellent cookies.
- Test for Doneness: If you’re unsure about baking time, it’s better to check a minute or two earlier—remember, cookies continue to cook on the baking sheet even after being pulled from the oven.
- Experiment with Color: Feel free to adjust the amount of food coloring to achieve your desired shade of red.
Easy Variations for Red Velvet Crinkle Cookie
Why not experiment a little? Here are some quick variations to consider:
- Chocolate Chips: Add a handful of semi-sweet chocolate chips for a richer chocolate experience.
- Nutty Addition: Incorporate chopped walnuts or pecans for that lovely crunchy texture.
- Peppermint Twist: For a festive twist, add peppermint extract and swap the vanilla. These are perfect for the holiday season!
Storage Tips to Store Red Velvet Crinkle Cookie
Proper storage will ensure these cookies stay fresh:
- Room Temperature: Store baked cookies in an airtight container at room temperature for up to a week.
- Freezing: If you want to save some for later, freeze the cookies by placing them in a single layer on a baking sheet until solid, then transfer to a freezer-safe bag. They can last up to three months in the freezer.
- Dough Storage: If you have leftover dough, it can also be chilled and stored in the fridge for a few days or frozen for later use. Just let it thaw in the fridge before baking.
Conclusion
Baking Red Velvet Crinkle Cookies is a delightful way to enjoy a classic dessert in a vibrant form. With their visually stunning appearance and delicious flavor, these cookies are sure to be a hit among family and friends. The process is simple, and with a bit of practice, you’ll be able to whip these up in no time. So gather your ingredients, channel your inner baker, and treat yourself to these tasty cookies!
FAQs About Red Velvet Crinkle Cookie
1. Can I use cake flour instead of all-purpose flour?
Yes, you can! Cake flour will give your cookies a lighter texture. Just be sure to adjust the measurement slightly, as cake flour is denser.
2. How do I know when the cookies are done baking?
They should look set and slightly puffy, with a soft center. Remember, they will continue to cook once removed from the oven.
3. Can I add nuts to the dough?
Absolutely! Chopped walnuts or pecans can add great texture and flavor.
4. How should I store leftover cookies?
Keep them in an airtight container at room temperature for a week, or freeze for longer-term storage.
5. Can I use gel food coloring instead of liquid?
Yes, gel food coloring is a great option, as it provides a more vibrant color without adding extra moisture to the dough.
With these insights and tips, you’re ready to bake some fabulous Red Velvet Crinkle Cookies that everyone will love! Happy baking!
Print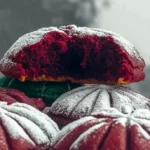
Red Velvet Crinkle Cookies
- Total Time: 1 hour 30 minutes
- Yield: 24 cookies 1x
- Diet: Vegetarian
Description
These Red Velvet Crinkle Cookies are a festive and decadent treat with a crackly powdered sugar coating and soft, chewy center. Perfect for holidays, special occasions, or whenever you’re craving a sweet, cocoa-rich bite with that classic red velvet charm.
Ingredients
Essential Ingredients:
- 1½ cups all-purpose flour
- ½ cup unsweetened cocoa powder
- 1 teaspoon baking powder
- ¼ teaspoon salt
- ½ cup unsalted butter, softened
- 1 cup granulated sugar
- 2 large eggs
- 1 teaspoon vanilla extract
- 1 tablespoon red food coloring
- ½ cup powdered sugar (for rolling)
Optional Add-Ons:
- ½ cup white chocolate chips or chunks
- ½ cup chopped nuts (walnuts or pecans)
- Cream cheese frosting drizzle, for extra decadence
Instructions
- Preheat oven: Set your oven to 350°F (175°C) and line a baking sheet with parchment paper.
- Mix dry ingredients: In a medium bowl, whisk together the flour, cocoa powder, baking powder, and salt.
- Cream butter and sugar: In a large mixing bowl, beat the softened butter and granulated sugar until light and fluffy (about 2–3 minutes).
- Add eggs and flavor: Beat in the eggs, one at a time. Add vanilla extract and red food coloring; mix until well combined.
- Combine: Gradually add the dry ingredients to the wet ingredients, mixing until a thick dough forms. Stir in optional add-ons if using.
- Chill: Cover and chill the dough for at least 1 hour for easier handling.
- Shape and coat: Scoop dough into 1-inch balls, roll in powdered sugar until well coated, and place on the prepared baking sheet about 2 inches apart.
- Bake: Bake for 10–12 minutes, or until cookies are set and crinkled on top. Let cool on the pan for 5 minutes before transferring to a wire rack to cool completely.
- Serve: Drizzle with cream cheese frosting if desired. Enjoy!
Notes
- Chilling the dough is crucial to keep the cookies from spreading too much.
- Use gel food coloring for more vibrant color with less liquid.
- Store cookies in an airtight container for up to 5 days.
- Prep Time: 15 minutes (+1 hour chilling)
- Cook Time: 12 minutes
- Category: Dessert
- Method: Baking
- Cuisine: American
Nutrition
- Serving Size: 1 cookie
- Calories: 120
- Sugar: 10g
- Sodium: 60mg
- Fat: 6g
- Saturated Fat: 3.5g
- Unsaturated Fat: 2g
- Trans Fat: 0g
- Carbohydrates: 15g
- Fiber: 1g
- Protein: 1.5g
- Cholesterol: 25mg
Keywords: red velvet crinkle cookies, holiday cookies, chocolate crinkle cookies, red velvet dessert, easy cookie recipe