Last updated on May 25, 2025
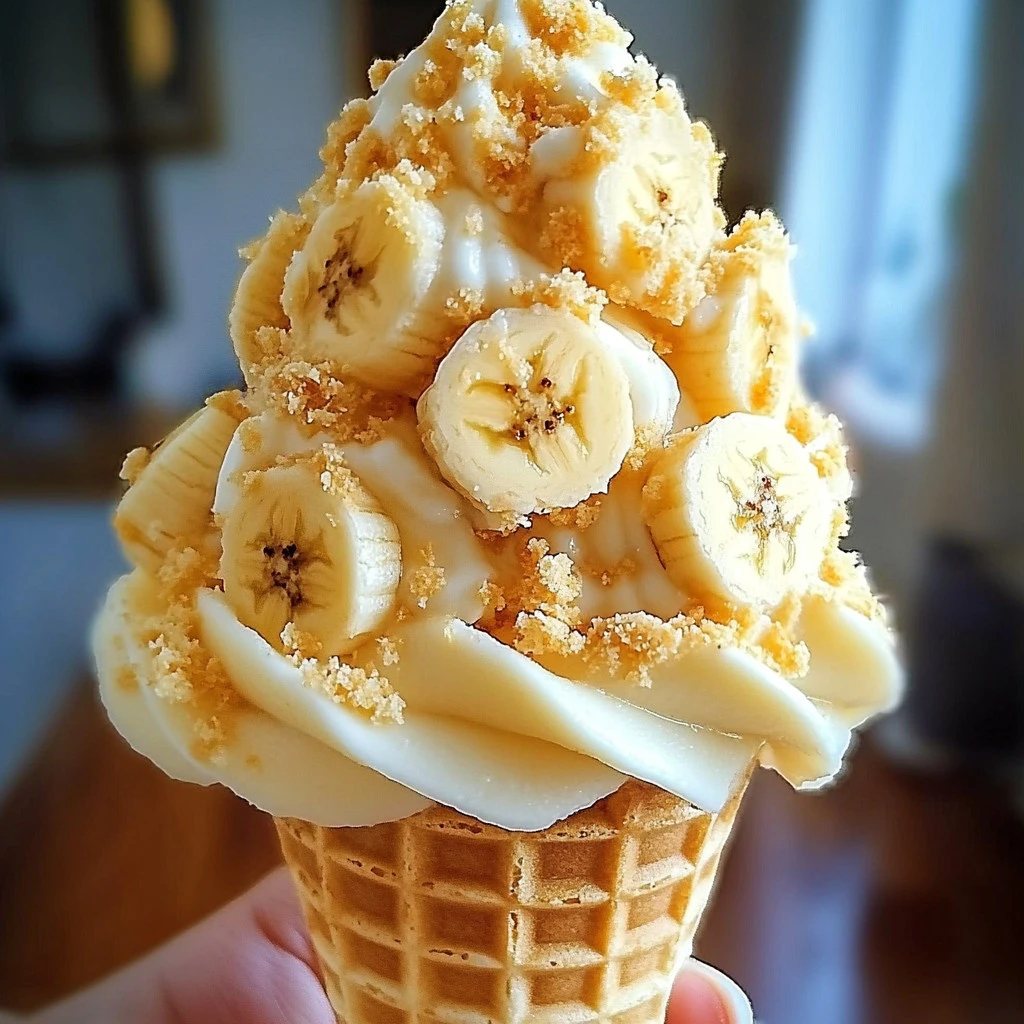
If you’re looking for a delightful dessert that beautifully balances the creaminess of cheesecake with the fun of an ice cream cone, look no further! The Banana Cheesecake Cone is a simple yet scrumptious treat that anyone can make. It’s perfect for gatherings, parties, or even just a sweet snack at home. With the sweet flavor of bananas and a creamy filling encased in a crunchy cone, this dessert is a hit with both kids and adults alike. Let’s dive into the details of how you can whip up this tasty treat in your own kitchen!
Table of Contents
Why You’ll Love This Banana Cheesecake Cone
There are countless reasons to love the Banana Cheesecake Cone! First and foremost, it is incredibly easy to make, requiring minimal ingredients and time. The combination of creamy cheesecake and ripe bananas creates a deliciously rich flavor that tantalizes your taste buds. Plus, serving it in a cone adds a fun twist, making it a grab-and-go dessert that’s perfect for any occasion.
The Banana Cheesecake Cone is also versatile. You can easily customize it with various toppings or add-ins. Whether you enjoy a little chocolate drizzle, some fresh fruit on top, or even a sprinkle of nuts, the options are endless. Most importantly, this dessert is a fantastic way to use up overripe bananas, ensuring nothing goes to waste!
Ingredients You’ll Need for Banana Cheesecake Cone:
Essentials
To make your Banana Cheesecake Cones, here are the key ingredients you’ll need:
- 1 ripe banana, mashed: The star ingredient that adds sweetness and moisture.
- 8 oz cream cheese, softened: This creates the creamy base for your cheesecake filling.
- 1/4 cup powdered sugar: Sweetens the mix without adding graininess.
- 1/2 tsp vanilla extract: Enhances the overall flavor, giving it that lovely warmth.
- 1 cup whipped cream: Lightens the cheesecake mixture and adds a fluffy texture.
- Graham cracker crumbs: For dipping and adding a crunchy texture to the top.
- Ice cream cones: The perfect vessel for your creamy filling.
Optional Add-Ons
To take your Banana Cheesecake Cone to the next level, consider these optional add-ons:
- Chocolate chips: For a chocolatey twist.
- Chopped nuts: Almonds, walnuts, or pecans add a lovely crunch.
- Fresh fruit: Slices of strawberries, blueberries, or additional banana pieces for added freshness.
- Caramel sauce: A drizzle on top for sweetness and visual appeal.
How to Make Banana Cheesecake Cone: Step by Step
Making Banana Cheesecake Cones is a straightforward process that anyone can follow. Here’s a detailed guide to help you through each step:
Step 1: Prepare the Cream Cheese
Begin by taking your softened cream cheese and placing it into a mixing bowl. Using an electric mixer or a sturdy spatula, beat the cream cheese until it is smooth and creamy. This step is crucial; you want to ensure there are no lumps for that perfect cheesecake texture.
Step 2: Add in the Flavors
Once your cream cheese is nice and smooth, it’s time to add the flavorings. Add in the mashed banana, powdered sugar, and vanilla extract to the bowl. Mix until everything is well combined and the banana is fully incorporated. The mixture should be creamy and slightly thick.
Step 3: Fold in the Whipped Cream
Now comes the fun part! Take your whipped cream and gently fold it into the banana-cream cheese mixture. Use a spatula to combine the ingredients, being careful not to deflate the whipped cream too much. This folding technique ensures that your cheesecake filling stays light and airy.
Step 4: Fill the Ice Cream Cones
Grab your ice cream cones and begin filling them with the banana cheesecake mixture. You can use a spoon to scoop it in, or for a cleaner look, a piping bag would work wonders. Fill each cone generously, as this will be the highlight of your dessert!
Step 5: Add Graham Cracker Crunch
Next, take your graham cracker crumbs and place them in a shallow bowl. Dip the tops of each filled cone into the crumbs, coating them as much as you desire. This creates a nice crunch and mimics the classic cheesecake crust.
Step 6: Serve or Chill
At this point, your Banana Cheesecake Cones are ready to serve! You can enjoy them immediately for a delightful treat, or if you prefer a chilled dessert, place them in the refrigerator for about 30 minutes. Chilling them will help the cheesecake filling firm up slightly.
Serving Suggestions for Banana Cheesecake Cone
Refreshing and fun, Banana Cheesecake Cones are easy to serve at gatherings or enjoy at home. Here are some serving suggestions to elevate your experience:
- Garnish: Consider topping each cone with a dollop of whipped cream and a slice of banana for an elegant finish.
- Drizzle: A drizzle of caramel or chocolate sauce over the top can make your dessert even more visually appealing and flavorful.
- Pairing: Serve your cones with a scoop of vanilla or banana ice cream on the side for a double banana delight!
- Display: Arrange your cones upright in a cupcake holder or a tall glass for a beautiful and eye-catching display at parties.
Pro Tips for Perfecting Your Banana Cheesecake Cone
To ensure your Banana Cheesecake Cones turn out perfectly every time, here are some helpful tips:
- Choose Ripe Bananas: The riper the banana, the sweeter and more flavorful your cheesecake will be. Look for bananas with lots of brown spots!
- Soften the Cream Cheese: Make sure your cream cheese is adequately softened before mixing. This avoids clumps and makes blending easier.
- Taste Test: Always taste your filling before serving. Feel free to adjust the sweetness with more powdered sugar or add a splash more vanilla to suit your preference.
- Pipe for Neatness: If you have a piping bag, it’s an excellent tool for filling the cones neatly without making a mess.
- Avoid Soggy Cones: If you’re not serving them immediately, place the cones upright in the fridge to maintain their crunchiness.
Easy Variations for Banana Cheesecake Cone
While the classic Banana Cheesecake Cone is delightful on its own, there are several easy variations you can try:
- Nutty Banana Cone: Mix chopped nuts into the cheesecake mixture for added crunch and flavor.
- Chocolate Banana Cone: Stir in mini chocolate chips into the batter or use a chocolate cone instead.
- Berry Banana Cone: Add a layer of fresh berries (like strawberries or blueberries) at the bottom of the cone before filling it with cheesecake.
- Spiced Banana Cone: Add a pinch of cinnamon or nutmeg to the cheesecake mixture for a warming flavor.
Storage Tips to Store Banana Cheesecake Cone
If you find yourself with leftover Banana Cheesecake Cones, storing them correctly will help maintain their taste and texture. Here are some storage tips:
- Chilled Storage: Store any leftovers in the refrigerator. Place them in an airtight container to keep them fresh.
- Avoid Soaking: If you’re worried about the cones getting soggy, store the filling in a separate container and fill the cones right before serving.
- Freeze Option: If you’d like to store them for an extended period, you can freeze the cheesecake filling. However, avoid freezing the cones, as they will lose their crunch.
Conclusion
The Banana Cheesecake Cone is more than just a simple dessert; it’s a combination of textures and flavors that everyone will love. Its ease of preparation and adaptability make it perfect for any occasion. Whether you’re hosting a party, enjoying a family gathering, or simply treating yourself, this delightful treat will surely impress.
So, gather your ingredients and bring a little fun to your dessert table with these scrumptious Banana Cheesecake Cones. Your friends and family will be talking about this one for a while!
FAQs About Banana Cheesecake Cone
1. Can I use different fruits instead of banana?
Yes! You can substitute bananas with strawberries, blueberries, or even peaches to create your favorite flavor combination.
2. How can I make the filling lighter?
To make a lighter filling, you can use light cream cheese or Greek yogurt. This will reduce the calories while still keeping the creamy texture.
3. Can I use store-bought whipped cream?
Absolutely! You can simplify the process by using store-bought whipped cream instead of making your own.
4. How long can I store Banana Cheesecake Cones?
These cones can be stored in the fridge for up to 2-3 days, although they are best enjoyed fresh.
5. What can I do if the cones get soggy?
To prevent sogginess, fill the cones just before serving. If they do become soggy, you can re-crisp them briefly in the oven or air fryer.
Print
Banana Cheesecake Cone
- Total Time: 45 minutes
- Yield: 6 cones 1x
Description
These Banana Cheesecake Cones are a fun and delicious no-bake treat combining creamy banana cheesecake filling with a crunchy graham cracker finish — all served in a crisp ice cream cone. They’re perfect for parties, kids, or a whimsical dessert idea!
Ingredients
Essential Ingredients:
- 1 ripe banana, mashed
- 8 oz cream cheese, softened
- 1/4 cup powdered sugar
- 1/2 tsp vanilla extract
- 1 cup whipped cream (or whipped topping)
- Graham cracker crumbs (for dipping or sprinkling)
- Ice cream cones (waffle or sugar cones)
Optional Add-Ons:
- Chocolate chips (mini or regular)
- Chopped nuts (almonds, walnuts, pecans)
- Fresh fruit (strawberries, blueberries, extra banana slices)
- Caramel sauce (for drizzling)
Instructions
- Make the filling: In a medium bowl, beat the cream cheese until smooth. Add mashed banana, powdered sugar, and vanilla extract. Mix until fully combined and creamy.
- Fold in whipped cream: Gently fold in the whipped cream until the mixture is light and fluffy.
- Chill: For best texture, refrigerate the filling for 30 minutes before assembling.
- Assemble the cones: Fill each ice cream cone with the banana cheesecake mixture using a spoon or piping bag.
- Garnish: Dip the top of the filled cone in graham cracker crumbs. Add your choice of optional toppings like chocolate chips, fruit, or caramel sauce.
- Serve immediately or chill: Enjoy right away, or keep chilled until ready to serve.
Notes
- Use very ripe bananas for the best flavor and sweetness.
- For a firmer filling, chill the cheesecake mixture longer or freeze cones for a frozen treat.
- Waffle cones offer more space and structure than sugar cones.
- Prep Time: 15 minutes
- Cook Time: undefined
- Category: Dessert
- Method: No-bake
- Cuisine: American
Nutrition
- Serving Size: 1 cone
- Calories: 220
- Sugar: 12g
- Sodium: 95mg
- Fat: 14g
- Saturated Fat: 8g
- Unsaturated Fat: undefined
- Trans Fat: undefined
- Carbohydrates: 20g
- Fiber: 1g
- Protein: 3g
- Cholesterol: 35mg
Keywords: Banana Cheesecake Cone, No-Bake Banana Dessert, Cheesecake in a Cone, Easy Banana Cheesecake, Banana Cream Cone


