Last updated on June 24, 2025
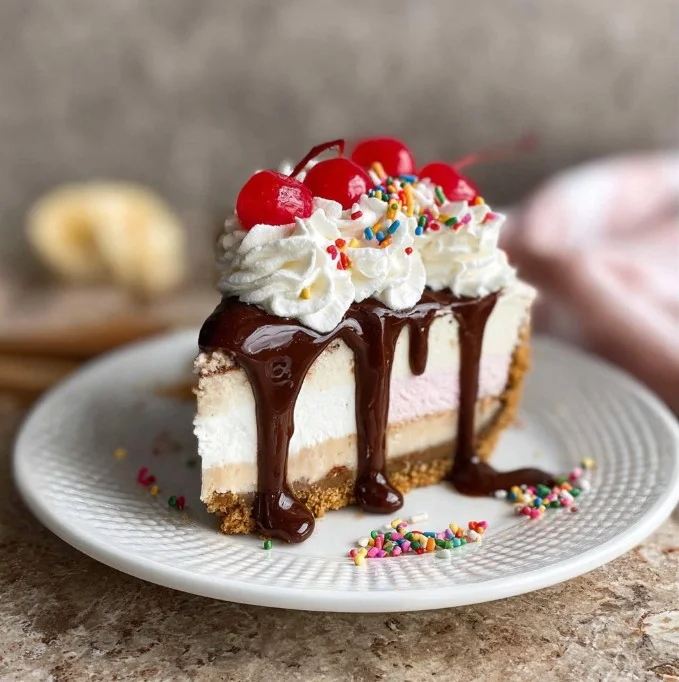
If you’re searching for a dessert that feels like a glorious childhood treat with an adult twist, look no further than Banana Split Ice Cream Pie. This delightful dish combines the classic flavors of a traditional banana split and layers them into a creamy pie with a crunchy cookie crust. Every bite brings back memories of summer days spent at ice cream parlors, and it’s perfect for any gathering, from birthday parties to cozy family dinners. The combination of flavors and textures makes it not only delicious but also visually appealing. So, let’s dive into the art of creating this fantastic dessert!
Table of Contents
Why You’ll Love This Banana Split Ice Cream Pie
This Banana Split Ice Cream Pie is a wonderful mixture of nostalgia and indulgence. Here are just a few reasons why it deserves a spot in your dessert rotation:
- Layered Flavors: With layers of chocolate, strawberry, and vanilla ice cream topped with fresh banana slices, it captures the essence of a banana split in a new form.
- Easy to Make: Unlike some desserts that take hours to prepare, this pie is simple and can be made in advance, allowing you to spend more time enjoying the moment.
- Customizable: Want more chocolate? Add extra sauce! Prefer fewer toppings? No problem! This recipe is flexible and can be adjusted based on your preferences.
- A Crowd-Pleaser: With its vibrant colors and delicious flavors, this pie is sure to impress guests of all ages. It’s a dessert that brings smiles to faces!

Banana Split Ice Cream Pie
- Total Time: 3 hours 30 minutes
- Yield: 12 servings 1x
- Diet: Vegetarian
Description
This Banana Split Ice Cream Pie is a fun, frozen twist on the classic dessert. With layers of chocolate, strawberry, and vanilla ice cream on a crunchy Oreo crust, fresh banana slices, and all the traditional toppings, it’s a no-bake dessert that’s as stunning as it is delicious.
Ingredients
Essential Ingredients:
- 24 Oreos (crushed for the crust)
- 4 tbsp unsalted butter (melted)
- 4 cups chocolate ice cream (softened)
- 4 cups strawberry ice cream (softened)
- 4 cups vanilla ice cream (softened)
- 2–3 large bananas (sliced)
- Chocolate sauce (for drizzling)
- Caramel sauce (for drizzling)
- Rainbow sprinkles (for topping)
- Whipped cream (for topping)
- Cherries (for garnish)
Optional Add-Ons:
- Nuts (chopped walnuts or peanuts)
- Mini marshmallows
- Chopped peanut butter cups
- Fresh mint leaves (for garnish)
Instructions
- Create the Cookie Crust: Pulse Oreos in a food processor into fine crumbs. Add melted butter and pulse until mixture resembles wet sand. Press into a 9-inch springform pan. Freeze for 10–15 minutes to set.
- Add the Banana Layer: Layer banana slices evenly over the crust.
- Chocolate Ice Cream Layer: Spread softened chocolate ice cream evenly over bananas. Freeze for 1 hour.
- Strawberry Ice Cream Layer: Spread softened strawberry ice cream over the chocolate layer. Freeze for another hour.
- Vanilla Ice Cream Layer: Spread softened vanilla ice cream over the strawberry layer. Freeze for a final hour until fully set.
- Decorate: Drizzle with chocolate and caramel sauce, add whipped cream, sprinkles, and top with cherries. Garnish with optional nuts, marshmallows, or mint leaves.
- Serve: Slice and serve immediately. For clean slices, use a sharp knife dipped in hot water.
Notes
- Let each ice cream layer soften slightly before spreading to make it easier to handle.
- To make ahead, prepare and freeze the pie (undecorated) up to 3 days in advance. Decorate just before serving.
- Use a warm knife for clean slicing.
- Prep Time: 30 minutes
- Cook Time: undefined
- Category: Dessert
- Method: No-bake, Frozen
- Cuisine: American
Nutrition
- Serving Size: 1 slice
- Calories: 420
- Sugar: 35g
- Sodium: 160mg
- Fat: 22g
- Saturated Fat: 12g
- Unsaturated Fat: 8g
- Trans Fat: 0g
- Carbohydrates: 50g
- Fiber: 2g
- Protein: 5g
- Cholesterol: 45mg
Keywords: banana split ice cream pie, frozen dessert, summer pie, Oreo crust, no bake dessert
Ingredients You’ll Need for Banana Split Ice Cream Pie:
Before we get started on our delicious journey, let’s gather our ingredients. Below is everything you need to make this delightful dessert.
Essential Ingredients:
- 24 Oreos: The crunchy base of our pie that gives a rich, chocolatey flavor.
- 4 tablespoons unsalted butter, melted: This holds the cookie crumbs together for the crust.
- 4 cups chocolate ice cream: The first layer that adds a deep, chocolaty sweetness.
- 4 cups strawberry ice cream: A fruity layer that brings balance to the chocolate.
- 4 cups vanilla ice cream: A classic flavor that rounds out the dessert beautifully.
- 2-3 large bananas, sliced: Fresh bananas add a creamy texture and fresh taste.
- Nuts (optional): Chopped walnuts or peanuts can add a delightful crunch.
- Chocolate sauce: A drizzle on top enhances both flavor and presentation.
- Caramel sauce: For a sweet contrast to the chocolate.
- Rainbow sprinkles: For a fun pop of color on top.
- Whipped cream: A fluffy topping that completes the dessert.
- Cherries: A classic cherry on top is the finishing touch.
Optional Add-Ons:
- Marshmallows: Mini marshmallows can add another layer of sweetness.
- Peanut butter cups: Chopped pieces can enhance the flavors with a nutty twist.
- Mint leaves: Fresh mint can be used for garnishing, adding a pop of color and freshness.
How to Make Banana Split Ice Cream Pie: A Step by Step Guide
Now that we have all our ingredients ready, let’s jump into the step-by-step process of making this mouthwatering Banana Split Ice Cream Pie.
Step 1: Create the Cookie Crust
In a food processor, add the 24 Oreos and pulse them until they turn into fine crumbs. Make sure no larger pieces remain. Next, slowly pour in the melted butter. Continue to process for a few seconds until everything is well combined and holds together like wet sand.
Now, take a 9-inch springform pan and press the Oreo mixture firmly into the bottom and slightly up the sides. This creates a sturdy base for your pie. Once done, place the pan in the freezer for about 10-15 minutes. This will help the crust firm up nicely.
Step 2: Add the Banana Layer
Once your crust is ready, take it out of the freezer. Next, arrange the banana slices evenly in a single layer over the crust. The bananas will provide a tasty layer that complements the ice cream flavors beautifully.
Step 3: Layer with Chocolate Ice Cream
Now, it’s time to start adding the ice cream! Begin with the chocolate ice cream layer. Make sure the ice cream is slightly softened for easy spreading. Scoop the chocolate ice cream on top of the bananas and spread it evenly using a spatula. Once it’s evenly layered, return the pie to the freezer for about one hour to set.
Step 4: Add the Strawberry Layer
After an hour, retrieve the pie from the freezer and now it’s time for the strawberry ice cream. Again, ensure it is softened before scooping. Spread the strawberry layer evenly over the chocolate layer and return the pie to the freezer, allowing it to set for another hour.
Step 5: Finish with the Vanilla Layer
Finally, add the last layer: vanilla ice cream. Spread it evenly over the strawberry layer, then place the pie back into the freezer for a final hour to freeze completely.
Step 6: Decorate and Serve
After the pie has fully frozen, it’s time for the fun part—toppings! First, drizzle some chocolate and caramel sauce on top of the frozen pie. Next, add a generous amount of whipped cream around the edges and sprinkle rainbow sprinkles over the top for color and texture. Finally, add cherries on top for that classic banana split look.
Once you’ve decorated your pie, serve it immediately or return it to the freezer until you are ready to serve.
Serving Suggestions for Banana Split Ice Cream Pie
For the best experience, slice the Banana Split Ice Cream Pie with a warm knife to ensure clean cuts. Serve it as is, or pair it with a scoop of each ice cream flavor on the side for an extra treat. You could even offer a selection of toppings for guests to customize their slices.
This pie is ideal for summer barbecues, birthday parties, or any casual gathering. It’s light, yet indulgent, making it the perfect end to any meal.
Pro Tips for Perfecting Your Banana Split Ice Cream Pie
- Soften Ice Cream for Easy Spreading: Before beginning, always let your ice cream sit out for a few minutes to soften. This will make it much easier to work with.
- Uniform Layers: Take your time spreading each layer evenly to create a perfectly layered pie. This not only improves the look but helps integrate flavors.
- Chill Between Steps: Don’t rush the freezing times. Allow each layer to freeze completely before adding the next to avoid mixing and melting.
- Customize Your Pie: Feel free to swap in different flavors of ice cream or even use fruit compote for a more fruity version.
- Try with a Chocolate Crust: For chocolate lovers, consider using chocolate sandwich cookies for the crust instead of Oreos.
Easy Variations for Banana Split Ice Cream Pie
While this recipe shines as is, don’t hesitate to get creative! Here are a few easy variations you could try:
- Nutty Lovers Pie: Mix crushed nuts into the crust, or sprinkle them between layers.
- Frozen Yogurt Version: Use frozen yogurt instead of ice cream for a lighter, tangy taste.
- Mint Chocolate Ice Cream Layer: Swap chocolate ice cream for mint chocolate chip ice cream for a refreshing twist.
- Fruit Festival: Add layers of berries or other fruits along with the ice cream for a healthful boost.
Storage Tips to Store Banana Split Ice Cream Pie
If you have leftovers (though they might be hard to resist), storing this delightful dessert is a breeze:
- Cover the Pie: Use plastic wrap to cover the pie tightly. Alternatively, you can put the entire springform pan in a large resealable freezer bag.
- Freezing: The pie can be stored in the freezer for up to 2 weeks. Just remember to allow it to soften slightly before serving.
- Serve Fresh: For the best flavor and texture, it’s ideal to consume the pie within the first few days of making it.
Conclusion
In conclusion, Banana Split Ice Cream Pie is a fun and delicious dessert that’s perfect for all occasions, from casual gatherings to special celebrations. It brings the joy of a classic banana split into a delightful pie form that everyone will love. With its easy preparation and endless customization options, this recipe is sure to become a favorite in your household. So gather your ingredients, follow the steps, and get ready to impress your friends and family with this indulgent treat!
FAQs About Banana Split Ice Cream Pie
Can I use low-fat ice cream for this recipe?
Yes! You can use low-fat or dairy-free ice creams as substitutes. Just ensure they’re soft enough for easy spreading.
How long does the pie need to set in the freezer?
Each layer should freeze for about one hour to ensure a nice firm texture. The pie should be in the freezer for a total of approximately 4 hours after all layers are added.
Can I make this pie ahead of time?
Absolutely! This pie can be made 1-2 days in advance and stored in the freezer until you’re ready to serve it.
Is there a way to make the crust gluten-free?
Yes! You can use gluten-free cookie alternatives, such as gluten-free chocolate sandwich cookies, to create the crust.
How can I prevent the bananas from browning?
To help prevent browning, you can dip the banana slices in lemon juice before adding them to the pie. This will keep them looking fresh and appealing!
Now you’re ready to make the ultimate Banana Split Ice Cream Pie! Enjoy your dessert-making adventure, and watch as everyone digs into their slices with gusto!
Looking for more delicious recipes? Follow us on Pinterest and Facebook!