Last updated on July 3, 2025
Ah, the first time I tried making brownies from scratch! Picture this: me in the kitchen, apron tied a little too loosely, a heap of flour dust on my sleeves, and a ridiculous fear that my brownies would turn out crumbly rather than fudgy. You know, those delicious, chewy brownies that are so rich they make you go “wow!” I remember nervously mixing ingredients, bracing myself for the worst but hoping for that magical moment when I could take a bite of warm, gooey chocolate bliss.
If you can relate to that mix of excitement and apprehension, you’re in the right place! Today, I’m sharing my recipe for Fudgy S’mores Brownies, a recipe that captures the nostalgic joy of summer campfires with the cozy comfort of homemade brownies. I promise you—it’s completely doable, even if it’s your first time dabbling in the world of baking.
Sure, you might be worried about complicated steps or ruining your creation, but don’t fret. This post is designed to break things down into easy, manageable parts that will help you enjoy every step. Before you know it, you’ll impress family and friends with your sweetness, all while feeling like a pro in the kitchen.
Table of Contents
Ingredients You’ll Need for Fudgy S’mores Brownies
Let’s get into the ingredients for these decadent brownies. I’ve broken them down into essentials, optional add-ons, and substitutions, so you’re fully prepared for your baking adventure.
Print
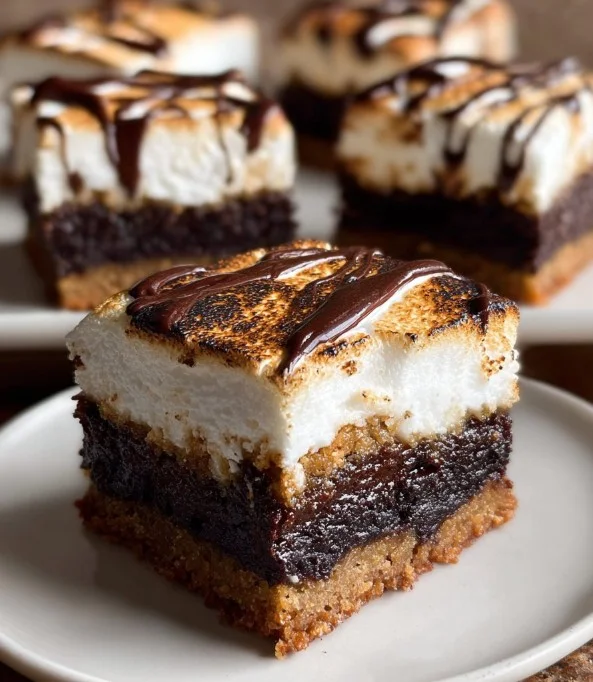
Fudgy S’mores Brownies
- Total Time: 5 hours 10 minutes
- Yield: 16 brownies 1x
- Diet: Vegetarian
Description
These Fudgy S’mores Brownies bring all the best parts of campfire s’mores—graham crackers, gooey marshmallows, and rich chocolate—into one irresistible, oven-baked treat. Perfectly chewy, delightfully indulgent, and totally crave-worthy!
Ingredients
Essentials:
- 4–5 honey graham cracker sheets
- 10 tablespoons unsalted butter, at room temperature
- 2/3 cup dark chocolate chips
- 1/2 cup dark brown sugar, packed
- 1/2 cup granulated sugar
- 2 large eggs + 1 large egg yolk
- 2 teaspoons vanilla extract
- 2/3 cup all-purpose flour
- 1/4 cup unsweetened Dutch cocoa powder
- 1/4 teaspoon fine sea salt
Optional Add-Ons:
- 1 teaspoon espresso powder
- 1/2 cup chopped dark chocolate
For Marshmallow Topping:
- 1/3 cup water (for gelatin)
- 1 tablespoon unflavored gelatin
- 1 cup granulated sugar
- 1/4 cup agave syrup
- 1/4 cup water (for sugar syrup)
- 1 teaspoon vanilla bean paste
- Pinch of salt
- Powdered sugar, for dusting
Substitutions:
- Butter → coconut oil or vegetable oil
- Dark chocolate → semi-sweet or milk chocolate
- Eggs → flaxseed eggs (1 tbsp flax + 2.5 tbsp water per egg)
- Sugar → coconut sugar
Instructions
- Preheat Oven: Preheat to 350°F (180°C).
- Prepare Pan: Line an 8×8-inch pan with parchment paper.
- Base Layer: Place 4-5 sheets of graham crackers on the bottom of the pan.
- Melt Butter & Chocolate: Melt butter and chocolate chips in a microwave or double boiler until smooth.
- Mix Wet Ingredients: In a bowl, whisk brown sugar, granulated sugar, eggs, yolk, and vanilla extract until smooth.
- Combine Mixtures: Whisk in the melted butter-chocolate mixture until fully incorporated.
- Mix Dry Ingredients: In another bowl, combine flour, cocoa powder, salt, and espresso powder (if using).
- Combine Wet & Dry: Gently fold dry ingredients into wet mixture. Do not overmix.
- Pour Batter: Spread brownie batter evenly over graham crackers.
- Bake: Bake for 30-35 minutes. Cool for 1-2 hours after baking.
- Start Marshmallow: In a stand mixer bowl, add 1/3 cup water and sprinkle in gelatin.
- Boil Sugar Syrup: Heat sugar, agave, and 1/4 cup water in a pot until 240-250°F (soft-ball stage).
- Combine Syrup & Gelatin: Slowly pour hot syrup into gelatin while mixer runs on low. Avoid touching the bowl sides.
- Whip Marshmallow: Increase speed and whip for 10-15 minutes until fluffy. Add vanilla paste and salt.
- Spread Topping: Quickly spread marshmallow over cooled brownies. Let sit 4+ hours to set.
- Dust & Cut: Dust with powdered sugar. Use a hot, oiled knife to slice cleanly.
- Toast Marshmallow: Use a kitchen torch to toast the top until golden and bubbly.
Notes
- Let brownies cool completely before adding marshmallow to prevent melting.
- Store in an airtight container at room temperature for 2-3 days or in the fridge for up to 5 days.
- Use a kitchen torch for that signature toasted s’mores look!
- Prep Time: 35 minutes
- Cook Time: 35 minutes
- Category: Dessert
- Method: Baking
- Cuisine: American
Nutrition
- Serving Size: 1 brownie
- Calories: 270
- Sugar: 24g
- Sodium: 85mg
- Fat: 14g
- Saturated Fat: 8g
- Unsaturated Fat: undefined
- Trans Fat: undefined
- Carbohydrates: 34g
- Fiber: 2g
- Protein: 3g
- Cholesterol: undefined
Keywords: fudgy s’mores brownies, marshmallow brownies, s’mores dessert bars, homemade brownies, chocolate graham brownies, summer dessert
Essentials
4-5 Honey Graham Cracker Sheets: These provide the classic s’mores flavor and texture we all love. They lend a sweet, crunchy base to our fudgy brownies.
10 Tablespoons Unsalted Butter: Rich and creamy, butter is fundamental for that melt-in-your-mouth brownie experience. Make sure it’s at room temperature so it melts evenly.
2/3 Cup Dark Chocolate Chips: For deep chocolate flavor. Dark chocolate enhances the fudginess of the brownies, making them super rich.
1/2 Cup Dark Brown Sugar: Packed tightly, this brings moisture and a slight caramel taste to the mix—essential for that chewy, fudgy texture!
1/2 Cup Granulated Sugar: This balances the richness of the brown sugar, giving just the right sweet kick.
2 Large Eggs + 1 Large Egg Yolk: These add structure to your brownies and help achieve that beautiful, fudgy texture.
2 Teaspoons Vanilla Extract: This is essential for enhancing the overall flavor of your brownies.
2/3 Cup All-Purpose Flour: This helps bind everything together but be careful not to overmix it to ensure they remain fudgy.
1/4 Cup Unsweetened Dutch Cocoa Powder: For that deep chocolate flavor. Make sure you use Dutch-processed cocoa for the best color and taste.
1/4 Teaspoon Fine Sea Salt: Just a pinch helps to elevate the flavors in your brownies.
Optional Add-Ons
1 Teaspoon Espresso Powder: An optional but recommended boost—the espresso enhances the chocolate flavor without adding a coffee taste.
1/2 Cup Chopped Dark Chocolate: Adding chopped chocolate creates pockets of molten chocolate that will melt in your mouth.
Substitutions and Shortcuts
You don’t need to stress if you’re missing some ingredients! Here are a few handy substitutions:
Butter: You can substitute with coconut oil or vegetable oil if you prefer, but keep in mind the flavor may change slightly.
Chocolate Chips: Use semi-sweet or milk chocolate if you prefer a sweeter brownie instead of the more intense dark chocolate.
Eggs: If you’re looking for a vegan option, you can use a flaxseed egg (1 tablespoon flaxseed meal combined with 2.5 tablespoons of water) for each egg.
Sugar: You can try using coconut sugar instead of brown sugar for a healthier alternative.
How to Make Fudgy S’mores Brownies Step-by-Step
Now that you have all your ingredients ready, let’s get down to the baking! Making Fudgy S’mores Brownies is easier than you might think. Just follow these straightforward steps:
Step 1: Preheat Your Oven
First, you’ll want to preheat your oven to 350°F (180°C). This helps the brownies bake evenly.
Step 2: Prepare Your Baking Pan
Line an 8×8-inch baking pan with parchment paper. This will make it so much easier to remove the brownies later.
Step 3: Lay Down the Graham Crackers
Arrange 4-5 sheets of honey graham crackers neatly at the bottom of your prepared pan. They will act as the delightful base for your brownies, adding texture and that iconic s’mores flavor.
Step 4: Melt Butter and Chocolate
In a microwave-safe bowl or a double boiler, melt the butter and dark chocolate chips together until smooth. If using a microwave, heat in short bursts—30 seconds at a time—stirring in between. Be careful not to overheat, as chocolate can seize if it gets too hot!
Step 5: Whisk Together Sugar, Eggs, and Vanilla
In a mixing bowl, whisk together dark brown sugar, granulated sugar, eggs, the extra yolk, and vanilla extract until everything is combined and smooth. Take a moment to enjoy that sweet aroma!
Step 6: Combine Melted Chocolate with Sugar Mixture
Add the melted butter and chocolate mixture to the sugar and egg mixture. Gently whisk it all together until combined.
Step 7: Fold in the Dry Ingredients
In another bowl, mix together the all-purpose flour, cocoa powder, salt, and optional espresso powder. Slowly fold the dry ingredients into the wet ingredients. Mix just until incorporated—overmixing could lead to dry brownies.
Step 8: Pour the Batter Over Graham Crackers
Pour the brownie batter over the graham crackers, spreading it evenly using a spatula.
Step 9: Bake
Pop the pan into your preheated oven. Bake for 30-35 minutes or until a toothpick inserted comes out with a few moist crumbs. When they are baked to perfection, remove them from the oven and allow them to cool for 1-2 hours.
Step 10: Make the Marshmallow Topping
While the brownies cool, let’s whip up a delicious marshmallow topping. Pour 1/3 cup water into a mixing bowl and sprinkle gelatin over the water. Attach the bowl to your stand mixer.
Step 11: Boil Sugar Mixture
In a heavy-bottomed pot, combine the granulated sugar, agave, and the remaining water. Bring the mixture to a boil and cook for 10-13 minutes. Use a candy thermometer to check the temperature; you want it to reach 240-250°F.
Step 12: Combine Marshmallow Ingredients
Once the sugar mixture is ready, with the mixer running, slowly stream the hot sugar into the bowl with the gelatin. Be cautious and don’t let it touch the sides of the bowl. Add the vanilla bean paste and salt.
Step 13: Whip the Marshmallow
Increase the mixer speed to medium-high and let it whip for 10-15 minutes until fluffy and glossy.
Step 14: Spread the Marshmallow on Brownies
Working quickly, scrape the marshmallow onto the cooled brownies and spread it evenly. Let the marshmallow set aside for at least 4 hours until firm.
Step 15: Cut the Brownies
When you’re ready to cut your brownies, gently pull up the parchment paper and transfer them to a cutting board. Dust the marshmallow topping with powdered sugar to prevent sticking.
Run a knife under hot water and wipe it clean, then dab it with oil to ensure a smooth cut. Cut into squares or rectangles as desired, and arrange them on a sheet pan.
Step 16: Toast the Marshmallow
To achieve that classic s’mores finish, use a kitchen torch or place the brownies under your broiler for a minute or two until the marshmallow tops are golden brown and toasty. Keep a close eye on them—this process happens quickly!
Common Mistakes to Avoid
Every great cook learns from mistakes, and I’m no exception! Here are a few common pitfalls to steer clear of while making Fudgy S’mores Brownies.
Not Measuring Ingredients Accurately
Baking is a science, and incorrect measurements can lead to disasters. Use kitchen scales or measuring cups and spoons for accuracy.
Overmixing the Batter
While you want to combine the ingredients well, overmixing can lead to tough brownies. Mix just until everything is integrated, and leave some lumps if you must!
Forgetting to Cool the Brownies Properly
It can be tempting to dig in right after baking, but allowing them to cool for 1-2 hours ensures that they set well and cuts beautifully. Patience is a virtue here!
Skipping the Marshmallow Topping
The marshmallow is what makes these brownies a true s’mores experience! Don’t skip this step, or you’ll miss out on that wonderful, gooey layer.
Quick Wins for Beginner Cooks
As a beginner, mastering the kitchen can seem overwhelming. Here are some quick wins that can boost your confidence in making Fudgy S’mores Brownies.
Prep Your Workspace Ahead of Time
Gathering all your ingredients and utensils before you start ensures you won’t run into panic mode halfway through baking. Plus, it makes the whole process smoother and more enjoyable.
Use a Parchment Lining
Lining your baking pan with parchment paper makes removing brownies a breeze. No more worrying about them sticking to the pan—just lift the parchment and cut!
Embrace Your Oven’s Hot Spots
Every oven performs a bit differently. If you find that your brownies are baking unevenly, try rotating the pan halfway through baking for even results.
Don’t Be Afraid to Taste!
A small taste of your brownie batter (before adding raw eggs, of course!) can help you check if the flavors are balanced. Just remember, it’s all about finding your personal taste preference!
Pro-Level Tips for When You’re Ready
Once you’ve got the hang of making Fudgy S’mores Brownies, it’s time to elevate your skills. Here’s how you can become a pro:
Experiment with Flavors
Add your favorite nuts or even a swirl of peanut butter for a delightful twist on the classic flavors. You can try white chocolate chips for a fun contrast or sea salt flakes on top for a savory finish.
Try Different Chocolate Ratios
Testing different types of chocolate can dramatically change the flavor and texture of your brownies. Consider a mixture of milk and dark chocolate for a more complex taste.
Explore Epic Toppings
Why stop at marshmallow? Delve into caramel drizzle or crushed candy bars on top for a decadent finish. It transforms simple brownies into showstoppers!
Perfect Your Technique
After you’ve made the brownies a few times, focus on perfecting the marshmallow. Depending on your equipment, you can experiment with different whipping times for a lighter or denser texture.
FAQs About Fudgy S’mores Brownies
Can I make Fudgy S’mores Brownies ahead of time?
Absolutely! You can prepare the brownies and the marshmallow topping in advance. Just store them in an airtight container in the fridge once they set.
What’s the best way to store Fudgy S’mores Brownies?
Store your brownies in an airtight container at room temperature for up to three days or in the fridge for up to a week.
Can I freeze Fudgy S’mores Brownies?
Yes, you can freeze them! Wrap the brownies tightly in plastic wrap and then foil. They can be frozen for up to three months—just thaw them in the fridge when you’re ready to indulge.
Can I use vegetarian gelatin for the marshmallow?
Yes! There are vegetarian alternatives to gelatin, such as agar-agar, but the texture may differ slightly. Follow the package instructions for the best results.
What if I don’t have a stand mixer for the marshmallow?
You can use a hand mixer instead—just be prepared for a little extra arm workout. It may take a bit longer to whip up the marshmallow, but it’s entirely doable.
Conclusion & Next Steps
Baking Fudgy S’mores Brownies may seem daunting at first, but I hope this post has reassured you that it’s easier than it looks! Each step is manageable, and the result is a cozy, classic treat that everyone will love.
Remember, these brownies are customizable to suit your taste and preferences, making them perfect for any occasion. Now that you’ve learned all the ins and outs, I encourage you to dive in and give this recipe a try. You’ll feel accomplished, and the smiles on your loved ones’ faces will be the icing on the cake—or should I say, the marshmallow on the brownie!
So, roll up your sleeves, gather those ingredients, and start your journey toward creating the perfect Fudgy S’mores Brownies. Happy baking!
Looking for more delicious recipes? Follow us on Pinterest and Facebook!