Last updated on June 29, 2025
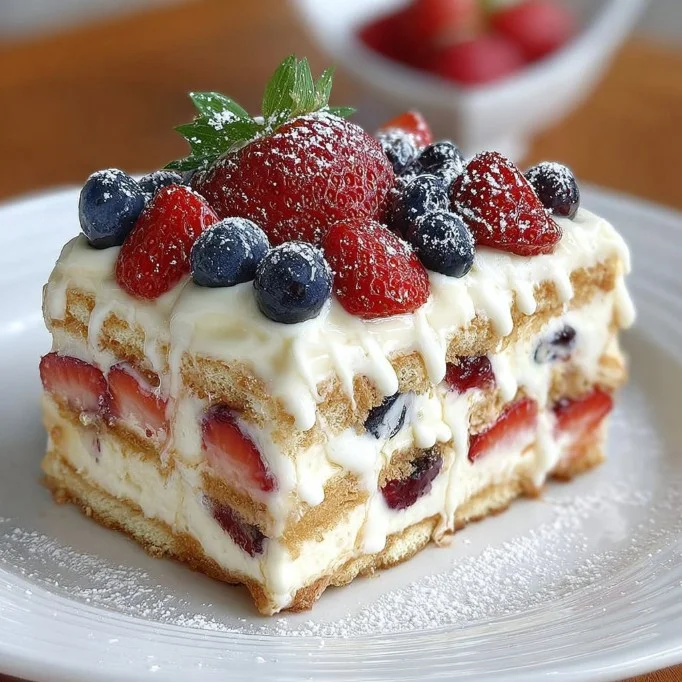
Summer always brings back wonderful memories of lazy afternoons spent at family barbecues where desserts flowed as freely as the laughter. One of my favorite moments was the yearly unveiling of my grandmother’s famous No Bake Summer Berry Icebox Cake. There was something magical about this dessert—the way the sweet, juicy berries complemented the creamy layers was truly irresistible. I can still hear everyone’s “oohs” and “aahs” as the cake was cut, revealing its colorful layers.
If you’ve never made a dessert like this before, it can feel a bit intimidating. Maybe you’re worried about using ingredients you’ve never tackled, or you think you might ruin the dish with a misstep. Fear not! No Bake Summer Berry Icebox Cake is incredibly forgiving and perfect for beginners. With just a handful of simple ingredients and some straightforward steps, you can create a showstopper dessert that will have everyone asking for seconds. So, roll up your sleeves and prepare to make a delicious dessert that proves you don’t need to bake to impress!
Table of Contents
Ingredients You’ll Need for No Bake Summer Berry Icebox Cake
Creating this delightful icebox cake is a breeze, thanks to the straightforward ingredients. Here’s what you’ll need:
Print
No Bake Summer Berry Icebox Cake
- Total Time: 4 hours 25 minutes
- Yield: 1 9×13 cake (serves 12) 1x
- Diet: Vegetarian
Description
This No Bake Summer Berry Icebox Cake is a chilled, creamy dessert layered with graham crackers, pudding, whipped cream, and fresh berries. Perfect for hot days when you want a delicious dessert without turning on the oven!
Ingredients
Essential Ingredients:
- 19 oz graham crackers
- 8 oz cream cheese, softened
- Two (3.4 oz) packages vanilla instant pudding mix (total ~6.8 oz)
- 2 ½ cups cold milk
- 12 oz Cool Whip or homemade whipped cream (reserve ½ cup for topping)
- 3 cups fresh strawberries, sliced
- 1 ½ cups fresh blueberries
- 2 oz white chocolate chips, for drizzling
Optional Add-Ons:
- Additional fresh berries like raspberries or blackberries
- Chopped nuts or granola for texture
- 1 tsp vanilla or almond extract for extra flavor
Substitutions and Shortcuts:
- Oreo cookies or gluten-free crackers in place of graham crackers
- Mascarpone cheese instead of cream cheese
- Use cornstarch and vanilla extract instead of pudding mix
- Store-bought whipped topping or homemade whipped cream with heavy cream
Instructions
- Prepare the Pudding Mixture: Beat softened cream cheese and dry pudding mix together until smooth (2–3 mins). Slowly add cold milk, mixing until fully combined. Gently fold in 11½ oz of Cool Whip, reserving ½ cup for topping.
- Layer the Base: Spread a thin layer of reserved Cool Whip in the bottom of a 9×13-inch baking pan. Lay down a single layer of graham crackers, breaking as needed to fit.
- Add Pudding and Berries: Spread a layer of pudding mixture over graham crackers. Add a layer of sliced strawberries and blueberries.
- Repeat: Add another layer of graham crackers, pudding mixture, and berries. Repeat once more for a total of three layers, ending with berries on top.
- Chill: Cover and refrigerate for at least 4 hours or overnight to allow the graham crackers to soften and flavors to meld.
- Drizzle White Chocolate: Melt white chocolate chips and drizzle over the top before serving. Use a spoon or piping bag for a clean finish.
Notes
- Layer ingredients gently to keep berries looking fresh and vibrant.
- Chill overnight for best results—the texture improves as it rests.
- Make it your own with different berries or flavored pudding mixes!
- Prep Time: 25 minutes
- Cook Time: undefined
- Category: Dessert
- Method: No-Bake
- Cuisine: American
Nutrition
- Serving Size: 1 slice (1/12 of cake)
- Calories: 280
- Sugar: 20g
- Sodium: 220mg
- Fat: 14g
- Saturated Fat: undefined
- Unsaturated Fat: undefined
- Trans Fat: undefined
- Carbohydrates: 34g
- Fiber: 2g
- Protein: 4g
- Cholesterol: undefined
Keywords: icebox cake, no bake dessert, summer dessert, berry icebox cake, cool whip dessert, graham cracker cake
Essential Ingredients
19 oz Graham Crackers
These serve as the cake’s base, adding a delightful crunch and sweetness. Feel free to experiment with flavored graham crackers if you want to get adventurous!8 oz Cream Cheese
Make sure it’s softened; this allows you to blend it smoothly into the pudding mixture. If you’re using block cheese, take it out to warm up a bit before beginning.2 ¾ oz Packages Vanilla Instant Pudding
This is where the magic happens! It helps to create a creamy, dreamy texture. You could also use a different flavor, like cheesecake or butterscotch, for a fun twist.2 ½ Cups Cold Milk
Milk is essential to prepare the pudding. Ensure it’s cold to help achieve the right consistency without lumps.12 oz Cool Whip or Homemade Whipped Cream
Cool Whip is easy and convenient, but homemade whipped cream can elevate your dish to the next level. If you’re up for it, give it a try!3 Cups Fresh Strawberries, Sliced
Strawberries provide a beautiful burst of color and tartness. They make this dessert feel like summer on a plate.1 ½ Cups Fresh Blueberries
These lovely little gems add another layer of flavor and visual appeal. Plus, they’re packed with antioxidants!2 oz White Chocolate Chips
Drizzling white chocolate over the top adds a touch of elegance and sweetness.
Optional Add-Ons
- Other Fresh Berries: Feel free to mix in raspberries, blackberries, or even chopped peaches for variation.
- Nuts or Granola: For added crunch and flavor, consider sprinkling chopped nuts or granola in between the layers.
- Flavoring: A teaspoon of vanilla or almond extract can add an extra layer of flavor.
Substitutions and Shortcuts
- Graham Crackers: If you want to switch things up, use crushed Oreo cookies for a chocolate version or a gluten-free option for those with dietary restrictions.
- Cream Cheese: Mascarpone cheese can be a delicious alternative for a richer flavor.
- Pudding Mix: If you need a more natural solution, consider using cornstarch and vanilla extract rather than instant pudding.
- Whipped Cream: You can use a store-bought whipped topping or make your own with heavy cream whisked with a bit of sugar and vanilla.
How to Make No Bake Summer Berry Icebox Cake Step-by-Step
Now that you have all your ingredients ready, let’s walk through the steps to create your No Bake Summer Berry Icebox Cake:
Step 1: Prepare the Pudding Mixture
In a large mixing bowl, start by beating the softened cream cheese and the dry vanilla pudding mixes together using a hand mixer. Mix until they are blended well; this usually takes about 2-3 minutes.
Next, gradually add in the cold milk while continuing to mix. It’s essential to pour the milk slowly, allowing it to incorporate fully before adding more. Scrape down the sides of the bowl to ensure there are no lumps. Once everything is combined, gently fold in 11½ oz of Cool Whip or your homemade whipped cream. Reserve about half a cup for later use; this will be for the final topping.
Step 2: Start Assembling
Now, let’s layer! Begin by spreading a thin layer of reserved Cool Whip across the bottom of a 9×13-inch baking pan. This thin layer acts as a glue to hold everything together, ensuring the graham crackers don’t stick to the bottom.
Next, take five graham crackers and lay them across the center of the pan. You might need to break a couple of crackers to fit them perfectly at the edges of the pan, and that’s perfectly okay!
Once you have the first layer of crackers, spread a generous layer of the pudding mixture over the grahams. Use a spatula to ensure an even coating.
Step 3: Add the Berries
Time to get fruity! Sprinkle a layer of sliced strawberries and blueberries on top of the pudding mixture. The vibrant colors of the fresh fruit contrast beautifully with the creamy layers, making your cake visually stunning.
Step 4: Repeat the Layers
Now, it’s time to repeat the layers. Place more graham crackers on top of the berries, then another layer of the pudding mixture. Follow this with another layer of berries.
Repeat this layering process one final time, meaning you’ll have three layers total. Your last layer should be a final blanket of berries; it’s stunning when served!
Step 5: Chill
Once you have finished layering, cover the cake with plastic wrap or foil. Refrigerate for at least 4 hours or overnight. It’s crucial to let the cake chill so that the graham crackers can soften. This is the secret to achieving that melt-in-your-mouth texture we all love.
Step 6: Drizzle with White Chocolate
When you’re ready to serve, melt your white chocolate chips according to the directions on the package. You can either do this in a microwave-safe bowl or over a double boiler, being careful not to burn the chocolate.
Once melted, drizzle the white chocolate over the top of the cake. You can use a spoon for this, or if you want a more precise look, pour the melted chocolate into a zip-top bag, snip off one corner, and pipe it over the top for a lovely finish.
Common Mistakes to Avoid
Even the best of us have made mistakes in the kitchen. Here are some common missteps to avoid when making your No Bake Summer Berry Icebox Cake:
1. Using Cold Cream Cheese
One common mistake is to forget to soften your cream cheese. When it’s cold, it won’t blend smoothly, leading to lumps in your pudding mixture. Always remember to set it out beforehand or give it a quick microwave spin for 10 seconds to soften it up.
2. Skipping the Chilling Time
Patience is key! Some might be tempted to skip the chilling step to serve the cake sooner, but this can lead to a mushy mess. Make sure to refrigerate it for at least 4 hours, or, ideally, overnight. This gives the graham crackers time to absorb moisture and soften properly.
3. Overmixing the Pudding Mixture
While you want everything well combined, overmixing can lead to a grainy texture. Once you’ve blended the cream cheese and pudding mix, add the milk gradually and mix just until combined. Lastly, remember to fold in the whipped cream gently.
Quick Wins for Beginner Cooks
As a beginner home cook, it’s often the small wins that boost your confidence in the kitchen! Here are some quick tips to support you as you embark on your No Bake Summer Berry Icebox Cake journey:
1. Prep Your Ingredients First
Before you dive into mixing, gather and prep all your ingredients. This simple step saves you from scrambling around the kitchen and ensures you have everything you need on hand.
2. Use a Hand Mixer
If you have one handy, grab a hand mixer! It can make the process of combining the pudding mixture much easier and faster than mixing by hand.
3. Keep Things Simple
Don’t stress over perfection with the layers. It’s okay if the layers aren’t perfectly even—trust me, they’ll still taste fantastic! Focus on enjoying the process and having fun.
Pro-Level Tips for When You’re Ready
Once you feel more comfortable with the basics, here are some pro-level tips to make your icebox cake even better:
1. Experiment with Flavors
Dive into your flavor profile! Try using different puddings or additional flavorings like lemon zest or almond extract. Mix up the fruits, too—peaches or raspberries can add a delightful twist.
2. Get Fancy with Toppings
Besides just white chocolate, consider topping your cake with toasted nuts, a mint sprig for freshness, or a sprinkling of crushed graham crackers for a little crunch.
3. Presentation Matters
To serve, consider turning your cake out onto a platter for a more dramatic presentation. You can slice it like a traditional cake, showcasing your beautiful layers, and impress your friends and family.
Conclusion & Next Steps
You’ve come to the end of your No Bake Summer Berry Icebox Cake adventure! It’s easier than it looks, and with these simple steps, you can create a delightful treat in no time. Pay attention to the layering and chilling times, and remember you can customize it with your favorite flavors and fruits. This classic dessert is full of warmth and nostalgia, making it perfect for any summer gathering or just a cozy night in.
Now that you know how to create this delicious dessert, why not share it with friends? Have a family potluck or a picnic, and let your cake shine as the centerpiece! Not only will it satisfy those sweet teeth, but it’ll be a conversation starter, too. Happy baking, or should I say, happy assembling!
FAQs About No Bake Summer Berry Icebox Cake
Can I make No Bake Summer Berry Icebox Cake a day ahead?
Absolutely! In fact, letting it chill overnight enhances the flavors and allows the graham crackers to soften perfectly.
What can I use instead of Cool Whip?
You can use homemade whipped cream; just beat 1 cup of heavy cream with 2 tablespoons of sugar and a splash of vanilla until soft peaks form.
How do I store leftover No Bake Summer Berry Icebox Cake?
Store it covered in the refrigerator for up to three days. Just note that the longer it sits, the softer the graham crackers will become.
Can I freeze No Bake Summer Berry Icebox Cake?
While it’s best enjoyed fresh, you can freeze it. Just cover it well with plastic wrap and aluminum foil. Thaw it overnight in the fridge before serving.
What other fruits can I use in this cake?
Feel free to switch in other fresh fruits like peaches, mangoes, or even bananas. Just make sure they’re ripe and ready to eat!
Looking for more delicious recipes? Follow us on Pinterest and Facebook!


