Last updated on September 8, 2025
Cheesy Halloween Breadstick Bones: A Spooktacular Treat for All Ages
As the crisp autumn air settles in and Halloween approaches, fond memories of cozy family gatherings come rushing back to me. One of my favorite moments was when my mom and I embarked on a fun cooking adventure, transforming simple ingredients into whimsical treats. It’s amazing how food has the power to evoke nostalgia and bring people together. Today, I’m thrilled to share a delightful and whimsical recipe: Cheesy Halloween Breadstick Bones. Don’t worry; this recipe is designed to be simple and stress-free, making it totally doable—even if it’s your first time baking!
Why I Love This Recipe of Cheesy Halloween Breadstick Bones
There’s something special about shaping food into playful forms, especially around Halloween. This recipe for Cheesy Halloween Breadstick Bones brings that excitement to life, making it perfect for kids and kids-at-heart alike. It’s an ideal project to whip up after school or during a weekend gathering, infusing your home with warmth and that irresistible cheesy aroma. Even if you’re a beginner, you’ll appreciate how adaptable and forgiving this recipe is, allowing for creativity and fun without the pressure of perfection. Plus, the cozy experience of baking together is sure to create lasting memories and spark laughter, especially when those bone-shaped breadsticks come out of the oven, golden and gooey.
Ingredients You’ll Need for Cheesy Halloween Breadstick Bones
To make these Cheesy Halloween Breadstick Bones, gather the following ingredients, which are primarily pantry staples, making this recipe easy to whip up:
All-purpose flour (for dusting): Essential for preventing sticking, this flour is your best friend when shaping the dough. You can also use whole wheat flour for a slightly different flavor.
1 pound pizza dough: You can use store-bought or homemade dough, making it a flexible option depending on your schedule.
2 tablespoons unsalted butter (melted): This adds richness and flavor to your breadsticks. If you want to add an extra kick, consider using garlic butter or herb-infused butter for additional depth.
½ cup grated Parmesan cheese: This contributes a deliciously salty and nutty flavor to your breadsticks. Feel free to adjust the amount according to your taste.
1 cup shredded mozzarella cheese: The gooey cheese topping takes these breadsticks over the top, making them irresistibly stretchy. You can substitute a mix of your favorite cheeses, like cheddar or provolone, for a unique twist.
Marinara sauce (for dipping): A cozy sidekick for these breadsticks, marinara sauce adds a delightful, tangy complement. You can easily make your own or use your favorite store-bought brand.
Optional Add-ons and Substitutions
If you want to make these breadsticks even more special, consider adding the following:
- Herbs and spices: A sprinkle of dried oregano, Italian seasoning, or garlic powder can elevate the flavor.
- Olives or sun-dried tomatoes: Chopped finely and mixed into the dough can give an extra punch.
- Different cheeses: Experiment with a blend of cheeses to suit your preferences—just remember to balance flavor and meltability.
Shortcuts for Cheesy Halloween Breadstick Bones
If you’re pressed for time, here are a few shortcuts:
- Use pre-made pizza dough, which saves a lot of prep time. You can often find it in the refrigerated section of your grocery store.
- Buy pre-grated cheese to skip the shredding step. Just be cautious, as pre-grated cheese may not melt as well as fresh-shredded cheese.
How to Make Cheesy Halloween Breadstick Bones Step-by-Step
Now that you have all your ingredients ready, let’s dive into the step-by-step process of crafting your Cheesy Halloween Breadstick Bones.
Step 1: Preheat the Oven
Start by preheating your oven to 375°F (190°C). While the oven warms up, you can prepare your baking sheets.
Step 2: Prepare Baking Sheets
Line two baking sheets with parchment paper. This not only prevents sticking but also makes cleanup much easier.
Step 3: Handle the Dough
Let your pizza dough sit at room temperature for about 20 minutes before you start working with it. This step will make it easier to shape. Once it’s ready, dust your work surface with all-purpose flour to prevent sticking.
Step 4: Divide the Dough
Now, divide the pizza dough into 10 equal pieces. This is where the fun begins! You can use a bench scraper or knife to achieve equal portions.
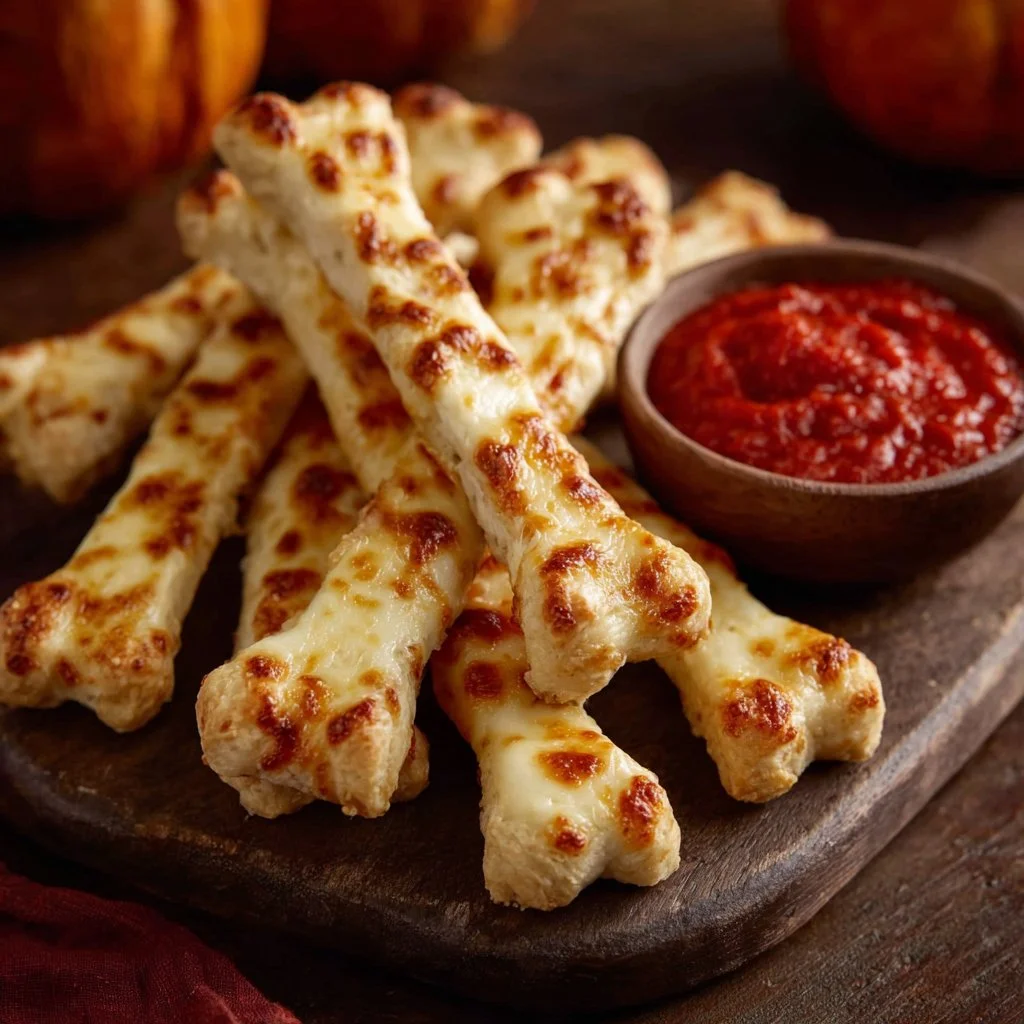
Step 5: Shape into Bones
Roll each piece into an 8-inch long rope. To mimic the shape of bones, make the ends slightly thicker than the middle. Then, snip each end of the rope about 1 inch deep—this will create the bone ends. Gently pull them apart to enhance the effect.
Step 6: Prepare for Baking
Place the shaped breadsticks on the lined baking sheets, ensuring you leave some space between them so they can rise and expand in the oven.
Step 7: Butter and Cheese
With the breadsticks lined up and ready, brush them generously with melted butter. This step will not only add flavor but also help the cheese to adhere. Next, sprinkle grated Parmesan cheese generously over each stick, making sure to cover the surface for that perfect cheesy crust.
Step 8: Bake the Breadsticks
Bake the breadsticks in the oven for 15 minutes until they puff up and turn light golden brown. Keep an eye on them, as oven temperatures can vary.
Step 9: Cheese it Up!
Once your breadsticks are golden, remove them from the oven. Here comes the best part: sprinkle shredded mozzarella cheese generously on top. Return them to the oven for another 5-7 minutes until the cheese is perfectly melted and bubbly.
Step 10: Cool and Serve
Finally, take the breadsticks out of the oven and let them cool for a few moments. Serve warm with a side of marinara sauce for dipping—this brings everything together in a delicious, cozy way.
Common Mistakes to Avoid When Making Cheesy Halloween Breadstick Bones
When creating these festive treats, it’s easy to run into a few common pitfalls. Here are some mistakes to avoid to ensure your breadsticks turn out perfect every time.
Not Letting the Dough Rest
One common mistake is not allowing the dough to rest before shaping. Pizza dough needs to relax in order to be more pliable. Skipping this step may result in breadsticks that are tough to shape.
Overbaking the Breadsticks
Another mistake is overbaking. Keep a close watch as breadsticks can go from perfectly golden to overdone in a matter of minutes. Trust your instincts—if they look puffed and lightly golden, it’s time to take them out!
Skipping the Butter
Some cooks might opt to skip the melted butter brushing, thinking it’s unnecessary. However, this is a key step that adds a ton of flavor and helps the cheese stick. Don’t skip this delicious detail!
Not Making Enough
Lastly, a mistake I’ve made many times is underestimating how quickly these breadsticks disappear once they come out of the oven. Make an extra batch if you’re expecting guests, as they’ll surely want seconds!
Serving Suggestions for Cheesy Halloween Breadstick Bones
These Cheesy Halloween Breadstick Bones are versatile and can be enjoyed in various ways. Here are some serving suggestions to take your spooky spread to the next level.
Pair with a Halloween-Themed Themed Platter
Create an inviting serving platter filled with a variety of colorful vegetables like bell pepper strips, cucumbers, and carrots. Add a selection of dips such as hummus, ranch, or guacamole, creating a fun and festive buffet style making it an ideal option for parties.
Add a Spooky Touch
For a Halloween-themed meal, you can place the breadstick bones on a platter surrounded by small pumpkins and spooky decorations. Get creative with food coloring in your sauces or dips for a more festive appeal.
Create an Entrée
You can also turn these breadsticks into a complete meal by pairing them with a hearty soup or salad. Consider serving them alongside a pumpkin or tomato soup, perfect for those chilly October nights.
Serve as Appetizers
These breadsticks make fantastic appetizers for Halloween gatherings. You can cut them into smaller pieces for easier sharing or arrange them in a bone-shaped design on the platter for added fun.
Pro-Level Tips for When You’re Ready
Once you’ve mastered the basic recipe for Cheesy Halloween Breadstick Bones, you can try out these pro-level tips to elevate your baking game!
Experiment with Fillings
Consider stuffing the breadstick bones before baking. Think about adding a mix of spinach and feta, or pepperoni and mozzarella for a delightful surprise inside. Just keep in mind, you may want to seal the ends well to avoid any cheese leakage.
Play with Flavors
For a gourmet touch, incorporate herbs and spices into the butter. Infuse your melted butter with crushed garlic or fresh herbs like thyme and rosemary for an irresistible aromatic experience.
Make it a Family Activity
Extend the baking fun by involving family members, including kids, in the shaping process. This not only teaches them valuable cooking skills but also creates a sense of connection and cherished memories around the kitchen.
Plan Ahead
You can prepare the dough ahead of time, allowing you to enjoy more time with your guests. After shaping, cover the breadsticks with plastic wrap and refrigerate until you’re ready to bake. Let them come to room temperature before baking.
Conclusion & Next Steps
Congratulations! You’ve learned how to make Cheesy Halloween Breadstick Bones, an easy yet enchanting recipe anyone can enjoy. With just a few simple ingredients, you can create a cozy culinary experience that will impress your family and friends. Remember, it’s easier than it looks, and customizing this recipe allows for endless culinary creativity. So gather your loved ones, get those doughy hands ready, and enjoy creating together!
If you enjoyed this recipe, I encourage you to share your creations on social media or among your friends and family. I’d also love to hear your thoughts on this recipe or any variations you might have tried!
FAQs About Cheesy Halloween Breadstick Bones
1. Can I use homemade pizza dough for the Cheesy Halloween Breadstick Bones?
Absolutely! Homemade pizza dough works wonderfully in this recipe. Just be sure to let it rest and rise according to your dough recipe instructions.
2. What’s the best way to store leftover Cheesy Halloween Breadstick Bones?
To store leftover breadsticks, let them cool completely, then place them in an airtight container. You can refrigerate them for up to three days or freeze them for a month.
3. Can I make these breadsticks gluten-free?
Yes! You can substitute the all-purpose flour with gluten-free flour and use gluten-free pizza dough. Just keep in mind that the texture and flavor may vary slightly.
4. Is there a vegan option for this recipe?
Certainly! You can use vegan pizza dough, substitute the butter with a vegan alternative, and use plant-based cheeses to create these delicious breadsticks.
5. How can I get more cheese on my Cheesy Halloween Breadstick Bones?
If you’re a cheese lover, you can add more shredded cheese than the recipe calls for, or even sprinkle some cheese onto the breadsticks again halfway through baking for extra gooeyness.
Now roll up your sleeves, and let the Halloween festivities begin with these delightful Cheesy Halloween Breadstick Bones!