Last updated on May 4, 2025
The first time I made chimichangas at home, I was honestly intimidated. Growing up in the Southwest, I’d enjoyed countless restaurant versions of these crispy, stuffed burritos, and I was convinced they required some kind of special equipment or culinary magic. When my neighbor brought over homemade chimichangas for a potluck last summer, I was shocked to learn how simple they actually are to make.
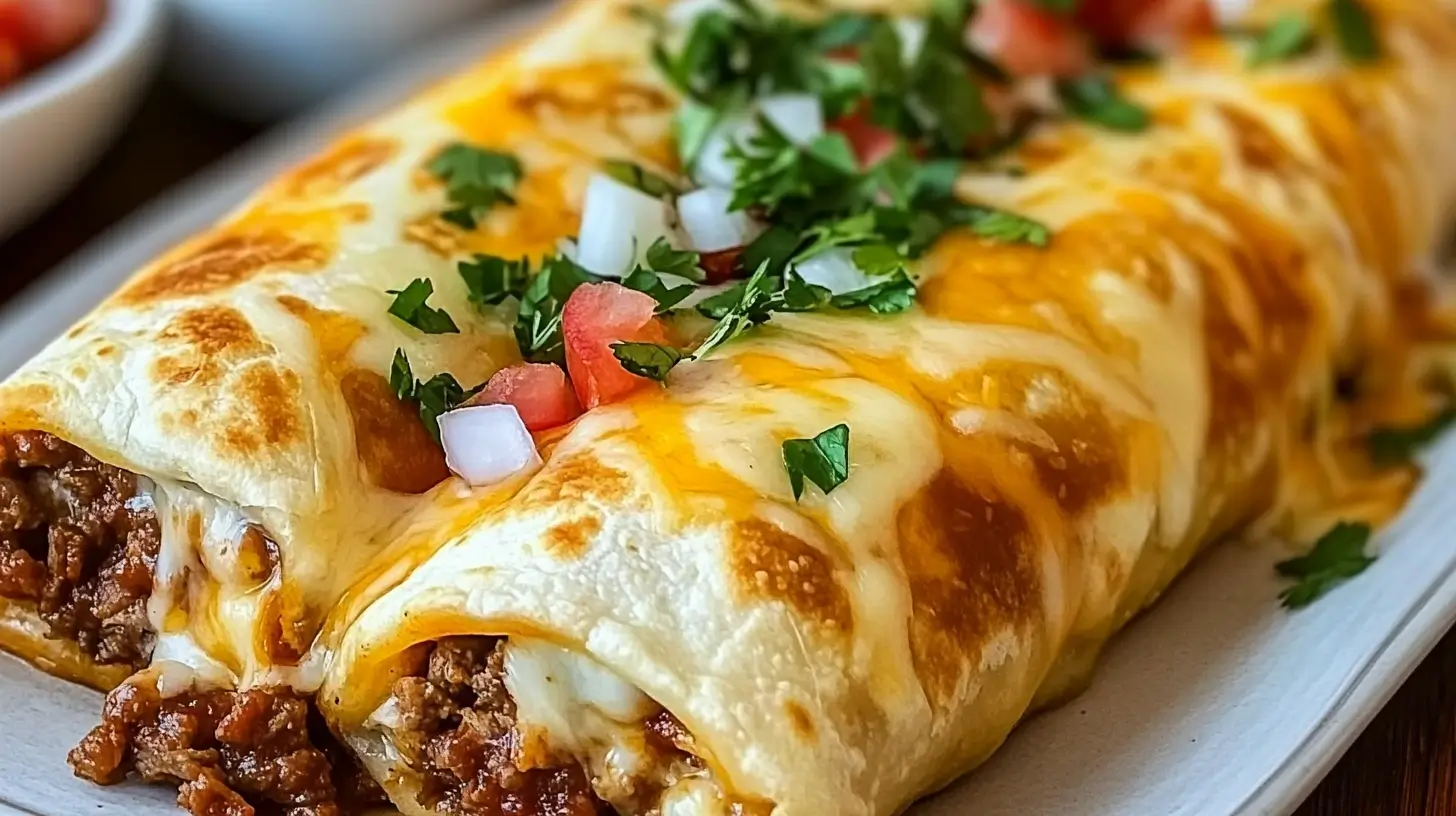
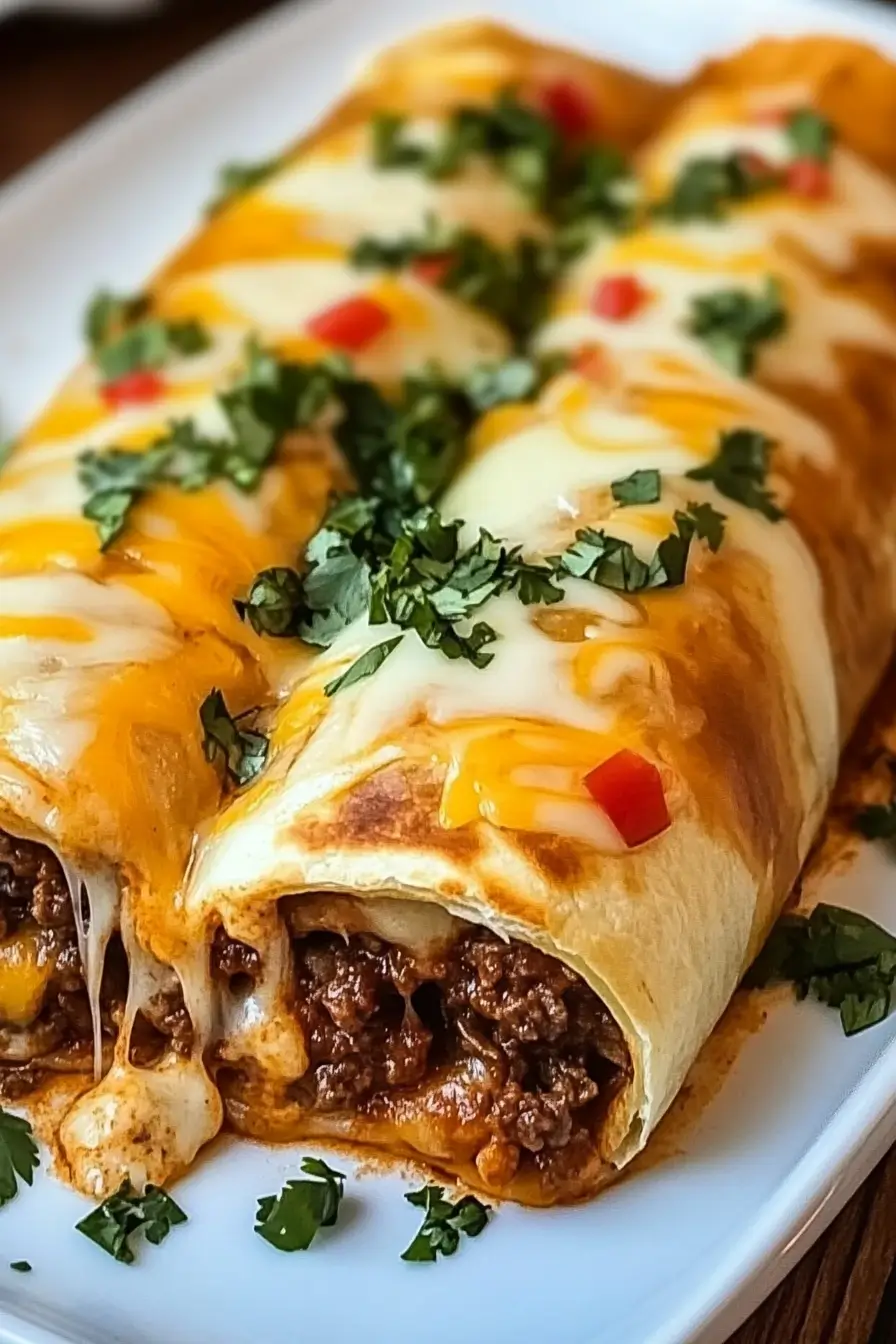
After that revelation, beef and cheese chimichangas have become a regular in my weeknight dinner rotation. There’s something extraordinarily satisfying about biting through that crispy exterior into a savory filling of seasoned beef and melted cheese. Even better, they’re endlessly customizable, quick to prepare, and always a hit with whoever I’m feeding.
Today, I’m sharing my foolproof method for easy beef and cheese chimichangas that delivers restaurant-quality results with minimal effort and everyday ingredients.
Table of Contents
What Are Chimichangas? The Deep-Fried Burrito Sensation
Chimichangas are essentially deep-fried burritos that originated in the Southwest United States and northern Mexico. Legend has it they were created accidentally when a burrito was dropped into a deep fryer—a delicious mistake that gave birth to one of Mexican-American cuisine’s most beloved dishes.
Unlike traditional burritos that are simply wrapped and served, chimichangas undergo a transformation when fried or baked until crispy. This creates a delightful textural contrast between the crunchy exterior and the warm, savory filling inside. While restaurant versions are typically deep-fried, my home version uses a fraction of the oil for a healthier but equally delicious result.
What makes chimichangas special is their versatility. Though beef and cheese is a classic combination, they can be filled with various proteins, vegetables, and cheeses to suit any preference. They’re substantial enough to serve as a main dish but can also be made into smaller portions for appetizers.
Here’s why you should add easy beef and cheese chimichangas to your recipe collection:
- They require just a handful of basic ingredients
- The entire meal comes together in about 30 minutes
- The crispy-on-the-outside, soft-on-the-inside texture is irresistible
- They’re perfect for using up leftover taco meat or rotisserie chicken
- Kids and adults alike love them
- They’re easy to customize based on dietary preferences
Essential Ingredients

Creating crave-worthy chimichangas starts with gathering the right ingredients. Here’s everything you’ll need for beef and cheese chimichangas that taste like they came from your favorite Mexican restaurant.
The Right Tortillas
The foundation of any good chimichanga is the tortilla. For best results:
- Large flour tortillas (10-12 inch): These provide enough surface area to hold a generous filling and fold properly. Burrito-size tortillas work perfectly.
- Fresh tortillas: Look for packages with recent dates, as fresh tortillas are more pliable and less likely to crack when folded.
- Room temperature: Take tortillas out of the refrigerator 30 minutes before assembly to increase flexibility.
Corn tortillas are not recommended for chimichangas as they tend to crack when folded and don’t seal as well as flour tortillas.
Beef Filling Options
The heart of your chimichangas is the seasoned beef filling:
- Ground beef: 80/20 lean-to-fat ratio provides the best flavor, though 90/10 works for a leaner option.
- Chuck roast: For a more traditional approach, slow-cooked and shredded chuck roast makes an excellent filling.
- Pre-cooked options: Leftover taco meat or shredded pot roast can be quickly repurposed for chimichangas.
Chimichanga Seasonings
The right blend of spices transforms ordinary beef into a flavorful chimichanga filling:
- 1 tablespoon chili powder
- 1 teaspoon ground cumin
- 1 teaspoon garlic powder
- 1/2 teaspoon dried oregano (preferably Mexican oregano)
- 1/2 teaspoon salt
- 1/4 teaspoon black pepper
- Pinch of cayenne (optional, for heat)
Cheese Choices
Cheese adds creaminess and richness to your chimichangas:
- Monterey Jack: Mild flavor with excellent melting properties
- Cheddar: Adds a sharper flavor that pairs well with beef
- Mexican blend: A convenient pre-shredded option that combines multiple cheeses
- Queso quesadilla: A traditional Mexican melting cheese with mild flavor
- Pepper Jack: Adds a spicy kick if you prefer heat
Additional Filling Components
While beef and cheese form the base, these additions create a more complex and satisfying filling:
- Diced onions and garlic
- Small can of diced green chiles
- Refried or whole black beans
- Cooked rice (Spanish or plain)
- Diced bell peppers
- Corn kernels
- Chopped green onions
For Cooking and Serving
- Vegetable oil for frying (or cooking spray for baked version)
- Toothpicks for securing (optional)
- Serving accompaniments: sour cream, guacamole, salsa, lettuce, diced tomatoes, and cilantro
How to Make Easy Beef & Cheese Chimichangas: Step-by-Step
Creating perfect chimichangas at home is simpler than you might think. Follow these steps for consistently delicious results.
Preparing the Beef Filling
- Heat a large skillet over medium-high heat.
- Add 1 pound of ground beef, breaking it apart with a wooden spoon.
- When beef is about halfway cooked (still some pink showing), add:
- 1/2 cup diced onion
- 2 minced garlic cloves
- Cook until beef is no longer pink and onions are translucent.
- Drain excess fat, leaving about a tablespoon in the pan.
- Add spice mixture (chili powder, cumin, garlic powder, oregano, salt, pepper, and cayenne if using).
- Stir in 1/4 cup water or beef broth and 1 small can of diced green chiles (optional).
- Simmer for 5 minutes until liquid reduces and flavors meld.
- Remove from heat and let cool slightly before assembly.
Assembly Instructions
- Lay a large flour tortilla on a flat surface.
- Place about 1/4 cup of the beef mixture slightly below the center of the tortilla.
- Top with 2-3 tablespoons of shredded cheese.
- Add any additional fillings like beans or rice (about 2 tablespoons each).
- Fold the bottom edge of the tortilla up and over the filling.
- Fold in both sides toward the center.
- Roll the tortilla up from the bottom to the top, creating a tight package.
- Secure with a toothpick if needed (remember to remove before serving).
Cooking Methods
Traditional Pan-Fried Method (My Favorite)
- Heat 1/4 inch of vegetable oil in a large skillet over medium-high heat.
- When oil is hot (about 350°F), place chimichangas seam-side down.
- Cook for 2-3 minutes until golden brown and crispy.
- Carefully flip and cook the other side for another 2-3 minutes.
- Remove and drain on paper towels.
Healthier Baked Option
- Preheat oven to 425°F.
- Place assembled chimichangas seam-side down on a baking sheet.
- Brush all sides lightly with oil or spray with cooking spray.
- Bake for 20-25 minutes, flipping halfway through, until golden and crispy.
Air Fryer Method
- Preheat air fryer to 380°F.
- Lightly brush or spray chimichangas with oil.
- Place in air fryer basket in a single layer, seam-side down.
- Cook for 8-10 minutes, flipping halfway through, until crispy and golden.
Tips for Perfect Texture and Flavor
- Avoid overfilling, which can cause the chimichanga to burst during cooking.
- Ensure the seam is placed down first when cooking to seal it shut.
- If pan-frying, maintain oil temperature around 350°F—too hot will burn the outside before heating the filling, too cool will make them greasy.
- For extra flavor, add a pinch of your spice blend to the outside of the tortilla before cooking.
- Let chimichangas rest for 2-3 minutes after cooking to allow fillings to set and prevent burning your mouth.
Serving Suggestions and Variations
The classic chimichanga experience is all about the toppings and sides that complement this crispy creation.
Traditional Toppings
Serve your chimichangas with any combination of these toppings:
- Sour cream or Mexican crema
- Guacamole or sliced avocado
- Pico de gallo or your favorite salsa
- Shredded lettuce
- Diced tomatoes
- Chopped cilantro
- Sliced jalapeños
- Lime wedges for squeezing
- Queso sauce for drizzling
Side Dish Pairings
Complete your meal with these complementary sides:
- Mexican rice or cilantro-lime rice
- Refried beans or black beans
- Simple green salad with cilantro-lime dressing
- Elote (Mexican street corn)
- Tortilla soup as a starter
Delicious Variations to Try
Once you’ve mastered the basic beef and cheese chimichanga, experiment with these tasty variations:
Chicken and Green Chile
Substitute the beef with 2 cups of shredded rotisserie chicken mixed with a can of green chiles, cumin, garlic powder, and salt for a lighter option.
Breakfast Chimichangas
Fill tortillas with scrambled eggs, chorizo, potatoes, and cheese for a hearty breakfast version. Top with salsa and avocado.
Vegetarian Bean and Cheese
Replace meat with a mixture of refried beans, black beans, corn, sautéed bell peppers, and onions for a satisfying meatless option.
Shredded Beef Barbacoa
Use slow-cooked shredded beef seasoned with chipotle peppers in adobo sauce for a smoky, slightly spicy filling.
Sweet Dessert Chimichangas
Fill tortillas with cinnamon-sugar tossed apple or banana slices and a sprinkle of cream cheese. Fry as directed and dust with cinnamon sugar while still hot.
Make-Ahead and Storage Tips
Chimichangas are perfect for meal prep and can be made ahead in several ways.
Preparing Components in Advance
- Cook beef filling up to 3 days ahead and store in an airtight container in the refrigerator.
- Shred cheese and prepare other toppings the day before.
- Assemble uncooked chimichangas and store in the refrigerator for up to 24 hours before cooking.
Freezing Instructions
- Assemble chimichangas but do not cook.
- Wrap each tightly in plastic wrap, then aluminum foil.
- Freeze for up to 3 months.
- To cook frozen chimichangas:
- Thaw overnight in the refrigerator (preferred method)
- Or cook from frozen by adding 5-7 minutes to cooking time
Reheating Leftovers
For the best texture when reheating already-cooked chimichangas:
- Oven method (best for maintaining crispiness): Preheat to 350°F, wrap loosely in foil, and heat for 10-15 minutes.
- Microwave method (quickest but sacrifices crispiness): Wrap in a paper towel and microwave for 1-2 minutes.
- Air fryer method (restores crispiness): Heat at 350°F for 3-4 minutes.
Healthier Chimichanga Options
Traditional chimichangas are indulgent, but these modifications make them more nutritious without sacrificing flavor.
Lower-Calorie Adjustments
- Use 93% lean ground beef or ground turkey instead of 80/20 beef
- Try whole wheat or low-carb tortillas
- Bake or air fry instead of pan-frying
- Use cooking spray instead of oil when baking
- Reduce cheese amount by half and add more vegetables
- Use Greek yogurt instead of sour cream for topping
Dietary Modifications
Gluten-Free:
- Use certified gluten-free tortillas (made from rice flour or cassava)
- Check that all seasonings and canned ingredients are gluten-free
Low-Carb:
- Use low-carb tortillas
- Skip rice and beans in filling
- Focus on protein and vegetables
- Serve with avocado instead of high-carb sides
Dairy-Free:
- Omit cheese or use plant-based cheese alternatives
- Ensure tortillas are dairy-free (some contain butter)
- Top with dairy-free sour cream alternatives
Troubleshooting Common Chimichanga Problems
Even experienced cooks encounter issues when making chimichangas. Here are solutions to common problems:
Tortillas Tearing or Not Holding Together
Problem: Tortillas crack when folding or come apart during cooking. Solutions:
- Warm tortillas slightly in the microwave (10-15 seconds) to make them more pliable
- Don’t overfill—stick to about 1/2 cup filling per large tortilla
- Secure with toothpicks if necessary (remove before serving)
- Make sure filling isn’t too wet, which can soften tortillas
Undercooked or Soggy Chimichangas
Problem: Chimichangas are soft instead of crispy. Solutions:
- Ensure oil is hot enough before adding chimichangas (350°F)
- Don’t overcrowd the pan, which lowers oil temperature
- If baking, place on a rack inside a baking sheet to allow air circulation
- Drain filling well to remove excess moisture
- Pat ingredients dry before using
Filling Falls Out During Cooking
Problem: Filling escapes during the cooking process. Solutions:
- Double-check that all edges are properly tucked and sealed
- Place seam-side down first when cooking
- Let filling cool slightly before assembly so it’s not as runny
- Use less filling until you perfect your folding technique
Conclusion
Easy beef and cheese chimichangas prove that restaurant-quality Mexican food is absolutely achievable at home. With their crispy exterior giving way to savory, cheesy beef filling, they satisfy cravings while being simple enough for weeknight cooking. Whether you choose the traditional pan-fried method or a healthier baked alternative, these versatile handheld meals are sure to become a favorite in your recipe rotation.
Don’t be surprised if making these at home ruins restaurant chimichangas for you—the freshly made version, tailored exactly to your taste, is hard to beat. So gather your ingredients, heat up that skillet, and get ready to enjoy crispy, cheesy perfection in every bite.
Frequently Asked Questions About Beef & Cheese Chimichangas
What’s the difference between a burrito and a chimichanga?
The main difference is that chimichangas are fried after being wrapped, while burritos are served soft. Both contain similar fillings, but chimichangas have that distinctive crispy exterior that makes them special. Think of chimichangas as the crunchy, indulgent cousin to the traditional burrito.
Can I make chimichangas without frying them?
Absolutely! While traditional chimichangas are fried, you can achieve a similar crispy texture by baking them at 425°F for 20-25 minutes or using an air fryer at 380°F for 8-10 minutes. Both methods use significantly less oil while still creating that satisfying crunch.
How do I keep my chimichangas from getting soggy?
The key to crispy chimichangas is ensuring your filling isn’t too wet. Drain excess fat from meat, pat ingredients dry, and let hot fillings cool slightly before assembly. Also, serve wet toppings like salsa and sour cream on the side rather than directly on top of the chimichanga.
What’s the best way to fold a chimichanga?
For a secure chimichanga that won’t burst open: place filling slightly below center, fold the bottom edge over the filling, fold in both sides, then tightly roll upward to close. Always cook with the seam side down first to seal it shut.
Can I make chimichangas ahead of time for a party?
Yes! You can prepare chimichangas up to the folding stage and refrigerate them uncooked for up to 24 hours. For longer storage, freeze assembled but uncooked chimichangas for up to 3 months. When ready to serve, cook directly from frozen by adding a few extra minutes to the cooking time.
What can I serve with chimichangas?
Traditional sides include Mexican rice, refried beans, guacamole, and pico de gallo. For a lighter meal, serve with a simple green salad dressed with cilantro-lime vinaigrette. Don’t forget the classic toppings: sour cream, guacamole, salsa, and fresh cilantro.
Print
Easy Beef & Cheese Chimichangas
- Total Time: 45 minutes
- Yield: 4 chimichangas 1x
Description
Beef & Cheese Chimichangas are a crispy, golden treat filled with seasoned beef, melty cheese, and optional extras like beans and rice. Whether fried or baked, they’re an irresistible Tex-Mex classic that’s perfect for dinner or game day.
Ingredients
Main Ingredients:
- 4 large flour tortillas (10–12 inch, burrito-size)
- 1 lb ground beef (80/20 or leaner)
- 1/2 cup diced onion
- 2 garlic cloves, minced
- 1/4 cup diced green chiles (canned)
- 1 cup shredded cheese (Monterey Jack, Cheddar, or Mexican blend)
- 1/2 cup cooked rice (optional)
- 1/2 cup refried or whole black beans (optional)
- 1/4 cup corn kernels or diced bell peppers (optional)
Seasoning Blend:
- 1 tbsp chili powder
- 1 tsp ground cumin
- 1 tsp garlic powder
- 1/2 tsp dried oregano
- 1/2 tsp salt
- 1/4 tsp black pepper
- Pinch of cayenne pepper (optional)
For Cooking & Serving:
- Vegetable oil for frying (or cooking spray for baking)
- Toothpicks (optional, to secure chimichangas)
- Sour cream, guacamole, salsa, shredded lettuce, diced tomatoes, cilantro (for serving)
Instructions
- Warm tortillas to room temperature for flexibility.
- In a skillet over medium heat, cook ground beef with diced onion and garlic until browned. Drain excess fat if necessary.
- Stir in green chiles and all seasonings. Simmer for 2–3 minutes. Add optional rice, beans, or vegetables at this stage.
- Remove from heat and mix in shredded cheese.
- Lay out tortillas. Add filling in the center, fold sides in, then roll tightly into a burrito shape. Secure with toothpicks if frying.
- For frying: Heat 1 inch of vegetable oil in a skillet over medium heat. Fry each chimichanga seam-side down for 2–3 minutes per side until golden brown. Drain on paper towels.
- For baking: Preheat oven to 400°F (200°C). Place seam-side down on a baking sheet. Lightly spray with cooking oil. Bake for 20–25 minutes, flipping once halfway through.
- Serve hot with sour cream, salsa, guacamole, and your favorite toppings.
Notes
- Use cooked shredded beef (like chuck roast or leftover pot roast) for a more traditional filling.
- For a spicy version, use Pepper Jack cheese or add diced jalapeños.
- Chimichangas can be frozen before cooking and baked straight from frozen — just add 10 more minutes to bake time.
- Prep Time: 20 minutes
- Cook Time: 25 minutes
- Category: Dinner, Tex-Mex
- Method: Frying or Baking
- Cuisine: Mexican-Inspired, American
Nutrition
- Serving Size: 1 chimichanga
- Calories: 580
- Sugar: 2g
- Sodium: 750mg
- Fat: 32g
- Saturated Fat: undefined
- Unsaturated Fat: undefined
- Trans Fat: undefined
- Carbohydrates: 38g
- Fiber: 3g
- Protein: 30g
- Cholesterol: undefined
Keywords: Beef Chimichangas, Cheese Chimichangas, Tex-Mex Dinner, Crispy Tortilla Wraps, Mexican Recipes, Fried Burritos