Last updated on January 20, 2026
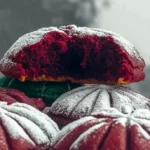
After-school backpacks hit the floor, homework is due, and you still have to pull together a dessert that won’t take all evening — I get it. When the day has been long and patience is shorter, I turn to quick, forgiving recipes the whole family will actually eat. These Hershey’s Red Velvet Blossoms are one of my go-to saves: simple dough, a fun pop of chocolate in the middle, and kids who happily help roll and decorate. They’re fast, low-fuss, and friendly for picky eaters — and if you like other red velvet treats, I also keep a favorite red velvet crinkle cookies recipe in my weeknight rotation for variety.
A Quick Look at This Hershey’s Red Velvet Blossoms Recipe
This Hershey’s Red Velvet Blossoms recipe uses two crowd-pleasers: butter and Hershey’s chocolate kisses, which kids and adults love. The dough mixes in minutes, bakes in just 10, and you press the warm chocolate kiss into each cookie for that classic blossom finish. Cleanup is minimal — one bowl if you use a stand mixer or just a mixing bowl and a spoon — and the recipe yields about 18 cookies, perfect for an after-school snack or quick dessert. It’s ideal for busy weeknights because it’s forgiving: the dough is easy to handle, timing isn’t precious, and the cookies still look special. Trust me — it’s one of those reliable recipes that feels fancy but is totally fast.
Ingredients You’ll Need for Hershey’s Red Velvet Blossoms
Below I break the ingredients into what you need, optional extras to try, and time-saving swaps. Everything is simple and easy to find at the grocery store.
Essentials
- 7 tablespoons butter (salted or unsalted), softened — soft but not melted
- 1/2 cup brown sugar — packed slightly when measuring
- 2 tablespoons granulated sugar
- 1 teaspoon vanilla extract
- 1 large egg yolk (discard or reserve the white for another use)
- 1/4 teaspoon red food coloring gel — gel gives brighter color with less liquid
- 1 cup all-purpose flour
- 1 tablespoon unsweetened cocoa powder — just enough for the mild chocolatey note found in red velvet
- 1/2 teaspoon baking powder
- 1/4 teaspoon salt
- 1/4 cup red sanding sugar — for rolling and sparkle
- 18 Hershey chocolate kisses — one per cookie
Optional Add-ons
- 1/4 teaspoon instant espresso powder — enhances chocolate flavor without a coffee taste
- 1–2 tablespoons white chocolate chips — stir into dough for extra sweetness
- A pinch of cinnamon or orange zest — small twist for grown-up palates
- Sprinkles or colored sanding sugar in different colors for parties or holiday themes
- Mini marshmallows or a dab of cream cheese frosting on top after the kiss cools for a more dessert-like treat
Substitutions and Shortcuts
- Butter swap: You can use margarine if needed, but flavor is best with real butter. For softer dough, use slightly less salted butter if subbing salted.
- Brown sugar shortcut: If you don’t have brown sugar, use 1/2 cup granulated sugar plus 1 tablespoon molasses, stirred in.
- Food coloring alternative: If you prefer to avoid red dye, use natural beet powder or a small amount of freeze-dried strawberry powder to tint — results will be milder.
- One-bowl method: If you don’t have a stand mixer, use a large mixing bowl and a handheld mixer or a sturdy wooden spoon. Creaming by hand takes a minute longer but works fine.
- Pre-measured cookie scoop: Use a 1-tablespoon cookie scoop for even cookies and fast portioning.
- Store-bought sanding sugar: Saves time instead of making your own; buy in bulk when it’s on sale.
How to Make Hershey’s Red Velvet Blossoms Step-by-Step
I keep steps short and practical so you can read through quickly and get baking. The method is forgiving — don’t worry about being perfect.
Preheat and prep: Preheat your oven to 350°F (177°C). Line a large baking sheet with parchment paper and set it aside so you can work without stopping later.
Cream the butter and sugars: In a stand mixer fitted with the paddle (or in a large bowl with a handheld mixer), cream 7 tablespoons softened butter with 1/2 cup brown sugar and 2 tablespoons granulated sugar until smooth and slightly lightened, about 1–2 minutes. Scrape the sides once.
Add wet flavors: Mix in 1 large egg yolk, 1 teaspoon vanilla extract, and 1/4 teaspoon red food coloring gel until everything is combined and evenly colored. Don’t overmix — you only want the color spread through.
Add dry ingredients: Add 1 cup all-purpose flour, 1 tablespoon cocoa powder, 1/2 teaspoon baking powder, and 1/4 teaspoon salt. Mix on low speed or fold with a spatula just until the flour disappears into the dough. Stop when it’s mixed — overworking flour makes cookies tougher.
Portion the dough: Using a tablespoon or a 1-tablespoon cookie scoop, scoop out 18 even cookie dough balls. Roll each quickly between your palms to smooth, then roll each ball in 1/4 cup red sanding sugar until coated.
Space and bake: Place the sugared dough balls on the prepared baking sheet about 2 inches apart. Bake at 350°F for 10 minutes. They should look set around the edges but still slightly soft in the center.
Add the kiss: Immediately after removing the tray from the oven, press one Hershey chocolate kiss into the center of each warm cookie. Press gently so the kiss nests in without melting completely flat.
Cool before moving: Let the cookies cool on the baking sheet for 10 minutes to firm up. Then transfer to a wire rack to finish cooling. The kisses will set and the bottoms will finish baking slightly while they rest.
Time-saving tips and reassurance:
- You can mix steps 2–4 in one bowl to avoid extra dishes.
- Dough can be made ahead and chilled up to 24 hours — shape and chill, then bake fresh when you need them.
- If you don’t have exact measuring tools, eyeballing is okay here — these cookies are forgiving.
Common Mistakes to Avoid
A few small slips can add stress and extra cleanup. Keep these tips in mind to stay efficient and get consistent results.
Mistake 1: Overmixing the dough
Stir just until the flour disappears. Overmixing activates gluten and can make cookies dense or tough, which leads to leftovers that no one wants to eat.
Mistake 2: Pressing the kiss too hard
If you press the Hershey kiss down while the cookie is piping hot or you press too forcefully, the chocolate will spread out and flatten. Press gently right out of the oven — the heat is enough to set it into the top.
Mistake 3: Skipping parchment or using too much spacing
Not lining your sheet, or placing cookies too close, causes sticking and misshapen cookies that need extra scraping and cleanup. One sheet of parchment saves time and keeps cookies looking tidy.
Serving Suggestions for Hershey’s Red Velvet Blossoms
These cookies are delicious on their own, but a few simple pairings make them feel special without extra work.
Start with a basic serving idea that requires almost no prep and still delights kids and grown-ups alike.
Kid-friendly sides
Serve with apple slices, banana halves, or a small cup of milk — simple, familiar choices kids will accept alongside a sweet treat. A small bowl of cut fruit keeps the plate balanced and colorful.
Easy add-ons
Set out a small bowl of extra sanding sugar, mini chocolate chips, or sprinkles for kids to decorate a few cookies after the kisses are set. This is a quick activity while you finish dinner or clear the table.
Minimal prep party plate
Line a platter with a doily or parchment, arrange cookies in circles, and add a few red berries (strawberries or raspberries). If you want a salty-sweet option, place a small dish of pretzels or kettle corn nearby — and for a themed snack you can pair with a batch of red velvet popcorn for an easy movie-night spread.

Conclusion
I’ve shared this Hershey’s Red Velvet Blossoms recipe because it saves time, limits cleanup, and still feels special for kids and adults. It’s flexible for picky eaters — simple flavors, a colorful look, and the beloved Hershey’s kiss make these a consistent win when the day’s been long. Try them on a busy weeknight, bake with your kids on the weekend, or make dough ahead and bake fresh when you need a quick dessert. For a different take or to see a similar easy version, check out this Easy Hershey’s Red Velvet Blossoms Cookies – Lifestyle of a Foodie — it’s a great reference that aligns with the same family-friendly spirit.
FAQs About Hershey’s Red Velvet Blossoms
Q1: How long do Hershey’s Red Velvet Blossoms stay fresh?
A1: Hershey’s Red Velvet Blossoms keep well at room temperature in an airtight container for up to 3 days. If you need them longer, store in the fridge for up to a week — bring to room temperature before serving for the best texture.
Q2: Can I freeze Hershey’s Red Velvet Blossoms dough or baked cookies?
A2: Yes. For quick future baking, shape the dough into balls, freeze on a baking sheet, then transfer to a freezer bag. Bake straight from frozen, adding a minute or two to the baking time. Baked Hershey’s Red Velvet Blossoms also freeze well for up to 3 months; thaw at room temperature.
Q3: Can I make Hershey’s Red Velvet Blossoms without food coloring?
A3: You can, but the signature red look will be milder. If you prefer natural color, try a small amount of beet powder or freeze-dried strawberry powder. The cookies will still taste great and are still Hershey’s Red Velvet Blossoms in spirit.
Q4: How can I make Hershey’s Red Velvet Blossoms kid-friendly to help kids bake?
A4: Kids can handle scooping the dough, rolling in sanding sugar, and placing the Hershey’s kisses after baking. I let younger kids do the rolling step and older kids press the kisses (with supervision). Using a tablespoon scoop keeps portions consistent and makes the process faster.
Q5: Is there an easy way to double the recipe for Hershey’s Red Velvet Blossoms?
A5: Yes. Double all ingredients and bake on multiple sheets, rotating halfway through if your oven space is limited. Keep portioned dough chilled on a lined tray while one sheet bakes to make the process orderly and fast.

Hershey’s Red Velvet Blossoms
- Total Time: 25 minutes
- Yield: 18 cookies 1x
- Diet: Vegetarian
Description
Quick and easy Hershey’s Red Velvet Blossoms cookies made with chocolate kisses, perfect for an after-school snack.
Ingredients
- 7 tablespoons butter, softened
- 1/2 cup brown sugar, packed
- 2 tablespoons granulated sugar
- 1 teaspoon vanilla extract
- 1 large egg yolk
- 1/4 teaspoon red food coloring gel
- 1 cup all-purpose flour
- 1 tablespoon unsweetened cocoa powder
- 1/2 teaspoon baking powder
- 1/4 teaspoon salt
- 1/4 cup red sanding sugar
- 18 Hershey chocolate kisses
Instructions
- Preheat your oven to 350°F (177°C). Line a large baking sheet with parchment paper.
- Cream the butter with the brown sugar and granulated sugar until smooth and lightened.
- Mix in the egg yolk, vanilla extract, and red food coloring until combined.
- Add flour, cocoa powder, baking powder, and salt; mix until just combined.
- Scoop out 18 dough balls and roll them in red sanding sugar.
- Place on prepared baking sheet and bake for 10 minutes.
- Press a Hershey kiss into the center of each cookie immediately after baking.
- Cool the cookies on the baking sheet for 10 minutes before transferring to a wire rack.
Notes
Dough can be made ahead and chilled for up to 24 hours. Cookies can be frozen for up to 3 months.
- Prep Time: 15 minutes
- Cook Time: 10 minutes
- Category: Dessert
- Method: Baking
- Cuisine: American
Nutrition
- Serving Size: 1 cookie
- Calories: 150
- Sugar: 14g
- Sodium: 70mg
- Fat: 7g
- Saturated Fat: 4g
- Unsaturated Fat: 2g
- Trans Fat: 0g
- Carbohydrates: 20g
- Fiber: 0g
- Protein: 2g
- Cholesterol: 15mg
Keywords: red velvet, cookies, dessert, chocolate, kids recipe