Last updated on December 29, 2025
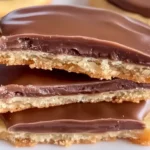
I still remember the first time I made chocolate turtles for a holiday swap—my kitchen smelled like toasted nuts and warm caramel, and I nervously hoped they wouldn’t turn into a sticky mess. It’s easy to feel intimidated by candy-making: will the caramel be too runny, will the chocolate seize, or will my clusters fall apart? I promise this recipe is calm, friendly, and entirely doable. With a few simple steps and a little patience, you’ll have glossy, bite-sized treats that look and taste like they came from a chocolatier—no fancy tools required.
Why I Love This Recipe of Homemade Chocolate Turtles
I love these Homemade Chocolate Turtles because they are the perfect blend of crunchy pecans, rich caramel, and smooth chocolate—comfort in three layers. They’re one of those recipes that feels special enough for gift boxes and casual enough to make on a weeknight. For beginner cooks, these turtles are forgiving. You don’t need exact candy thermometers or years of experience; a little attention and gentle heat go a long way. They’re also versatile: you can make them as simple as the classic version below or dress them up with sea salt, toasted coconut, or a drizzle of white chocolate.
There’s something very cozy about stirring caramel on the stove and stacking little nut clusters on a baking sheet. When I make these, I always think about how small, handmade treats feel more personal than store-bought boxes. They’re also quick: from start to finish, you’re looking at under an hour of active time, with some chilling in between. That combination of speed and charm is why I keep this recipe in my go-to file.
Ingredients You’ll Need for Homemade Chocolate Turtles
Here’s a friendly list of what you’ll need, plus a few optional add-ons and swaps in case you want to tweak things.
Essentials
- 1 cup pecans (about 4–5 ounces): halves or chopped. I like halves for a pretty look but chopped pecans make it easier to form clusters.
- 1 cup caramel candies (about 10–12 individually wrapped caramels): unwrap them before melting.
- 1 tablespoon butter: helps the caramel melt smoothly and keeps it glossy.
- 2 cups milk chocolate chips: or chopped milk chocolate bars for a smoother melt. You can also use semisweet if you prefer less sweetness.
- Parchment paper or silicone baking mat: prevents sticking.
- Baking sheet: for toasting nuts and assembling.
Optional add-ons and toppings
- Sea salt flakes: a tiny sprinkle on top adds a great contrast to the sweet caramel.
- Toasted coconut flakes: press onto the caramel before chilling for a tropical twist.
- Chopped pretzels: add crunch and a salty element.
- White chocolate chips or candy melts: for a decorative drizzle.
- Almonds, walnuts, or hazelnuts: swap for pecans if you prefer a different nut.
Substitutions and shortcuts
- Caramel substitute: if you don’t have wrapped caramels, use about 3/4 cup of ready-made caramel sauce (thicker style) and warm it gently on the stove. It won’t be as firm as cooled melted candies, but it still works.
- Dairy-free / vegan option: use dairy-free caramel candies or make a quick vegan caramel with coconut cream and brown sugar. For chocolate, try one of these dairy-free chocolate options for sweet treats I like. (This is a helpful read if you need a non-dairy chocolate choice.)
- Shortcuts for speed: instead of forming clusters by hand, press pecans into small muffin tin cups and pour caramel over them—this creates a neater shape, but you may lose the freeform “turtle” look.
How to Make Homemade Chocolate Turtles Step-by-Step
Below I break down each step in friendly, clear instructions, with tips to make each part go smoothly.
Prep and toast the pecans
- Preheat your oven to 350°F (175°C). Spread the pecans in a single layer on a baking sheet.
- Toast in the oven for 5–7 minutes. Keep a close eye: nuts go from nicely toasted to burnt quickly. You should see a slightly deeper color and smell a warm, toasty aroma.
- Remove from oven and let cool a few minutes. Toasting brings out flavor and helps the nuts stay crunchy under the caramel.
Make the caramel
- Unwrap the caramel candies and place them in a small saucepan.
- Add 1 tablespoon of butter. Heat over low heat, stirring constantly.
- Keep the heat gentle. The butter and caramel will melt together into a smooth, glossy mixture. If it seems too thick, add a teaspoon of milk or cream at a time until it’s easy to spoon—only a little, or the caramel will be too soft later.
- Once smooth, remove from heat. Work quickly but carefully: hot caramel can burn.
Form the pecan clusters
- Line a baking sheet with parchment paper or a silicone mat.
- Make clusters by placing 3–4 pecan halves together to form a base. The classic “turtle” shape is usually 3 pecan halves in a triangle with one on top. If you’re using chopped pecans, scoop about 1–1.5 teaspoons per cluster and press lightly into shape.
- Aim for uniform sizes so they set at the same time.
Coat with caramel
- Spoon a small amount of warm caramel over each pecan cluster. You want enough to coat the nuts and bind them together, but not so much that they become a big round mound.
- If your caramel cools and thickens while you’re working, return it to very low heat for a few seconds to soften. Stir to keep it smooth.
- Once each cluster is covered, let the sheet cool briefly at room temperature so the caramel firms up a bit—about 5–10 minutes.
Chill to set
- Transfer the baking sheet to the refrigerator for about 30 minutes, or until the caramel is set and not sticky to the touch. This step makes dipping much easier and keeps the chocolate from pulling the caramel away.
Melt the chocolate
- You can melt the chocolate chips either in the microwave or in a double boiler.
- Microwave method: Place chocolate chips in a microwave-safe bowl. Heat in 20–30 second bursts, stirring well between bursts, until smooth. Be careful not to overheat—stop when a few chips remain and stir until melted.
- Double boiler: Fill a small saucepan with an inch or two of water and bring to a simmer. Place a heatproof bowl over the pan (do not let the bowl touch the water). Add the chocolate and stir until melted.
- If the chocolate seems too thick for dipping, stir in 1 teaspoon of neutral oil (like vegetable or coconut oil) to loosen it slightly and give a glossy finish.
Dip the turtles in chocolate
- Use a fork or dipping tool to lift each chilled caramel-coated cluster and lower it into the melted chocolate.
- Turn to coat the entire cluster. Tap the fork on the edge of the bowl to let excess chocolate drip off.
- Place the coated turtle back on the parchment-lined sheet.
- If you want a decorative touch, drizzle a little white chocolate back and forth over the set chocolates or sprinkle a tiny bit of sea salt while the chocolate is still wet.
Let the chocolate harden
- Let the turtles sit at room temperature until the chocolate sets, or speed it up by returning them to the refrigerator for 15–20 minutes.
- Once firm, store them in an airtight container. They keep well for about 1–2 weeks at cool room temperature or up to a month refrigerated (chill makes the caramel firmer).
Serving and storing tips
- Bring refrigerated turtles to room temperature for a few minutes before serving for the softest bite.
- For gift-giving, place them in paper candy cups or stack layers separated by parchment paper in a tin.
- If you need to soften the caramel a bit on a cold day, let them sit at room temp for 10–15 minutes before unwrapping or serving.
Common Mistakes to Avoid
Below are three of the most common pitfalls, with practical tips so your turtles turn out beautiful every time.
Using too-high heat for caramel
A lot of home cooks try to rush the caramel by turning the heat up too high. That’s when caramel can scorch or separate, leaving grainy texture. Use low heat and steady stirring. If your caramel seems grainy, add a splash of cream and stir gently to smooth it out. Patience here is your friend.
Dipping while caramel is too warm
If you dip your clusters while the caramel is still very soft, the chocolate won’t stick well and the caramel can ooze or pull away. Chill the caramel-coated clusters until they’re firm before dipping. A solid 30 minutes in the fridge usually does the trick.
Overheating or seizing the chocolate
Chocolate can seize when it gets too hot or when water drops into melted chocolate. Heat in short bursts if using the microwave and stir often. For a rescue, if your chocolate does seize, stir in a small amount of warm vegetable oil or cocoa butter to bring it back together. Keep a clean, dry bowl and utensils to prevent steam or water from touching the chocolate.
Serving Suggestions for Homemade Chocolate Turtles
These turtles are lovely on their own, but here are three ways to present them and pair them for different occasions.
Cozy coffee or tea pairing
Serve a plate of turtles alongside a steaming mug of coffee or tea. The richness of the chocolate and caramel pairs especially well with a medium roast coffee, chai, or a nutty black tea. For a cozy afternoon, set out small plates and let guests take one or two with their hot drink.
Dessert platter and party centerpiece
Make a dessert platter with a mix of turtles, shortbread cookies, and fresh fruit like apple slices or orange segments. Place turtles in small paper cups and add sprigs of rosemary or mint for a seasonal touch. This works great for holiday gatherings or potlucks.
Gift boxes and holiday plates
Homemade turtles make a thoughtful, edible gift. Layer them in a small box with parchment separators or place a dozen in a clear cellophane bag tied with twine. Include a small note about flavors (milk chocolate, sea salt, coconut, etc.). They’re warm, personal gifts that show you spent time making something special.
Conclusion
You’ve just learned an easy, cozy method to make Homemade Chocolate Turtles that are truly beginner-friendly. The steps—toast nuts, melt caramel, form clusters, chill, then dip in chocolate—are simple and forgiving when you take your time. You can customize flavors, swap nuts, or add toppings like sea salt or coconut. Best of all, this recipe gives you small, beautiful treats that feel both timeless and personal.
If you’d like to see a different take or compare techniques, check out this Homemade Chocolate Turtles – Tastes Better from Scratch.
FAQs About Homemade Chocolate Turtles
Q: How long do Homemade Chocolate Turtles last at room temperature?
A: Homemade Chocolate Turtles will keep at cool room temperature in an airtight container for about 1–2 weeks. If your home is warm, store them in the refrigerator to prevent the chocolate from softening; they’ll keep up to a month chilled.
Q: Can I make Homemade Chocolate Turtles without dairy?
A: Yes. To make dairy-free Homemade Chocolate Turtles, use dairy-free caramel candies or a coconut-cream-based caramel and swap the milk chocolate for a dairy-free chocolate. For ideas on non-dairy chocolate options, this guide on dairy-free chocolate choices is helpful.
Q: What’s the best way to prevent caramel from sticking to my hands when making Homemade Chocolate Turtles?
A: Work with a small spoon or use silicone-tipped tools to place caramel, and chill the turtles before handling further. If you’re forming clusters by hand, lightly oil your fingers or use a piece of parchment to kind of press clusters without touching the hot caramel.
Q: Can I use other nuts instead of pecans for Homemade Chocolate Turtles?
A: Absolutely. Walnuts, almonds, or hazelnuts all work well. Toast them briefly to enhance their flavor. Keep in mind that different nuts have different shapes, so your final turtle appearance may vary.
Q: Can I prepare Homemade Chocolate Turtles ahead of time for a party?
A: Yes. You can make them up to a week in advance and store in an airtight container in a cool place or refrigerated if your home is warm. If giving as gifts, make them the day before or two days ahead to keep them fresh and pretty.
Thank you for reading—now grab your pecans and let’s make some cozy chocolate turtles.
Print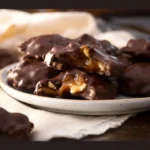
Homemade Chocolate Turtles
- Total Time: 45 minutes
- Yield: 24 turtles 1x
- Diet: Vegetarian
Description
A cozy and forgiving recipe for homemade chocolate turtles, combining crunchy pecans, rich caramel, and smooth chocolate.
Ingredients
- 1 cup pecans (about 4–5 ounces)
- 1 cup caramel candies (about 10–12 individually wrapped caramels)
- 1 tablespoon butter
- 2 cups milk chocolate chips
- Parchment paper or silicone baking mat
- Baking sheet
- Optional: Sea salt flakes, toasted coconut flakes, chopped pretzels, white chocolate chips, almonds, walnuts, or hazelnuts
Instructions
- Preheat your oven to 350°F (175°C) and spread pecans on a baking sheet. Toast for 5–7 minutes until golden and fragrant.
- Unwrap the caramel candies and place them with the butter in a small saucepan. Heat over low heat until smooth, stirring constantly.
- Line a baking sheet with parchment paper. Form clusters using 3–4 pecan halves and spoon warm caramel over each cluster to coat.
- Chill the clusters in the refrigerator for about 30 minutes until the caramel is set.
- Melt the chocolate chips either in the microwave or a double boiler, stirring until smooth. If too thick, add 1 teaspoon of neutral oil.
- Dip each caramel-coated cluster into melted chocolate, coat, and place back on the lined sheet. Optional: Drizzle with white chocolate and sprinkle with sea salt.
- Let the chocolate harden at room temperature or refrigerate for 15–20 minutes. Store in airtight containers.
Notes
Feel free to customize with different nuts or toppings. Always read labels if you’re cooking for someone with allergies.
- Prep Time: 15 minutes
- Cook Time: 30 minutes
- Category: Dessert
- Method: Candy Making
- Cuisine: American
Nutrition
- Serving Size: 1 turtle
- Calories: 150
- Sugar: 20g
- Sodium: 10mg
- Fat: 7g
- Saturated Fat: 4g
- Unsaturated Fat: 2g
- Trans Fat: 0g
- Carbohydrates: 22g
- Fiber: 1g
- Protein: 2g
- Cholesterol: 5mg
Keywords: chocolate turtles, candy, dessert, homemade, pecans, caramel