Last updated on January 6, 2026
Start with one short paragraph without the title Introduction, that Include these parts in a warm, inviting tone:
Choose one of the following for each post: (A nostalgic or cozy memory related to the dish OR A funny, relatable moment from trying to make it the first time OR A question that hits the reader’s craving or curiosity)
Describe a common beginner challenge related to the recipe (e.g., fear of ruining the dish, complicated steps, not knowing substitutions, etc.).
Reassure the reader that this post will make it simple, stress-free, and totally doable—even if it’s their first try.
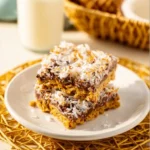
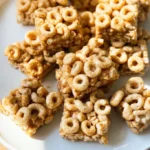
I still remember the first time I made these Magic Bars — I was nervously trying to press the crust evenly while my cat inspected every ingredient like it had been sent specifically for him. If you’re new to baking and worry about getting sticky layers right, or guess at substitutions and end up frustrated, you’re not alone. I promise this recipe is forgiving, simple, and cozy to make; I’ll walk you through each step so it feels stress-free and completely doable, even on your very first try. While you wait for them to cool, you can flip through an easy snack idea like easy snack bars I love — they’re great for busy days.
- Why I Love This Recipe of Magic Bars
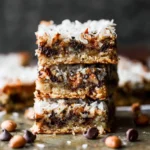
There’s something about Magic Bars that feels like a warm blanket — simple, sweet, and instantly nostalgic. For me, they are winter holiday kitchens, neighbors dropping by with a plate, and the sound of the sweetened condensed milk bubbling and browning at the edges of the pan. They’re a kind of all-in-one dessert: crust, coconut, chips, and a glossy top created by one humble can of sweetened condensed milk. That ease is everything. If you’re a beginner cook, you’ll especially appreciate how little hands-on time these take and how forgiving the layers are. You don’t need precise piping or perfect folding skills — you layer, pour, and bake. The result is always comforting, rich, and crowd-pleasing.
Beyond nostalgia, these bars are wonderful because they’re customizable. Want them more chocolatey? Add extra chocolate chips. Prefer a nuttier bite? Fold in chopped nuts. Need to bring something to a last-minute gathering? They travel well and can be cut into small squares for a quick dessert tray. I also love that these bars require pantry-friendly ingredients and minimal equipment, so they are perfect for weekday baking or sharing with friends.
- Ingredients You’ll Need for Magic Bars
Essentials
- 1 cup graham cracker crumbs — This forms the base. You can buy crumbs or crush whole graham crackers in a bag or food processor until fine.
- 1/2 cup unsalted butter, melted — Helps bind the crust and gives a golden, crisp finish.
- 1 cup sweetened shredded coconut — Adds chew and flavor. You can use sweetened or unsweetened depending on how sweet you want the bars.
- 1 cup chocolate chips — Classic semisweet or milk chocolate both work well.
- 1 cup butterscotch chips — These add a buttery sweetness that balances the chocolate. If you prefer, use white chocolate or caramel chips.
- 1 can (14 oz) sweetened condensed milk — This is the “magic” — it bakes into a glossy, slightly caramelized layer that holds everything together.
Optional add-ons
- 1 cup chopped nuts (walnuts, pecans, or almonds) — For crunch and a toasty flavor.
- 1/2 cup dried fruit (raisins, chopped dates, or dried cranberries) — Adds chewy tartness.
- A pinch of flaky sea salt on top — Brightens flavors and balances the sweetness.
- A few teaspoons of instant coffee or espresso powder — Deepens the chocolate flavor without tasting like coffee.
- A sprinkle of cinnamon or a small handful of oats — For a breakfast-bar twist.
Substitutions and Shortcuts
- Graham cracker crumbs: Substitute crushed digestive biscuits or plain shortbread cookies for a different flavor. Gluten-free graham-style crackers work too.
- Butter: Use salted butter and reduce added salt elsewhere, or swap with coconut oil or a vegan butter for a dairy-free version. If you use coconut oil, your crust will be a bit softer.
- Shredded coconut: Unsweetened coconut reduces overall sweetness. Toasting the coconut briefly in a dry pan before layering adds extra flavor.
- Chocolate and butterscotch chips: Mix and match chips — dark chocolate, white chocolate, toffee bits, or even peanut butter chips.
- Sweetened condensed milk: For a dairy-free option, use sweetened condensed coconut milk or a store-bought vegan condensed milk. You can also make a quick version at home by simmering evaporated milk with sugar until thick, but that takes extra time.
- Make it quicker: Use a pre-lined or greased 9×13-inch baking dish and press the crumb mixture directly into it. Using pre-crushed crumbs and measured toppings saves a lot of prep time.
Tips on buying and prep
- Buy chips in bulk if you plan to make these often; they’re one of the main flavor components.
- Let the butter cool slightly after melting so it doesn’t melt the coconut or chips when you layer them.
- If you want a cleaner slice, chill the baked bars thoroughly and use a sharp knife warmed briefly under hot water and dried.
A note on dietary concerns
- This ingredient list contains dairy (butter, sweetened condensed milk, and chocolate chips in many cases). If you need vegan or dairy-free Magic Bars, use vegan butter, sweetened condensed coconut milk, and dairy-free chips.
- None of these ingredients contain pork or alcohol.
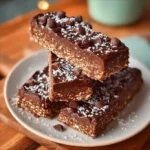
If you want another rich, layered bar idea with a slightly different flavor profile, you might enjoy this take on 7-layer Reeses bars I use when I want a peanut butter-chocolate twist: gooey chocolate peanut butter bars recipe.
- How to Make Magic Bars Step-by-Step
Before we start, preheat your oven to 350°F (175°C). A hot oven helps the condensed milk caramelize lightly and sets the layers properly.
Step 1 — Prepare your pan
- Grease a 9×13-inch baking dish with butter or nonstick spray. If you prefer easier removal and cleanup, line the dish with parchment paper, leaving a bit of overhang on two sides so you can lift the whole slab out after it cools.
Step 2 — Make the crust
- In a medium bowl, combine 1 cup of graham cracker crumbs and 1/2 cup melted unsalted butter. Stir until the crumbs are evenly moistened and look like wet sand.
- Press this mixture firmly and evenly into the bottom of your prepared 9×13-inch dish. I use the bottom of a glass or a flat measuring cup to get a compact, even layer. Don’t worry if it’s not perfect — a firm press will help it bake crisp and hold together when cutting.
Step 3 — Layer the coconut
- Evenly spread 1 cup of sweetened shredded coconut over the crust. Try to get it into a single, even layer — too much in one spot can create a soggy section, while too little in another can leave air pockets. If you like toasted coconut flavor, spread it on a baking sheet and toast in the oven for 5 minutes before layering.
Step 4 — Add the chips and extras
- Sprinkle 1 cup chocolate chips and 1 cup butterscotch chips evenly over the coconut. If you’re adding chopped nuts or dried fruit, scatter them now so they nestle into the coconut layer. I like to press the larger pieces in gently so they don’t float when the condensed milk is poured.
Step 5 — Pour the sweetened condensed milk
- Slowly pour the entire 14-ounce can of sweetened condensed milk over the top, aiming for even coverage. It won’t cover the chips completely, but it should flow into the nooks and glue everything together. Try to pour in a couple of thin streams across the pan rather than dumping it in one spot — this helps avoid pooling in the center.
Step 6 — Bake until golden
- Place the pan in your preheated oven and bake for 25–30 minutes. You’re looking for light golden edges and a set, glossy surface. The condensed milk will puff and brown slightly at the edges; that’s when those caramel notes develop. If your oven runs hot, check at 22–24 minutes to be safe.
Step 7 — Cool fully before cutting
- This is the hardest part: let the pan cool completely on a wire rack. The layers set as they cool, and cutting warm bars can make them fall apart. For cleaner slices, refrigerate the pan for an hour after it cools to room temperature. Use a sharp knife and wipe it between cuts for neat squares.
Bonus tips during baking
- Rotate the pan halfway through baking if your oven has hot spots.
- If the top is browning too fast, tent the pan loosely with foil for the last 5–10 minutes.
- For bars that hold together better, chill the whole pan for at least an hour before slicing.
- Common Mistakes to Avoid
Even though this recipe is forgiving, there are a few missteps I see often. Below I break down three common mistakes and how to avoid them so you get consistent, delicious results.
Overbaking and Dry Bars
One of the most common mistakes is leaving the bars in too long. The crust can dry out and the condensed milk can harden if baked beyond the right color. Watch for a light golden edge and a glossy top — once you see that, pull the pan out. Remember, bars continue to set as they cool, so a slightly jiggly center is okay when they first come out.
Uneven Topping Distribution
It’s tempting to dump chips and coconut quickly, but uneven distribution leads to spots that are heavy with chips and others that are bare. Measure out your chips into bowls and sprinkle in a grid pattern, so every area of the pan gets some of each topping. Press larger add-ins gently into the coconut so they won’t float when you pour the condensed milk.
Cutting Too Soon / Cutting Without Chilling
Cutting into the bars before they’re fully set is another frequent error. The sweetened condensed milk needs time to cool and bind the layers. If you cut while warm, you’ll get messy squares and layers that slide apart. Let the pan cool completely at room temperature, then chill for at least 30–60 minutes for cleaner slices — and use a warm, clean knife for the smoothest cuts.
- Serving Suggestions for Magic Bars
These bars are wonderful on their own, but a few serving ideas can elevate them into a cozy dessert or a shareable treat. Below are three ways I like to serve them, whether for snacking, gifting, or dessert.
For a cozy afternoon treat
Serve a warm square with a small scoop of vanilla ice cream and a sprinkle of flaky sea salt. The contrast of warm, chewy bar and cold ice cream is delightful. Pair with a cup of strong coffee or a milky tea for a simple, comforting pairing.
For a dessert plate or party
Cut these into bite-size squares and arrange on a platter with fresh berries, a bowl of whipped cream, and a few plain cookies. The mixture of textures and balances of sweet and tart will make the bars feel more gourmet, and guests can pick their perfect bite.
Pack for potlucks or gifts
These bars travel well when packed in an airtight container with layers separated by parchment. For homemade gifts, stack them in a decorated box with tissue paper. They stay fresh for several days at room temperature or longer in the fridge. If you’re mailing treats, freeze the bars first for sturdier shipping and wrap each piece individually.
Additional serving notes
- If you want a cleaner presentation, trim the edges before cutting into squares.
- Sprinkle chopped toasted nuts or a light dusting of cocoa powder just before serving for a finishing touch.
- Keep them at room temperature for the best chew; refrigeration makes them denser but helps them slice neatly.
Conclusion
You just learned a simple, forgiving recipe for Magic Bars that’s perfect for beginners and busy home bakers. With a buttery graham base, chewy coconut, two kinds of chips, and that sweet, glossy top from sweetened condensed milk, these bars are cozy, customizable, and crowd-pleasing. Don’t be afraid to experiment with mix-ins, and remember: press the crust firmly, distribute toppings evenly, and let the pan cool fully before cutting. If you’d like to compare this version with another classic take, I checked the original inspiration from the recipe at the Urban Bakes site here: Magic Bars | URBAN BAKES. Try the bars once, and I’m betting they’ll become a staple in your baking rotation.
FAQs About Magic Bars
Q1: Can I freeze Magic Bars?
A1: Yes, Magic Bars freeze very well. Cool the pan completely, then cut into squares or wrap the whole slab tightly in plastic wrap and foil. For individual squares, wrap each piece in plastic and place in a freezer-safe container. They’ll keep well for up to 3 months. Thaw in the refrigerator or at room temperature before serving.
Q2: Are Magic Bars the same as 7-layer bars?
A2: Magic Bars are very similar to 7-layer bars; they share the same idea of layered ingredients and sweetened condensed milk on top. The exact mix of layers can vary, but both are sweet, layered bar desserts. People often use the names interchangeably depending on family tradition.
Q3: Can I make Magic Bars without sweetened condensed milk?
A3: You can substitute sweetened condensed coconut milk for a dairy-free version, or make a homemade condensed milk by simmering evaporated milk and sugar until thick, but this takes extra time. The canned sweetened condensed milk is the quickest and most consistent option.
Q4: How do I get Magic Bars to cut neatly?
A4: The key is cooling. Let the baked pan cool completely to room temperature, then chill in the fridge for at least 30–60 minutes. Use a sharp knife and wipe it clean between cuts. For the sharpest slices, run the knife under hot water, dry it, and then slice.
Q5: Can I make Magic Bars nut-free?
A5: Absolutely. Simply omit nuts or replace them with seeds (like toasted pumpkin or sunflower seeds) if you need some crunch but must avoid tree nuts. Make sure any chips or packaged add-ins are labeled nut-free if you are serving people with allergies.
Magic Bars
- Total Time: 45 minutes
- Yield: 16 servings 1x
- Diet: Vegetarian
Description
Cozy and nostalgic Magic Bars layered with a buttery graham cracker crust, sweetened condensed milk, chocolate chips, and coconut.
Ingredients
- 1 cup graham cracker crumbs
- 1/2 cup unsalted butter, melted
- 1 cup sweetened shredded coconut
- 1 cup chocolate chips
- 1 cup butterscotch chips
- 1 can (14 oz) sweetened condensed milk
- 1 cup chopped nuts (optional)
- 1/2 cup dried fruit (optional)
- A pinch of flaky sea salt (optional)
- A few teaspoons of instant coffee or espresso powder (optional)
- A sprinkle of cinnamon or oats (optional)
Instructions
- Preheat your oven to 350°F (175°C).
- Grease a 9×13-inch baking dish or line it with parchment paper.
- In a medium bowl, combine graham cracker crumbs and melted butter. Press mixture into the bottom of the baking dish.
- Evenly spread shredded coconut over the crust.
- Sprinkle chocolate chips and butterscotch chips evenly over coconut.
- Pour sweetened condensed milk over the layers evenly.
- Bake for 25–30 minutes until golden around the edges.
- Cool completely on a wire rack before cutting into squares.
Notes
These bars are customizable; feel free to mix in your favorite chips or nuts. For a cleaner slice, chill the bars after cooling.
- Prep Time: 15 minutes
- Cook Time: 30 minutes
- Category: Dessert
- Method: Baking
- Cuisine: American
Nutrition
- Serving Size: 1 square
- Calories: 250
- Sugar: 23g
- Sodium: 150mg
- Fat: 12g
- Saturated Fat: 7g
- Unsaturated Fat: 3g
- Trans Fat: 0g
- Carbohydrates: 30g
- Fiber: 2g
- Protein: 3g
- Cholesterol: 15mg
Keywords: magic bars, dessert, easy baking, sweet treats, holiday desserts