Last updated on August 7, 2025
As the leaves begin to turn and a crispness fills the air, I can’t help but think about the flavors of fall. One of my fondest memories revolves around creating mini pumpkin pies to share with friends and family. The first time I made them was this delightful blend of excitement and nerves. I remember worrying about the crust holding up and the filling not being too runny. But when I took that first bite, I knew I was onto something special.
If you’ve ever been intimidated by baking pies from scratch or just unsure where to start, I assure you that this recipe for mini pumpkin pies is simple, stress-free, and totally doable—even if it’s your first time getting your hands floury in the kitchen. Let’s dive into this cozy fall favorite!
Table of Contents
Why I Love This Recipe of Mini Pumpkin Pies
What makes these mini pumpkin pies special for me is the warmth they bring during this season. They’re perfect bite-sized indulgences that hold the spirit of sharing and family gatherings. This recipe strikes the perfect balance between being easy enough for beginner cooks while also allowing seasoned bakers to impress friends with a homemade twist.
I love that this recipe provides an opportunity for anyone to connect with the season through the scents of cinnamon and nutmeg that waft through your home while baking. Additionally, you get the emotional comfort that comes with homemade treats—every little pie is a reminder of family, togetherness, and the efficacy of a little love stirred into everything you make.
Ingredients You’ll Need for Mini Pumpkin Pies
Here’s a peek at all the ingredients that are either essential or optional for whipping up these delightful mini pumpkin pies:
Print
Mini Pumpkin Pies
- Total Time: 3 hours 43 minutes (includes chilling)
- Yield: 18 mini pies 1x
- Diet: Vegetarian
Description
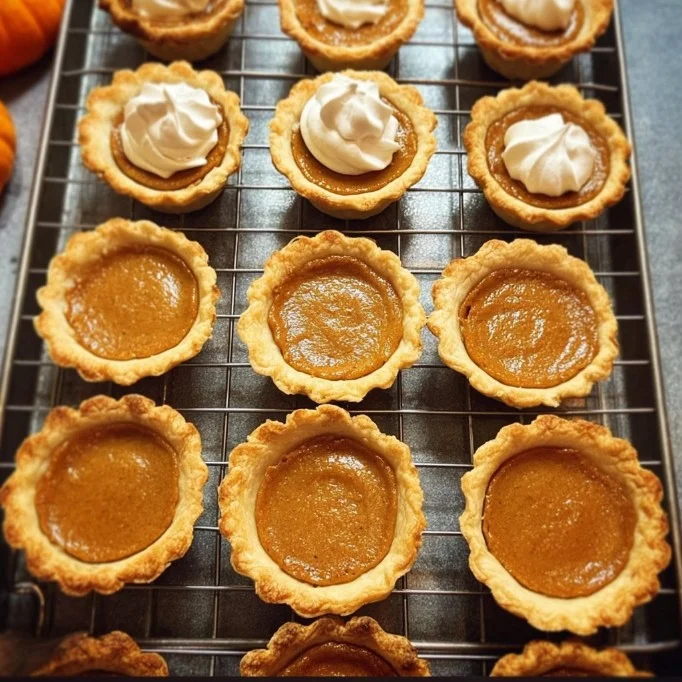
Mini Pumpkin Pies are bite-sized versions of the classic fall dessert. With a flaky crust and creamy pumpkin filling, they’re perfect for parties, Thanksgiving gatherings, or anytime you want a sweet seasonal treat in a perfectly portioned size.
Ingredients
- Crust:
- 2 9-inch unbaked pie crusts (store-bought or homemade)
- Filling:
- 1/3 cup brown sugar
- 2 tablespoons granulated sugar
- 1 1/2 teaspoons pumpkin pie spice
- 1/4 teaspoon salt
- 1 cup canned pumpkin puree (not pumpkin pie filling)
- 3/4 cup evaporated milk
- 1 large egg, lightly beaten
- 1/2 teaspoon vanilla extract
- Toppings (optional):
- Homemade whipped cream
- Chocolate shavings or drizzle
- Chopped pecans or walnuts
- Coconut cream (non-dairy option)
Instructions
- Preheat Oven: Preheat your oven to 400°F (200°C).
- Prepare Crusts: On a lightly floured surface, roll out the pie crusts to 1/8-inch thickness. Use a 3 1/2-inch round cutter to cut out 18 circles. Re-roll scraps as needed.
- Fit into Muffin Pans: Gently press each dough circle into a standard 12-count muffin tin slot. Chill in the fridge while preparing the filling.
- Make Filling: In a mixing bowl, whisk together the brown sugar, granulated sugar, pumpkin pie spice, and salt. Then add pumpkin puree, evaporated milk, beaten egg, and vanilla extract. Whisk until smooth.
- Fill the Crusts: Retrieve the muffin pans and spoon approximately 2 tablespoons of filling into each crust.
- Bake: Bake for 16–20 minutes, or until the crust is golden and the filling is set but slightly puffed.
- Cool: Allow the mini pies to cool in the muffin pan on a wire rack for 30 minutes.
- Chill: Carefully remove the pies from the muffin pans and chill in the refrigerator for at least 3 hours, preferably overnight.
- Serve: Top with whipped cream or your favorite toppings and serve chilled or at room temperature.
Notes
- No Pumpkin Pie Spice? Use equal parts cinnamon and nutmeg, with a pinch of ginger and cloves.
- Dairy-Free Option: Substitute evaporated milk with coconut milk or a non-dairy alternative.
- Crust Alternative: Use a graham cracker crust for a quicker, crunchier base.
- Make Ahead: These pies store well in the fridge for 3–4 days, making them a great make-ahead dessert.
- Prep Time: 25 minutes
- Cook Time: 18 minutes
- Category: Dessert
- Method: Baking
- Cuisine: American
Nutrition
- Serving Size: 1 mini pie
- Calories: 120
- Sugar: 8g
- Sodium: 90mg
- Fat: 6g
- Saturated Fat: 2g
- Unsaturated Fat: 3g
- Trans Fat: 0g
- Carbohydrates: 14g
- Fiber: 1g
- Protein: 2g
- Cholesterol: 15mg
Keywords: mini pumpkin pies, fall dessert, Thanksgiving treats, pumpkin pie bites, muffin tin pie recipe
Essentials
2 9-inch unbaked pie crusts (homemade or store-bought)
- The flaky, buttery crust is the foundation of your mini pies. If you’re short on time, store-bought crust works perfectly. If you want to dive into the world of homemade pastry, I encourage you!
1/3 cup brown sugar
- This adds warmth and a hint of molasses flavor to your pie filling.
2 tablespoons granulated sugar
- It balances the taste and sweetness of the brown sugar.
1 1/2 teaspoons pumpkin pie spice
- The quintessential fall flavor blend! It usually contains cinnamon, nutmeg, ginger, and cloves.
1/4 teaspoon salt
- Enhances all the flavors and balances sweetness.
1 cup canned pumpkin puree (not pumpkin pie filling)
- Make sure to grab pure pumpkin puree for the best flavor.
3/4 cup evaporated milk
- Adds creaminess to your filling and keeps the texture smooth.
1 large egg (lightly beaten)
- Acts as a binder and gives structure to your mini pies.
1/2 teaspoon vanilla extract
- Because vanilla makes everything better, especially in baked goods.
Homemade whipped cream (for topping)
- A touch of whipped cream elevates these pies to a truly delightful dessert.
Optional Add-Ons
- Chocolate shavings or drizzle: For a twist on the classic, try garnishing with chocolate.
- Chopped nuts: Add pecans or walnuts for an extra crunch on top.
- Coconut cream: A wonderful non-dairy alternative to top your pies with.
Substitutions and Shortcuts
- If you don’t have pumpkin spice, you can make your own using equal parts cinnamon and nutmeg with a dash of ginger and cloves.
- For a dairy-free option, consider replacing the evaporated milk with coconut milk or a non-dairy milk of your choice.
- You can substitute the pie crust with a graham cracker crust for a different texture and flavor for a quick twist.
How to Make Mini Pumpkin Pies Step-by-Step
Making mini pumpkin pies is a rewarding experience that you can tackle with ease, step by step. Here’s how to do it:
Step 1: Preheat and Prepare
Begin by preheating your oven to 400 degrees Fahrenheit. This step is crucial as it ensures your mini pies bake evenly.
On a lightly floured surface, roll out your pie crusts until they reach 1/8-inch thickness. Using a 3 1/2-inch cookie cutter or a cup, cut out 18 circles from your dough. If you have scraps, don’t worry! Simply re-roll the leftover dough and cut out more circles until you have enough.
Step 2: Fit the Crusts
Now, you need to place each round of pie crust into the slots of two standard 12-count muffin pans. Take your time to gently press the dough down and around the sides. The goal is to have them fit snugly in each cavity. This little task can be a bit fiddly, but it’s worth the effort!
Once you’ve set them all, pop the muffin pans into the refrigerator. Chilling the dough will help maintain its shape while we prepare the filling.
Step 3: Whisk Together the Filling
In a mixing bowl, whisk together the brown sugar, granulated sugar, pumpkin pie spice, and salt. Make sure it’s well combined before whisking in the pumpkin puree, evaporated milk, the lightly beaten egg, and vanilla extract. Whisk until everything is fully blended and smooth—all those flavors come together beautifully at this stage!
Step 4: Fill the Crusts
Now, retrieve your muffin pan from the fridge. Carefully distribute the pumpkin pie filling evenly between the crusts. Each crust should get about 2 tablespoons of filling. Be gentle to avoid any spills!
Step 5: Bake
It’s time to bake! Place the pans in the preheated oven and bake for 16-20 minutes. Keep a keen eye on them; you’re looking for slightly puffed-up tops and a light golden color on the crust. You don’t want to burn these lovely little pies!
Once baked to perfection, remove them from the oven and allow them to cool on a wire rack for about 30 minutes. This cooling process is important, so the pies can set properly before being taken out of the pans.
Step 6: Chill
After cooling, it’s essential to carefully remove each mini pie from the muffin pans and place them on a wire rack to cool completely. Once they’re at room temperature, transfer them to an airtight container and find a spot in the fridge to chill for at least three hours or ideally overnight. This helps develop the flavors and texture.
Step 7: Serve
Once chilled, gently remove the mini pumpkin pies from the pans. You can serve them chilled or at room temperature, garnished simply or with your homemade whipped cream on top.
Common Mistakes to Avoid When Making Mini Pumpkin Pies
Not Chilling the Dough
One common mistake is skipping the chilling step for the dough. Chilling is essential for a flaky crust because it keeps the fat solid and when baked, results in a beautifully flaky texture.
Overfilling the Pie Crusts
While it can be tempting to fill the crusts to the brim, too much filling can lead to spills and soggy bottoms. Remember: about 2 tablespoons per crust is key for the perfect bite-sized treat.
Not Pre-Baking or Blind Baking
For a crispy texture, you can consider pre-baking the crusts for about 5-7 minutes before adding the filling. This step is especially helpful if you find that your crusts tend to get too soggy.
Forgetting to Adjust Baking Time
Every oven is different. Make sure to do the toothpick test to check if the filling is set if you’re unsure. If the mini pies still appear wobbly in the middle, they may need a few more minutes.
Serving Suggestions for Mini Pumpkin Pies
Plain and Simple
These mini pumpkin pies are delightful on their own, showcasing the spice and pumpkin flavors beautifully. Simply place them on a platter for an easy dessert spread.
Topped with Whipped Cream
Adding a dollop of homemade whipped cream elevates these pies to a new level of deliciousness. Whip some heavy cream with a bit of sugar and vanilla extract until light and fluffy.
With a Drizzle of Caramel
For a sweet finishing touch, drizzle caramel sauce on top of the whipped cream. The combination of rich caramel and pumpkin pie is truly heavenly.
Pair with Coffee or Tea
Serve your mini pies alongside a warm cup of coffee or chai tea. The spices in both the drink and the dessert complement each other beautifully, creating a perfect moment of cozy indulgence.
Pro-Level Tips for When You’re Ready
Experiment with Spices
Once you feel comfortable with the basic recipe, consider experimenting with different spices or adding a little zest from an orange or lemon for a fresh twist.
Use Fresh Pumpkin
If you’re feeling adventurous, try making your pure pumpkin puree from fresh pumpkin. Roast them, scoop out the insides, and blend until smooth. You’ll be amazed by the difference in flavor!
Double the Batch
These little delights go fast, so make a double batch if you’re planning to share them at gatherings or special events. They freeze beautifully, too—just place them in an airtight container, and they will keep for up to a month.
Personal Touches
Feel free to put your own spin on the recipe—whether through coconut milk, alternative sweeteners, or adding your favorite nuts, the possibilities are endless.
Conclusion & Next Steps
It’s easier than it looks to make these mini pumpkin pies, and you can customize them in lots of fun and delicious ways! They are cozy, classic, and completely beginner-approved. So, whether you’re hosting a gathering, bringing a dish to share, or simply indulging at home, these little pies are bound to bring warmth and smiles.
Now that you’ve got all the steps and tips, I invite you to gather your ingredients and give these a try. Embrace the cozy vibes of fall, and whip up a batch of these mini pumpkin pies!
Looking for more delicious recipes? Follow us on Pinterest and Facebook!
FAQs About Mini Pumpkin Pies
Can I use fresh pumpkin instead of canned?
Yes, you can use fresh pumpkin! Just make sure to roast it and blend it into a smooth puree before using it in your recipe.
How long do mini pumpkin pies last in the fridge?
Mini pumpkin pies will keep well in the fridge for about 3-4 days when stored in an airtight container.
Can I make mini pumpkin pies ahead of time?
Absolutely! You can prepare them a day before serving. Just be sure to chill them as instructed for the best flavor.
What should I serve with mini pumpkin pies?
They are delicious on their own, but pairing them with whipped cream, caramel drizzle, or a warm beverage like coffee or tea makes for an inviting treat.
Can I freeze mini pumpkin pies?
Yes, you can! Freeze them in an airtight container, and they will keep well for up to a month. Just thaw in the fridge overnight before serving.