Last updated on July 29, 2025
Do you remember the last time you indulged in a frozen treat that was both vibrant and nostalgic? For me, it was a warm summer evening, sitting on the porch while my kids squealed with delight over a bowl of colorful, cookie-studded ice cream. It was that moment that brought me back to my own childhood, where every spoonful was a journey of joy and excitement. If you’re an ice cream lover with a hint of nostalgia in your heart, I’ve got a special treat for you: the Ninja Creami Cookie Monster Ice Cream recipe.
I know, I know… making ice cream might seem daunting, particularly if you’re a beginner cook. The thought of whipping up a creamy, dreamy dessert can spark a little fear—a fear of ruining the dish, forgetting an ingredient, or even making it too icy. But don’t you worry! This post will guide you step-by-step through a simple, stress-free process. By the time you’re done reading, you’ll feel totally confident to tackle this recipe, even if it’s your first time. Let’s dive into what makes this vibrant blue dessert so special.
Table of Contents
Why I Love This Recipe of Ninja Creami Cookie Monster Ice Cream Recipe
What makes this Ninja Creami Cookie Monster Ice Cream recipe particularly special for me is how it brings families together. Whenever I make this ice cream, I get to watch the joy on my kids’ faces as they dig into the bright blue treat, a burst of color and fun reminiscent of those classic childhood desserts we all cherished. Plus, it’s incredibly easy to whip up!
For beginner cooks, this recipe is a fantastic introduction to making homemade ice cream. You don’t need an ice cream maker or hours of churning; just a trusty blender and a Ninja Creami. You’ll be amazed at how simple it is to create a creamy, luxurious dessert that combines two beloved flavors—Oreo cookies and chocolate chip cookie goodness. So, let’s transform your kitchen into a mini ice cream parlor!
Ingredients You’ll Need for Ninja Creami Cookie Monster Ice Cream Recipe
Let’s dive into the ingredients that will make this delightful treat possible. You’ll need a few staples, and a couple of optional add-ons for extra flavor.
Print
Ninja Creami Cookie Monster Ice Cream
- Total Time: 24 hours 10 minutes
- Yield: 4 servings 1x
- Diet: Vegetarian
Description
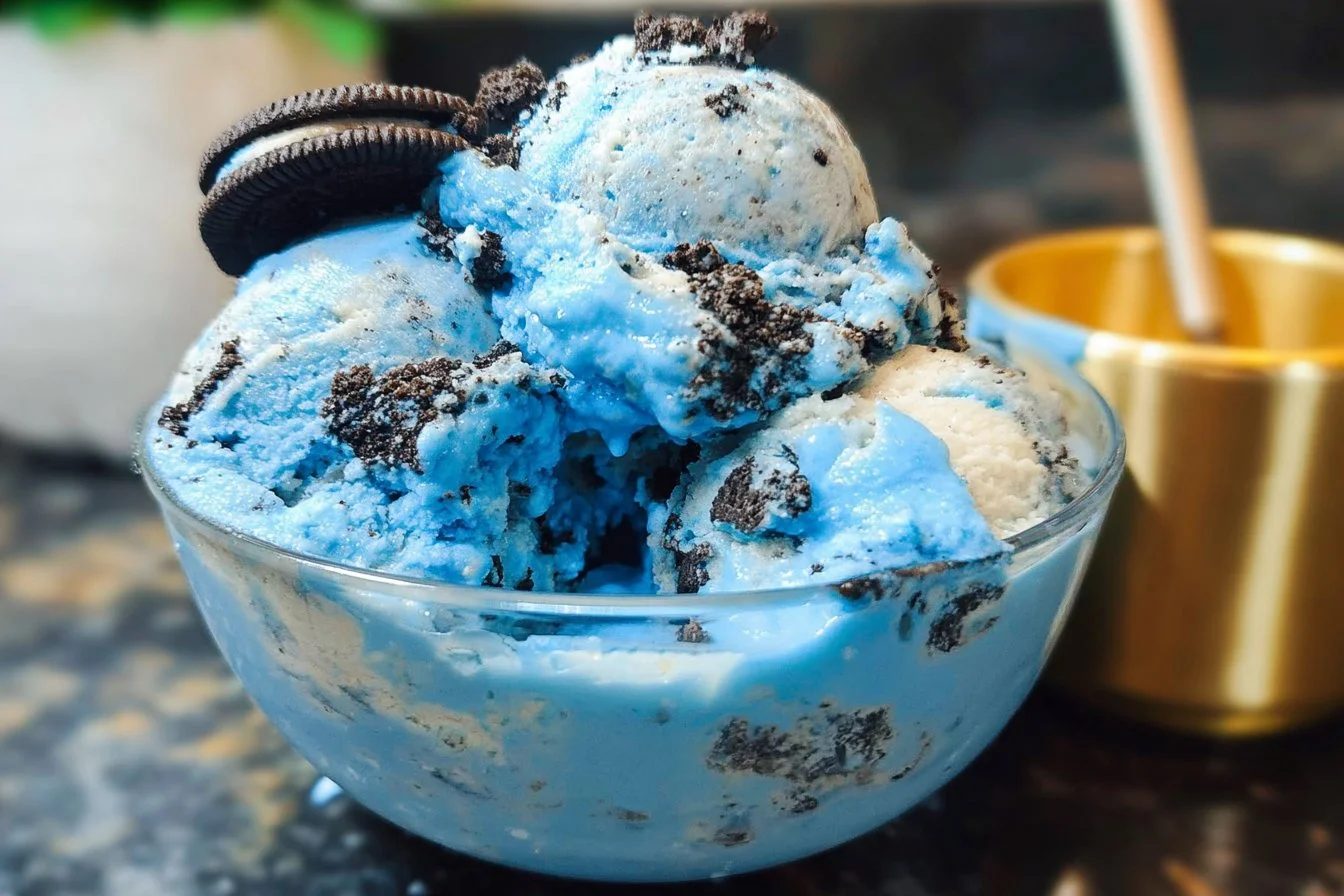
Ninja Creami Cookie Monster Ice Cream is a vibrant blue, cookie-stuffed frozen treat made with half and half, sweetened condensed milk, cream cheese, and loaded with Oreos and chocolate chip cookies. Perfect for kids and nostalgic adults alike!
Ingredients
- 2 cups half and half
- 1/2 cup sweetened condensed milk
- 2 teaspoons vanilla extract
- 1/2 cup cream cheese
- 1 teaspoon blue food coloring (adjust to preference)
- 3 Oreo cookies, crushed
- 3 chocolate chip cookies, crumbled
- Optional: extra cookie crumbles, chocolate syrup, sprinkles
Instructions
- In a blender, combine half and half, sweetened condensed milk, vanilla extract, cream cheese, and blue food coloring. Blend until completely smooth.
- Pour the blended mixture into a Ninja Creami pint container. Seal and freeze for 24 hours.
- After freezing, insert the pint into the Ninja Creami and process using the “Lite Ice Cream” setting.
- Once processed, make a well in the center and add crushed Oreo and chocolate chip cookies. Re-spin if needed to incorporate evenly.
- Scoop into bowls or cones and serve with optional toppings like chocolate syrup or sprinkles.
Notes
- You can substitute half and half with a mix of equal parts whole milk and heavy cream.
- Greek yogurt can be used instead of cream cheese for a lighter version.
- For a gluten-free version, use gluten-free cookies.
- Adjust blue food coloring based on desired color intensity.
- Prep Time: 10 minutes
- Cook Time: undefined
- Category: Dessert
- Method: Ninja Creami
- Cuisine: American
Nutrition
- Serving Size: 1/2 cup
- Calories: 310
- Sugar: 26 g
- Sodium: 180 mg
- Fat: 20 g
- Saturated Fat: 12 g
- Unsaturated Fat: 7 g
- Trans Fat: 0 g
- Carbohydrates: 30 g
- Fiber: 0.5 g
- Protein: 5 g
- Cholesterol: 60 mg
Keywords: Ninja Creami Cookie Monster Ice Cream, blue cookie ice cream, Oreo ice cream, kids ice cream, homemade ice cream
Essentials
2 cups Half and Half
Half and half provides the essential creaminess without being overly rich. It strikes a perfect balance, making the ice cream smooth and delightful.½ cup Sweetened Condensed Milk
Sweetened condensed milk adds that secret sweetness we all crave in ice cream. It provides a rich flavor and creamy texture, making your ice cream feel indulgent.2 teaspoons Vanilla Extract
Vanilla enhances all those lovely flavors, adding warmth and depth to your ice cream. It’s a must-have in any ice cream recipe!½ cup Cream Cheese
Cream cheese contributes to that luscious, creamy texture and adds a surprising tanginess that balances the sweetness perfectly.1 teaspoon Blue Food Coloring
This magical ingredient turns your ice cream into a vibrant blue delight reminiscent of the Cookie Monster himself! You can adjust this according to your desired intensity.3 pieces Oreo Cookies
Crushed Oreo cookies bring that chocolatey crunch we all love. They are a nod to childhood favorites and add a delightful texture to the ice cream.3 pieces Chocolate Chip Cookies
These add extra chewiness and chocolatey goodness, complementing the Oreo cookies beautifully.
Optional Add-Ons
- Extra Cookie Crumbles: If you want a cookie avalanche in your ice cream, feel free to add more crushed cookies!
- Chocolate Syrup: Drizzle some chocolate syrup on top before serving for that extra decadent touch.
- Sprinkles: Add colorful sprinkles for that festive touch—perfect if you’re serving this for a birthday or special occasion.
Substitutions and Shortcuts
If you’re missing an ingredient or have dietary restrictions, no problem! Here are some substitutions you can consider:
- Half and Half: You could use whole milk and cream in equal parts if you don’t have half and half on hand.
- Sweetened Condensed Milk: For a lighter version, you can try evaporated milk sweetened with a little sugar, although the texture might differ.
- Cream Cheese: Greek yogurt can work as a lighter alternative, but the flavor will change slightly.
How to Make Ninja Creami Cookie Monster Ice Cream Recipe Step-by-Step
Now that we’ve gathered all our ingredients, let’s get into the fun part—making the ice cream! Follow these simple steps:
Step 1: Blend the Ingredients
In a blender, combine the 2 cups of half and half, 2 teaspoons of vanilla extract, ½ cup of sweetened condensed milk, ½ cup of cream cheese, and 1 teaspoon of blue food coloring. Blend until smooth. You want a creamy, lump-free mixture. Taste it and feel free to add a bit more vanilla if you wish for more flavor!
Step 2: Pour and Freeze
Once blended, carefully pour the mixture into your Ninja Creami pint container. Pop the container in the freezer and let it freeze for a full 24 hours. It’s tempting to check early, but patience is key here!
Step 3: Process the Mixture
After 24 hours, it’s showtime! Remove the frozen pint from the freezer and insert it into your Ninja Creami. Process it on the “Lite Ice Cream” setting. Watch as your mixture transforms into rich and delightful ice cream!
Step 4: Add Cookie Mix-Ins
Once processed, create a well in the center of your creamy concoction. Gently fold in the crushed Oreo and chocolate chip cookies, ensuring they’re evenly distributed for the perfect cookie bite in every scoop.
Step 5: Scoop, Serve, and Enjoy
Now comes the best part! Scoop the ice cream into bowls or cones, and serve. Enjoy the symphony of flavors as your family digs in. It’s a treat that sparks joy and nostalgia in every spoonful.
Common Mistakes to Avoid
Making ice cream is fairly straightforward, but I’ve learned a few things along the way that can help ensure your batch turns out divine:
Not Blending Thoroughly
Make sure all your ingredients are well-blended. If there are lumps of cream cheese or unincorporated vanilla, it will impact the texture of your ice cream. Blend until completely smooth!
Freezing Time
Don’t rush the freezing process. Your ice cream needs a full 24 hours in the freezer. If it’s not fully frozen, you won’t achieve that desired creamy treat texture.
Over-Packing the Pint Container
Avoid filling the container to the brim. Leave a little space at the top so it has room to expand as it freezes. This will prevent messy spills.
Not Tasting Before Freezing
Always taste your mixture before freezing. If it’s not sweet enough for your liking, add a little more condensed milk or vanilla. You want the flavor to shine!
Quick Wins for Beginner Cooks
As you embark on this delightful ice-cream-making adventure, here are some quick wins to keep you feeling confident:
Prepare Ahead of Time
Gather all your ingredients and tools before starting. This will streamline your process and prevent any last-minute dashes to the grocery store.
Use Softened Cream Cheese
Before blending, let your cream cheese sit out at room temperature for about 30 minutes. This will ensure it incorporates beautifully into the mixture, preventing lumps.
Embrace the Mess
Don’t stress about spills or mess. Cooking can be a joyful, messy experience, and it’s all part of the fun! Enjoy the process as much as the end result.
Keep It Simple
Remember, this recipe is about enjoyment, not perfection. Don’t sweat over the details—trust the process, and let your kitchen be a place of creativity!
Pro-Level Tips for When You’re Ready
As you become comfortable with the recipe, here are some pro tips to elevate your ice cream game:
Play with Flavors
Don’t hesitate to experiment with your flavors. Mix in extracts like mint or almond for a twist, or even add pureed fruit for a unique fruity combo.
Cookie Upgrade
Try different cookies! Use chocolate sandwich cookies, peanut butter cookies, or even homemade cookies if you’re feeling ambitious.
Give Texture Varieties
Add different textures by tossing in mini chocolate chips, toffee bits, or even nuts (if you like). The more textures, the more fun every scoop becomes!
Make it a Sundae
Upgrade your scoop by turning it into a sundae. Top it with whipped cream, chocolate syrup, or even a sprinkle of nuts for a fantastic dessert experience.
Conclusion & Next Steps
Congratulations! You’ve just learned how to make your very own Ninja Creami Cookie Monster Ice Cream! It’s easier than it looks, and the best part is—you can customize it however you like. Whether you’re making it for yourself, friends, or family, it’s that cozy, classic dessert that feels great to share.
So, grab your ingredients and let the ice cream fun begin! I’d love for you to share your creations. Take a picture, share your twists on the recipe, or just tell me how it turned out for you!
Looking for more delicious recipes? Follow us on Pinterest and Facebook!
FAQs About Ninja Creami Cookie Monster Ice Cream Recipe
What is the Ninja Creami Cookie Monster Ice Cream Recipe and what makes it unique?
The Ninja Creami Cookie Monster Ice Cream Recipe is a fun, vibrant homemade ice cream featuring cookie crumbles! It combines sweetened condensed milk, cream cheese, and blue food coloring, making it both a visual treat and delicious dessert.
Can I use different cookies in the Ninja Creami Cookie Monster Ice Cream Recipe?
Absolutely! You can use any cookies you love, such as chocolate sandwich cookies, peanut butter cookies, or even homemade cookies. Be creative!
How can I store leftovers from the Ninja Creami Cookie Monster Ice Cream Recipe?
Keep your ice cream in the Ninja Creami container or another airtight container in the freezer. Just remember to let it sit for a few minutes at room temperature before scooping when you’re ready to enjoy it again!
What if I don’t have half and half? Can I substitute it in the Ninja Creami Cookie Monster Ice Cream Recipe?
Yes! You can use equal parts whole milk and cream as a substitute for half and half. It will still give you a creamy texture!
How long does it take to make the Ninja Creami Cookie Monster Ice Cream Recipe?
Allow for a total of about 24 hours for freezing plus about 10 minutes for the blending and processing. It’s mostly hands-off time, so you can relax while it freezes!
Now that you have everything you need, gather your ingredients and start creating your Cookie Monster masterpiece. Happy indulgence!