Last updated on July 19, 2025
Have you ever strolled through a garden in full bloom and caught a whiff of roses? That delightful fragrance dances in the air and evokes memories of spring days, sunny picnics, and cozy evenings under twinkling stars. When I first encountered rose ice cream at a quaint little café, I was instantly captivated by its unique flavor. However, I was equally terrified at the thought of making it myself. What if the recipe was just too complicated? What if it turned out bland and embarrassing?
Well, I’m here to tell you that making Ninja Creami Rose Ice Cream is a delightful journey that anyone, even as a beginner cook, can master. Trust me; this recipe is simple, stress-free, and totally doable—even if it’s your first time! Just like that cozy afternoon spent in the garden, you can bring the essence of roses into your kitchen, and I’ll guide you every step of the way.
Table of Contents
Why I Love This Recipe of Ninja Creami Rose Ice Cream Recipe
This Ninja Creami Rose Ice Cream recipe holds a special place in my heart. The first time I made it, my kitchen was filled with the soothing aroma of blooming rose petals, transporting me back to lovely afternoons of childhood memories spent tending to my grandmother’s garden. Its delicate and elegant flavor is both refreshing and comforting.
What I adore about this recipe is how it introduces beginners to the art of making ice cream at home. It’s simple enough that you won’t feel overwhelmed and yet sophisticated enough to impress your friends and family. Plus, it allows you to experiment with flavors—a joyous act that is both cozy and practical. You’ll appreciate the little touches of sweetness and creaminess that come together beautifully to create a dessert that feels like a hug in a cone.
Ingredients You’ll Need for Ninja Creami Rose Ice Cream Recipe
When it comes to making delicious ice cream, quality ingredients matter. Here’s a breakdown of what you’ll need to create this lovely Ninja Creami Rose Ice Cream:
Print
Ninja Creami Rose Ice Cream
- Total Time: 24 hours 25 minutes
- Yield: 4 servings 1x
- Diet: Vegetarian
Description
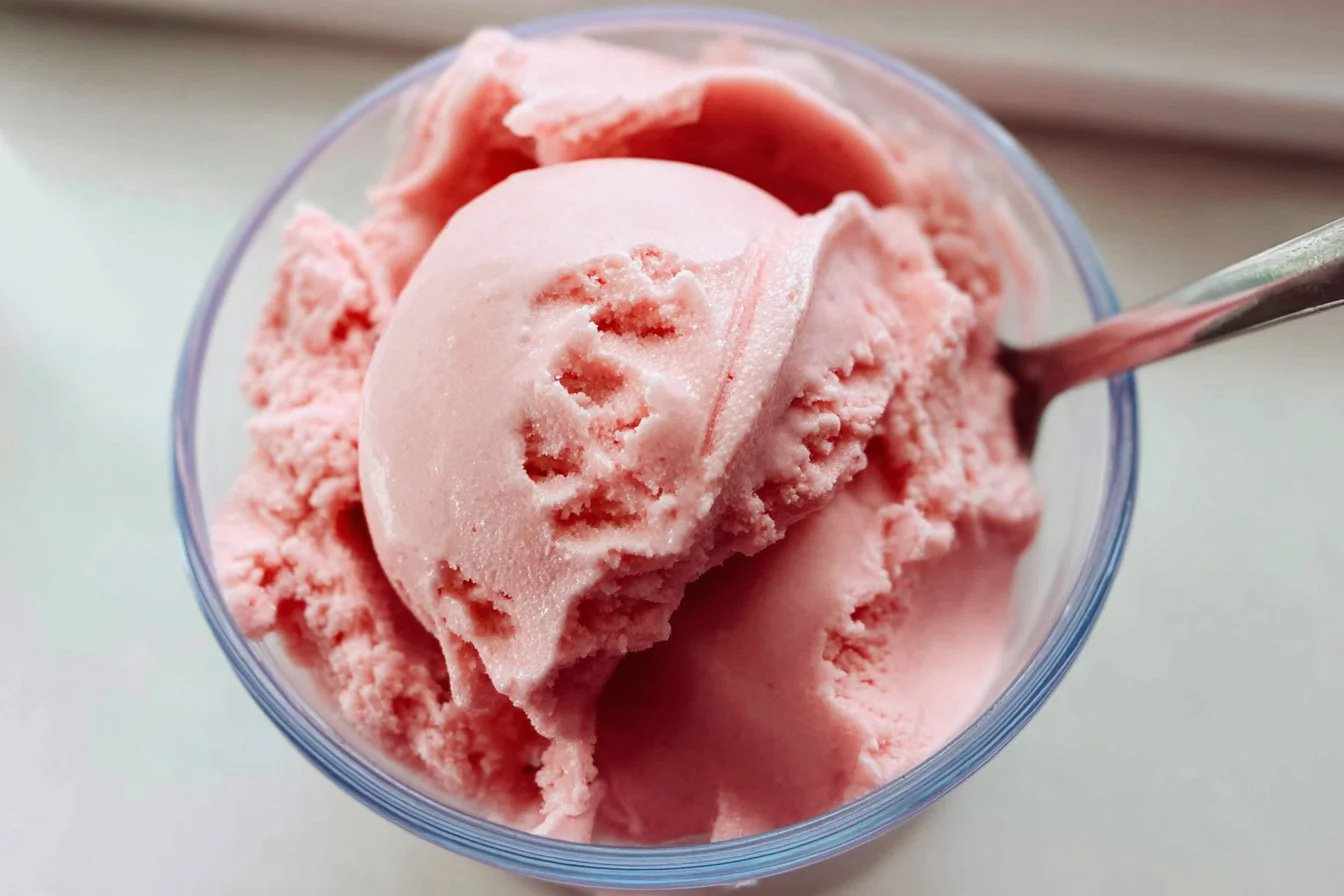
This Ninja Creami Rose Ice Cream is delicately floral, rich, and creamy with the subtle elegance of edible rose petals. It’s the perfect treat for summer afternoons or any special occasion that calls for something unique and beautiful.
Ingredients
- 2 tablespoons dried rose petals – Edible and aromatic; infuse in half and half
- 2 cups half and half – Provides a creamy, rich texture
- ½ cup sweetened condensed milk – Sweetens and smooths the mixture
- ½ cup cottage cheese – Adds body and protein without compromising creaminess
- 1 teaspoon vanilla extract or vanilla bean paste – Enhances the floral flavor and aroma
- 3 drops red food color (optional) – For a rosy hue
Optional Add-Ons
- Chopped nuts, chocolate chips, or fresh fruit – For extra texture and variety
- Pinch of cardamom or cinnamon – Complements the rose flavor beautifully
Substitutions and Shortcuts
- Rose water – Use 1–2 drops in place of rose petals
- Dairy-free option: Substitute half and half with coconut cream or almond milk; adjust sweetness
- Vanilla bean paste – Adds elegant specks of vanilla to the mix
Instructions
- Warm the half and half: In a saucepan over low heat, warm the half and half—do not let it boil.
- Infuse the rose petals: Stir in dried rose petals and steep for 10 minutes to extract flavor.
- Blend: Transfer the infused liquid to a blender. Add sweetened condensed milk, cottage cheese, vanilla extract or paste, and food coloring (if using). Blend until smooth.
- Transfer: Pour the mixture into a Ninja Creami pint container, leaving space at the top.
- Freeze: Place the container in the freezer and let it freeze for 24 hours.
- Process: After freezing, process the pint in your Ninja Creami using the “Ice Cream” setting. Respin if needed for extra creaminess.
- Serve: Scoop into bowls or cones and enjoy immediately!
Notes
- Storage: Keep leftovers in the Creami container in the freezer. Reprocess as needed to return to creamy texture.
- Flavor tip: Steep longer for a stronger rose flavor, or combine with a hint of citrus zest for balance.
- No rose petals? Use 1–2 drops of food-grade rose water instead of steeping.
- Prep Time: 10 minutes
- Cook Time: undefined
- Category: Dessert
- Method: Ninja Creami
- Cuisine: Fusion
Nutrition
- Serving Size: 1/2 cup
- Calories: 240
- Sugar: 21g
- Sodium: 110mg
- Fat: 14g
- Saturated Fat: 9g
- Unsaturated Fat: undefined
- Trans Fat: undefined
- Carbohydrates: 24g
- Fiber: 0g
- Protein: 7g
- Cholesterol: undefined
Keywords: ninja creami rose ice cream, floral ice cream, cottage cheese ice cream, rose dessert, ninja creami recipes, homemade ice cream, no churn rose ice cream
Essentials
2 tablespoons Dried Rose Petals
Dried rose petals can be found in specialty stores or online. They add a natural floral flavor and send forth a beautiful aroma. Make sure to look for edible rose petals to ensure they are safe for consumption.2 cups Half and Half
Half and half gives the ice cream its rich and creamy texture. It’s a crucial ingredient that balances the other flavors beautifully. If you’re unable to find half and half, you can make your own by mixing equal parts of whole milk and heavy cream.½ cup Sweetened Condensed Milk
Sweetened condensed milk adds a lovely sweetness and creaminess to the ice cream. It also helps in achieving a smooth texture.½ cup Cottage Cheese
Don’t worry; this isn’t a quirky twist! Cottage cheese helps add body to the ice cream while giving it a creamy texture. Plus, it’s packed with protein!1 teaspoon Vanilla Extract or Vanilla Bean Paste
Vanilla complements the floral notes perfectly. Using vanilla bean paste will enhance the flavor with little specks of vanilla, creating an aesthetically pleasing finish.3 drops Red Food Color (optional)
If you want your ice cream to have rosy hues, this step is for you! It can give your dessert that extra visual appeal, but feel free to skip it if you prefer a more natural look.
Optional Add-Ons
- Additional Mix-Ins: Consider adding finely chopped nuts, chocolate chips, or pieces of fresh fruit to elevate your ice cream experience.
- Herbs or Spices: For a twist, try adding a pinch of cardamom or cinnamon to complement the rose.
Substitutions and Shortcuts
- If you can’t find dried rose petals, you can substitute with a drop (or two) of rose water for a similar flavor.
- For a dairy-free option, consider using coconut cream or almond milk instead of half and half. Just be mindful of the sweetness and adjust the sweetened condensed milk accordingly.
How to Make Ninja Creami Rose Ice Cream Recipe Step-by-Step
Now that you have gathered the ingredients, it’s time to get started on this delightful recipe. Follow these detailed steps to create your creamy, floral Ninja Creami Rose Ice Cream:
Step 1: Gently Heat the Half and Half
In a medium saucepan, pour the 2 cups of half and half. Turn the heat to low and warm it gently, stirring occasionally. Be careful not to let it boil; you’re just trying to warm it enough to infuse the rose petals with their flavor.
Step 2: Infuse the Rose Petals
Once the half and half is warm, add the 2 tablespoons of dried rose petals. Stir them gently into the liquid. Let it sit for about 10 minutes, allowing the petals to bloom and release their wonderful aroma. This step is where the magic happens and your kitchen will smell heavenly.
Step 3: Blend Your Ingredients
After you’ve infused the half and half, it’s time to bring all the ingredients together! Pour the infused half and half mixture into a blender or food processor. Add the ½ cup of sweetened condensed milk, ½ cup of cottage cheese, and 1 teaspoon of vanilla extract (or paste). If you’re using red food color, add the 3 drops now too. Blend everything together until you achieve a smooth, creamy consistency. This will only take a minute or two.
Step 4: Pour into the Container
Once everything is blended well, pour the mixture into a Ninja Creami pint container. Ensure you leave a little room at the top, as the mixture will expand while freezing.
Step 5: Freeze for 24 Hours
Place the filled container into your freezer and let it freeze for 24 hours. This is the hardest part—waiting! But I promise, it’ll be worth it.
Step 6: Process with the Ninja Creami
After 24 hours, it’s time for the fun part! Remove the container from the freezer and place it into the Ninja Creami. Select the “Ice Cream” setting and let the machine work its magic. Depending on your machine, you might need to “respin” the mixture to achieve that perfect creamy texture. For me, it only took one respin!
Step 7: Scoop and Enjoy
Once your ice cream is creamy and smooth, it’s ready to be scooped! Serve it in bowls, cones, or even on top of a warm slice of pie. Whichever way you choose, I guarantee it will be delightful.
Common Mistakes to Avoid
Not Infusing the Rose Petals Properly
One of the key elements that can make or break this recipe is the infusion of the rose petals. Don’t rush this step; allow the petals to steep in the half and half long enough to release their full flavor.
Overheating the Half and Half
Remember to keep the heat low! If you accidentally let it boil, you might end up with a curdled mixture, which won’t blend smoothly and can ruin the ice cream’s texture.
Failing to Blend Long Enough
Make sure you blend all the ingredients until completely smooth. Leaving lumps of cottage cheese or unmixed sweetened condensed milk can lead to a grainy texture in your final product.
Skipping the Freezing Time
This is crucial! If you don’t let the mixture freeze for a full 24 hours, the texture will be more like a slushy than ice cream. Patience is key!
Quick Wins for Beginner Cooks
Familiarize Yourself with Ingredients
Take the time to understand the ingredients you are using. Discovering the role that each one plays in your recipe will not only boost your confidence but can enhance your cooking skills in general.
Keep Your Kitchen Organized
A well-organized kitchen allows you to move effortlessly through each step of the recipe. Gather all your ingredients and tools before you start. This will help you focus on enjoying the cooking process instead of searching for missing items.
Taste as You Go
Don’t be afraid to taste the mixture before freezing it. This allows you to adjust the sweetness or flavor to your liking. Cooking is all about balance and finding what pleases your palate!
Take Notes
Every time you make this recipe, take notes on what worked well and what you might tweak the next time. With time, you’ll develop your unique twist on this lovely dessert!
Pro-Level Tips for When You’re Ready
Experiment with Flavors
Once you feel comfortable with the basic rose ice cream recipe, why not try to mix in different flavors? A touch of cardamom would add warmth, while a hint of lemon could give a refreshing twist.
Garnish Creatively
Impress your family and friends by getting creative with garnishes. Consider topping your ice cream with fresh berries, edible flowers, or a drizzle of honey. The presentation can elevate your dessert from delightful to extraordinary.
Master the Texture
If you’re aiming for ultra-creaminess, try using an ice cream maker or an immersion blender once the ice cream is fully frozen. This can help achieve that dreamy, scoopable texture that everyone loves.
Share Your Creation
Once you become confident in your recipe-making skills, share your creation! Invite friends over for an ice cream party or package some up as a warm gift. The joy of sharing good food is truly fulfilling.
Conclusion & Next Steps
Making your own Ninja Creami Rose Ice Cream is a charming and cozy experience that proves to be easier than it looks. Remember, you can customize it to suit your taste—whether you want to add extra petals or different flavorings. It’s a classic recipe that is both beginner-approved and feels wrapped in warmth.
Now, I hope you’re ready to create your very own batch! Roll up your sleeves, gather those ingredients, and enjoy the whimsical process. And don’t forget—once you’ve made it, share your thoughts or variations with me!
FAQs About Ninja Creami Rose Ice Cream Recipe
What is Ninja Creami Rose Ice Cream Recipe?
Ninja Creami Rose Ice Cream Recipe is a delightful homemade ice cream made with dried rose petals, half and half, sweetened condensed milk, cottage cheese, and vanilla. It’s a unique flavor that’s perfect for floral enthusiasts.
Can I use fresh rose petals instead of dried ones?
It’s best to use dried rose petals for this recipe. Fresh petals can have a high water content and may make the ice cream too watery.
How long do I need to freeze the mixture?
You need to freeze the mixture for a full 24 hours to achieve the best texture and creaminess.
How does the Ninja Creami make a difference?
The Ninja Creami processes the frozen mixture to give it a creamy consistency, making it easier to achieve that perfect scoop without having to churn manually.
Can I customize the flavors in this recipe?
Absolutely! Feel free to experiment with additional flavors or mix-ins, such as chocolate, nuts, or different extracts, to make this recipe your own.
Looking for more delicious recipes? Follow us on Pinterest and Facebook!