Last updated on August 26, 2025
Ah, the allure of apples, golden pastry, and a little bit of mischief! I remember the first time I tried to create my very own poisoned apple tarts for a Halloween gathering. I was so anxious, filled with thoughts of whether my pastry would puff up perfectly or if I’d end up with a soggy mess. Adding to my fears was the thought of making a dessert that would impress my friends yet still feel like a warm hug from my kitchen. If you can relate to those worries, fear not! This recipe is designed to put your mind at ease, guiding you step by step, so you can create these delightful pastries without the stress—even if it’s your first try.
Table of Contents
Why I Love This Recipe of Poisoned Apple Tarts
What I adore most about poisoned apple tarts is not just their ominous name but their delightful taste and appearance. There’s something so comforting about the combination of sweet, spiced apples encased in flaky pastry, especially when they are given a sinister twist with their vibrant red glaze. For beginner cooks, this recipe is exceptionally forgiving. If the pastry gets a bit uneven, it will still turn out delicious. Plus, the creative potential is limitless! You can make these tarts for Halloween, a fall gathering, or even just because you crave a little fun in your day.
Ingredients You’ll Need for Poisoned Apple Tarts
Gathering ingredients is half the fun! Here’s what you’ll need to make these poisoned apple tarts:
Essentials
- 1 sheet of puff pastry: Make sure it’s thawed if you bought it frozen. The flaky layers are the star of the show here!
- 2 medium apples: Granny Smith apples are my go-to for their tartness, but any tart variety will do.
- 1/2 cup granulated sugar: To sweeten the mix and balance the tartness of the apples.
- 1 teaspoon cinnamon: A warm spice that elevates the apples’ flavor.
- 1 tablespoon lemon juice: This adds a touch of acidity and prevents the apples from browning.
- 1 egg: For brushing over the pastry to give it that lovely golden color.
- 1/4 cup red food coloring: To achieve that signature “poisoned” glaze.
- 1/2 cup corn syrup: This will help create a glossy finish for your tarts.
- 1 tablespoon water: Just for thinning the glaze.
- 1/4 teaspoon vanilla extract: Adds a delicious background flavor.
- Green fondant or green marzipan: For making adorable leaves to decorate your tarts.
Optional Add-ons
- Chopped nuts: Walnuts or pecans can add a crunchy texture to the apple filling.
- Raisins or cranberries: They can sweeten the experience even more.
Substitutions and Shortcuts
- Instead of puff pastry, you can use pie crust if you prefer.
- For a vegan version, use a plant-based milk for the egg wash and replace the egg with a flaxseed mixture (1 tablespoon ground flaxseed mixed with 3 tablespoons water).
- If you don’t have red food coloring, consider using berry puree for a natural alternative.
How to Make Poisoned Apple Tarts: Step-by-Step
Now that we’ve gathered all our ingredients, let’s dive into creating these whimsical treats!
Step 1: Preheat the Oven
Start by preheating your oven to 200°C (400°F). This is a crucial step as we want our tarts to bake evenly and come out perfectly golden.
Step 2: Roll Out the Puff Pastry
On a clean, floured surface, roll out the thawed puff pastry to about 3 millimeters thick. Dust your rolling pin lightly with flour to avoid sticking. Once rolled out, use a round cutter (or a large glass) to cut out circles measuring 10 centimeters in diameter. You’ll need about 8 circles, depending on how thin you roll the pastry.
Step 3: Prepare the Apple Filling
Peel, core, and slice the apples into thin wedges. In a mixing bowl, toss the sliced apples with the granulated sugar, cinnamon, and lemon juice. The sugar will draw out juices and create sauce, while the cinnamon adds warmth.
Step 4: Assemble the Tarts
On a baking sheet lined with parchment paper, place a puff pastry circle. Spoon a generous amount of the apple filling into the center (be careful not to overfill!). Top it with another puff pastry circle, pressing the edges gently to seal. Use a fork to crimp the edges for a decorative touch. Brush the top of each tart with the egg wash to ensure they have a golden color when done baking.
Step 5: Bake the Tarts
Place your assembled tarts in the preheated oven and bake for 20 to 25 minutes, or until they are golden and puffed up. Keep an eye on them, as oven times can vary.
Step 6: Prepare the Poison Glaze
While the tarts are baking, mix the corn syrup, water, red food coloring, and vanilla extract in a small saucepan over low heat until combined. Let this cool slightly; it will serve as the poison glaze once the tarts are out of the oven.
Step 7: Glaze the Tarts
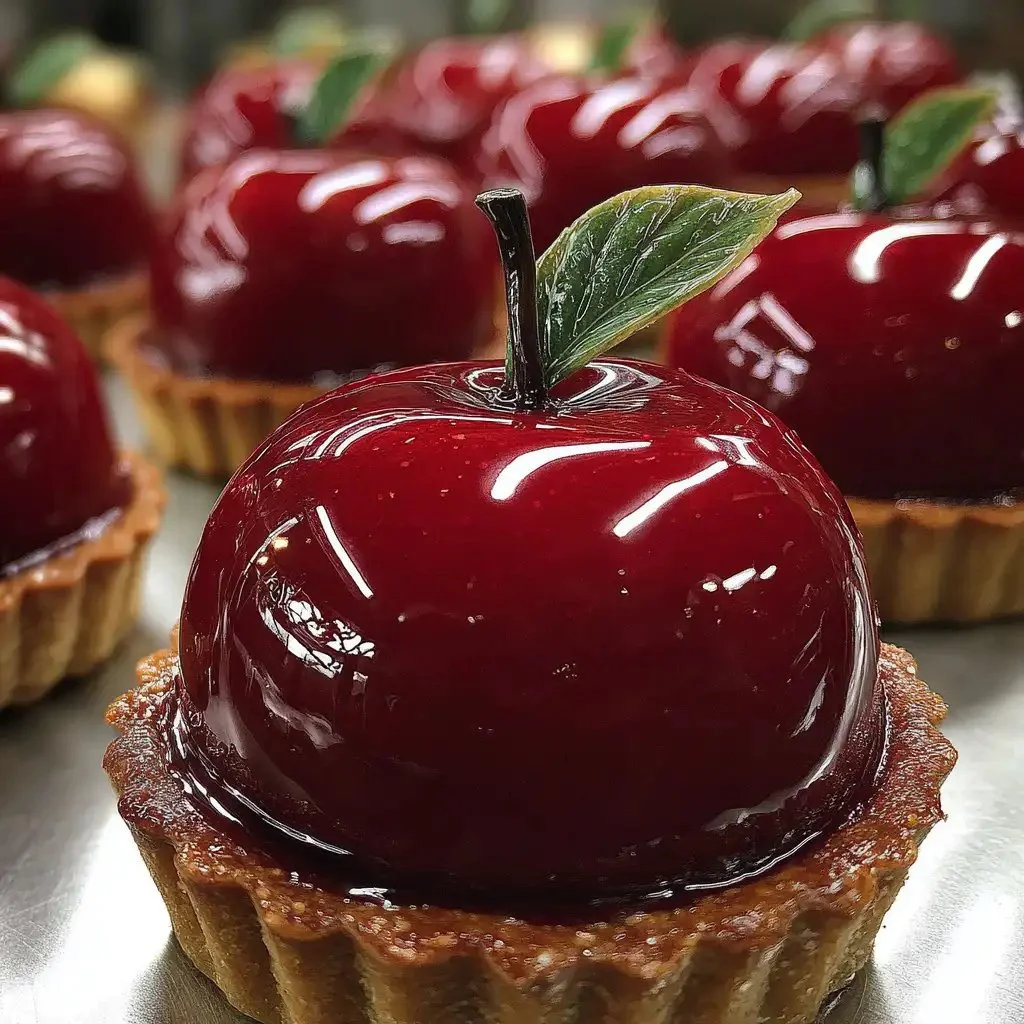
Once the tarts are cool enough to handle, brush them with the red glaze to give them that poisoned look. Use fondant or marzipan to create little leaves and attach them to the tarts.
Common Mistakes to Avoid
Making poisoned apple tarts is a fun adventure, but like any cooking project, it has its pitfalls. Here are some common mistakes along with tips to avoid them.
Overfilling the Pastry
It’s tempting to pile on the apple filling, but overfilling can cause the tarts to burst. Keep the filling in moderation to ensure a perfect seal.
Not Sealing the Edges Properly
If the pastry edges are not sealed tightly, the filling may ooze out during baking. Crimping with a fork or sealing with your fingers can help prevent this.
Baking Too Long
If you lose track of time, the tarts can easily go from perfectly golden to burnt. Set a timer and check for doneness a few minutes before the recommended time.
Skipping the Egg Wash
The egg wash adds that beautiful golden hue that makes your tarts look irresistible. Don’t skip it!
Serving Suggestions for Poisoned Apple Tarts
Once your poisoned apple tarts are ready, it’s time to think about serving them. Here are some delightful ideas to make them even more special:
A Scoop of Vanilla Ice Cream
Serving your tarts warm with a scoop of vanilla ice cream is pure magic. The creaminess of the ice cream complements the tartness of the apples beautifully.
Caramel Drizzle
A swirl of caramel sauce over the top can add a sweet touch, enhancing the overall flavor. Just be sure to keep the presentation neat!
Whipped Cream
Dolloping some fresh whipped cream on the side creates a lovely contrast and adds an airy texture. You can also sprinkle a bit of cinnamon on top for extra flair.
A Cup of Hot Cider
Pairing your tarts with a warm mug of spiced apple cider will provide the ultimate cozy experience, especially in the autumn months.
Pro-Level Tips for When You’re Ready
Once you’ve mastered the basics, consider these pro-level tips for your next round of poisoned apple tarts!
Experiment with Different Types of Apples
While Granny Smith is my favorite, trying out different types of apples can yield new flavors. Honeycrisp, Fuji, or Braeburn also work well.
Personalize Your Glaze
Feel free to add spices (like nutmeg or cardamom) to your glaze to enhance the flavor. You can even swap the red food coloring for a combination of berry purees for a unique look.
Try Other Fillings
Why stop at apples? Use pears, cherries, or even a mix of berries for different variations. The possibilities are endless!
Make Mini Tarts
For a fun twist, consider portioning the pastry into smaller circles, creating bite-sized treats perfect for parties or gatherings.
Conclusion
Congratulations! You’ve successfully made poisoned apple tarts that not only look enchanting but taste divine. Remember, it’s easier than it looks, and don’t hesitate to customize the recipe to make it your own. Whether it’s changing the apple varieties or adding a unique twist to the glaze, get creative and have fun with it!
Now that you’ve conquered this recipe, I’d love for you to share your experiences with me. Have you put your spin on these tarts? Or do you have a funny story from your baking journey? Please leave a comment below, and don’t forget to check out other cozy recipes on the blog!
Looking for more delicious recipes? Follow us on Pinterest and Facebook!
FAQs About Poisoned Apple Tarts
1. Can I use store-bought pastry for poisoned apple tarts?
Absolutely! Store-bought puff pastry makes this recipe incredibly easy and accessible, especially for beginner cooks.
2. How do I store leftover poisoned apple tarts?
Keep them in an airtight container in the fridge for up to three days. Reheat them in the oven for a few minutes to regain that crispiness.
3. What can I substitute for the corn syrup in the glaze?
You can use maple syrup or a simple sugar-water glaze if corn syrup isn’t available to you.
4. How can I make my own pastry for the tarts?
If you’re feeling adventurous, making your own puff pastry is a fun project, though it can be time-consuming. There are many recipes available for a flaky homemade version!
5. Can I bake these tarts ahead of time?
Yes! You can assemble the tarts a day in advance and keep them refrigerated until you’re ready to bake. Just pop them in the oven when your guests arrive!