Last updated on June 21, 2025
Are you looking for a delicious, nutritious bread that not only satisfies your cravings but also supports a healthy lifestyle? Look no further! Quinoa bread is a delightful addition to your culinary repertoire. This wonderful bread combines the unique nutrition of quinoa with the wholesome qualities of oat flour, creating a tasty and gluten-free option great for sandwiches or as a side with your meals. Whether you’re a seasoned baker or a kitchen novice, this recipe is approachable and rewarding!
Table of Contents
Why You’ll Love This Quinoa Bread
Quinoa bread offers numerous benefits beyond its fantastic taste. It’s packed with protein, making it an excellent source of energy. Plus, it’s gluten-free, which means you can enjoy this bread without worrying about gluten sensitivities. The psyllium husk powder gives the bread a lovely texture and helps keep it moist while improving its fiber content.
Baking quinoa bread is not only easier than you might think; the aroma wafting through your kitchen while it’s baking is just heavenly! You’ll feel accomplished when you take that first bite of homemade bread that is savory, a little chewy, and perfectly crusty on the outside. Trust me, once you try it, you’ll want to make it again and again!
Print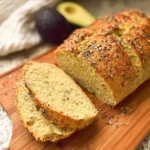
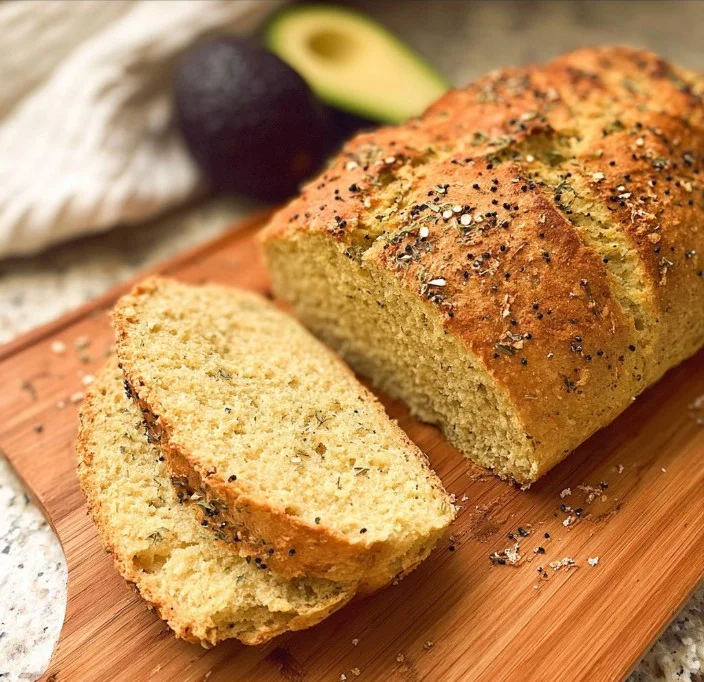
Quinoa Bread
- Total Time: 1 hour 15 minutes
- Yield: 1 loaf 1x
Description
This Quinoa Bread is a wholesome, gluten-free, and vegan loaf that’s packed with fiber, protein, and nutrients. Made with soaked quinoa and oat flour, it’s soft inside with a perfect crust—ideal for sandwiches, toast, or as a side with soups and salads.
Ingredients
Essential Ingredients:
- 1 cup dry quinoa (soaked for at least 6 hours or overnight, rinsed, and drained)
- 1 1/2 cups oat flour (homemade or store-bought)
- 3 tablespoons psyllium husk powder
- 1 teaspoon baking soda
- 1 1/2 cups lukewarm water
- 2 tablespoons apple cider vinegar
- 1 teaspoon salt
Optional Add-Ons:
- 1–2 tablespoons bagel seasoning (for topping)
Instructions
- Preheat your oven to 375°F (190°C). Line a 9×5-inch loaf pan with parchment paper or lightly grease it.
- In a large mixing bowl, combine the soaked quinoa, oat flour, psyllium husk powder, baking soda, and salt.
- In a separate bowl, mix the lukewarm water and apple cider vinegar.
- Pour the wet mixture into the dry ingredients and stir until a thick dough forms. Let it sit for 5–10 minutes to allow the psyllium husk to activate and thicken the dough.
- Spoon the dough into the prepared loaf pan and smooth the top with a spatula. If using, sprinkle bagel seasoning evenly over the top.
- Bake for 60–70 minutes, or until the loaf is firm to the touch and a toothpick inserted into the center comes out clean.
- Allow the bread to cool in the pan for 10 minutes before transferring it to a wire rack to cool completely.
Notes
- Soaking the quinoa is essential to soften it and remove bitterness—don’t skip this step.
- You can make oat flour by blending rolled oats in a food processor until fine.
- This bread stores well in the fridge for up to 5 days or can be frozen for up to 3 months.
- Prep Time: 10 minutes (+ soaking time)
- Cook Time: 65 minutes
- Category: Bread
- Method: Baked
- Cuisine: Gluten-Free, Vegan
Nutrition
- Serving Size: 1 slice (1/12 loaf)
- Calories: 140
- Sugar: 0g
- Sodium: 190mg
- Fat: 2.5g
- Saturated Fat: 0g
- Unsaturated Fat: 2.5g
- Trans Fat: 0g
- Carbohydrates: 24g
- Fiber: 5g
- Protein: 4g
- Cholesterol: 0mg
Keywords: quinoa bread, gluten-free bread, vegan bread, oat flour bread, healthy homemade bread
Ingredients You’ll Need for Quinoa Bread
Making quinoa bread requires some simple ingredients, most of which you may already have at home. Here’s what you’ll need:
Essential Ingredients:
- 1 cup dry quinoa – soaked, rinsed, and drained
Quinoa is the star of this recipe, loaded with nutrients and flavor. - 1 1/2 cups homemade oat flour
Oat flour provides a wonderful texture and adds a nutty flavor. - 3 tablespoons psyllium husk powder
This ingredient helps hold the bread together and adds fiber. - 1 teaspoon baking soda
Baking soda helps the bread rise, giving it a light, fluffy texture. - 1 1/2 cups lukewarm water
Water is essential for blending; it activates the quinoa. - 2 tablespoons apple cider vinegar
The vinegar adds a slight tang and helps the bread rise. - 1 teaspoon salt
Salt enhances the flavor of the bread.
Optional Add-Ons:
- Bagel seasoning (for topping)
Add this for a burst of flavor on the crust. It’s optional but highly recommended!
How to Make Quinoa Bread: Step by Step
Now that you have gathered your ingredients, it’s time to roll up your sleeves and get baking! Here’s a detailed guide to making your quinoa bread:
Step 1: Soak the Quinoa
Place the dry quinoa in a bowl, cover it with cold tap water, and let it soak for about 3 hours. For best results, you can soak it overnight. This soaking helps to remove the bitterness often found on quinoa’s surface. After soaking, drain and rinse the quinoa thoroughly.
Step 2: Blend the Quinoa
Transfer the soaked quinoa to a high-speed blender. Add the lukewarm water to the blender with the rinsed quinoa. Blend the mixture on medium-high speed for about 20–30 seconds. You want to achieve a smooth texture where no quinoa grains remain. Set the blended mixture aside.
Step 3: Prepare the Dry Ingredients
In a large mixing bowl, combine the oat flour, salt, baking soda, and psyllium husk powder. Whisk these ingredients together until they are well combined. Mixing the dry ingredients ensures an even distribution of flavors throughout the bread.
Step 4: Combine Ingredients
Pour the blended quinoa mixture into the bowl with the dry ingredients. Then, add the apple cider vinegar. Use a spatula to stir the mixture until it forms a thick, moist dough. Allow the dough to sit for about 10 minutes. This resting period allows the psyllium husk powder to work its magic, giving the dough more structure.
Step 5: Preheat the Oven
While the dough is resting, preheat your oven to 350°F (180°C). Prepare a baking sheet by lining it with lightly oiled parchment paper, which prevents sticking and makes for easier cleanup.
Step 6: Shape the Dough
After the dough has rested, use your hands to shape it into an oval loaf, keeping the height at a maximum of 2 inches. Place the shaped dough on the prepared baking sheet. If using bagel seasoning, sprinkle it over the top for an added layer of flavor.
Step 7: Bake
Bake the bread in the center of the preheated oven for about 1 hour. The bread should become hard and crusty on the outside. To check for doneness, insert a toothpick into the center of the loaf. If it comes out clean, your bread is ready!
Step 8: Cool Before Slicing
Once the bread is baked, remove it from the oven and let it cool on a rack for about 3 hours. You can also leave it overnight for the best slicing results. This cooling process ensures the bread firms up to the perfect texture, making it easier to cut.
Serving Suggestions for Quinoa Bread
Now that your quinoa bread is ready, how can you enjoy it? The possibilities are endless! Here are some delicious serving suggestions:
- Toast it: Lightly toast slices of quinoa bread and spread with your favorite nut butter or avocado.
- Sandwiches: Use it as the base for sandwiches filled with turkey and cheese or a hearty veggie mix.
- With Soups: Enjoy your quinoa bread with a bowl of soup or chili for a wholesome meal.
- Even sweet: Spread a bit of honey or jam over a slice for a sweet treat, pairing perfectly with coffee or tea.
Pro Tips for Perfecting Your Quinoa Bread
To ensure that your quinoa bread turns out just right, keep these pro tips in mind:
Use a High-Speed Blender: A quality blender makes a big difference when blending quinoa. It should create a smooth consistency without any grainy bits.
Don’t Rush the Resting Period: Allowing the dough to rest for 10 minutes lets the psyllium husk thicken the mixture properly, leading to a better texture in the final product.
Check the Oven Temperature: An oven thermometer can help ensure that your oven is at the correct temperature for baking. This ensures even cooking.
Experiment with Seasonings: Feel free to experiment with other seasonings, such as garlic powder, or dried herbs to add more flavor to your bread.
Slicing: Use a sharp serrated knife to slice the cooled bread. This will help in getting even slices without crushing the loaf.
Easy Variations for Quinoa Bread
This quinoa bread recipe is versatile! Here are some easy variations to try making it your own:
Herbed Quinoa Bread: Add dried herbs like thyme, rosemary, or basil to the dry ingredients for a fragrant loaf.
Cheesy Quinoa Bread: Mix in shredded cheese, such as cheddar or parmesan, for a cheesy twist that’s perfect for pairing with soup.
Nutty Quinoa Bread: Fold in slivered almonds or walnuts into the dough to add crunch and flavor.
Sweet Quinoa Bread: For a sweeter version, add a bit of honey or maple syrup to the dough along with cinnamon for a breakfast treat.
Storage Tips to Store Quinoa Bread
To make the most of your quinoa bread, proper storage is essential:
Room Temperature: Store the quinoa bread wrapped in a clean kitchen towel or in a paper bag at room temperature for up to 3 days.
Refrigeration: For longer storage, wrap the bread tightly in plastic wrap, then place it in an airtight container. It can last in the fridge for up to a week.
Freezing: To freeze, slice the bread and wrap each slice individually in plastic wrap. Place the slices in a freezer-safe bag or container. It can stay frozen for up to 3 months. When ready to enjoy, just toast or thaw your slices for a fresh taste!
Conclusion
Baking quinoa bread is not just about making a nutritious loaf; it’s an experience that fills your kitchen with warmth and delightful aromas. With its simple ingredients and easy instructions, quinoa bread is a recipe you’ll want to keep close at hand. Remember, food made at home with love tastes best, and homemade quinoa bread is no exception. So gather your ingredients, follow the steps, and dive into the joy of baking this wholesome bread!
FAQs About Quinoa Bread
Can I use store-bought oat flour instead of homemade?
Yes, you can absolutely use store-bought oat flour! Just ensure it’s gluten-free if you need it to be.
How do I know if my quinoa bread is done baking?
Use a toothpick for testing; if it comes out clean, the bread is ready! It should also sound hollow when tapped on the bottom.
What if my quinoa bread is too dry?
If your bread turns out dry, try adding a little more liquid the next time or ensure it’s cooled properly before slicing.
Can I substitute quinoa with another grain?
Yes, you can experiment with other grains, but you may need to adjust the liquid and soak times based on the grain you choose.
Is quinoa bread gluten-free?
Absolutely! Both quinoa and oat flour are gluten-free, making this bread a suitable option for those with gluten sensitivities.
Now, it’s your turn to try making this delicious quinoa bread! Enjoy the process and the marvelous taste that comes from your own kitchen. Happy baking!
Looking for more delicious recipes? Follow us on Pinterest and Facebook!