Last updated on September 4, 2025
Spooky Baked Halloween Chips: A Fun and Easy Family Treat
As the leaves turn and pumpkin spice lattes fill the air, I can’t help but feel a flutter of excitement in my heart—it’s Halloween season! I remember the first time I tried making these Spooky Baked Halloween Chips with my kids. The kitchen was a delightful mess, flour dusted everywhere, and laughter echoed as we attempted to create ghost shapes from tortillas. I assure you, this recipe is simple, stress-free, and totally doable—even if you’re trying it for the first time! Grab your cookie cutters and let’s make some treats that will add a spooky twist to your Halloween festivities!
Why I Love This Recipe of Spooky Baked Halloween Chips
These Spooky Baked Halloween Chips hold a special place in my heart. They’re not just about the crispy goodness; they evoke a sense of nostalgia, reminding me of cozy family evenings spent preparing festive snacks. It’s a simple recipe that even beginner cooks can master, making it the perfect introduction to Halloween festivities. Plus, the process of cutting out little ghostly shapes and watching them bake into delicious chips brings everyone together. Whether you are a seasoned chef or a novice in the kitchen, these chips are a fun and engaging way to involve the kids, cultivate creativity, and create lasting memories around the dinner table.
Ingredients You’ll Need for Spooky Baked Halloween Chips
To whip up these delightful Spooky Baked Halloween Chips, you’ll need just a few essentials, and I promise they are easy to find. Here’s what you’ll need:
Essentials
- 4 Flour Tortillas: You can choose gluten-free or grain-free tortillas, depending on your family’s dietary needs. Cut them into fun shapes, and you’ve got the base for your spooky chips.
- Spray Avocado or Olive Oil: A light misting of oil helps the chips get that beautiful golden color while keeping them crispy. These oils are also a healthier alternative.
- Salt: Just a sprinkle adds flavor to your chips and enhances the overall taste.
Optional Add-Ons
- Seasonings: If you want to kick up the flavor, consider adding some chili powder, garlic powder, or smoked paprika. A dash of these can make your chips even tastier.
- Dippers: Don’t forget about serving them with a side of fun! Homemade salsa, creamy guacamole, or my absolute favorite, Pumpkin Taco Soup, pair perfectly with these spooky treats.
Substitutions and Shortcuts
If you’re short on time or ingredients, feel free to get creative! Here are some tips:
- Tortilla Alternatives: Use pita bread or corn tortillas if that’s what you have on hand.
- Oil Substitutes: If you don’t have spray oil, brush the tortillas lightly using a pastry brush for even coverage.
- Seasoning Mix: A pre-made taco seasoning can be a quick way to add flavor without thinking!
How to Make Spooky Baked Halloween Chips Step-by-Step
Ready to dive into the fun of making these spooky chips? Let’s break it down into simple, easy-to-follow steps.
Step 1: Preheat the Oven
Start by preheating your oven to 375 degrees F. This ensures the chips will bake evenly and come out crispy.
Step 2: Prepare Your Baking Sheet
Lightly grease a cookie sheet with your spray oil. This prevents the chips from sticking and ensures a perfectly crunchy texture.
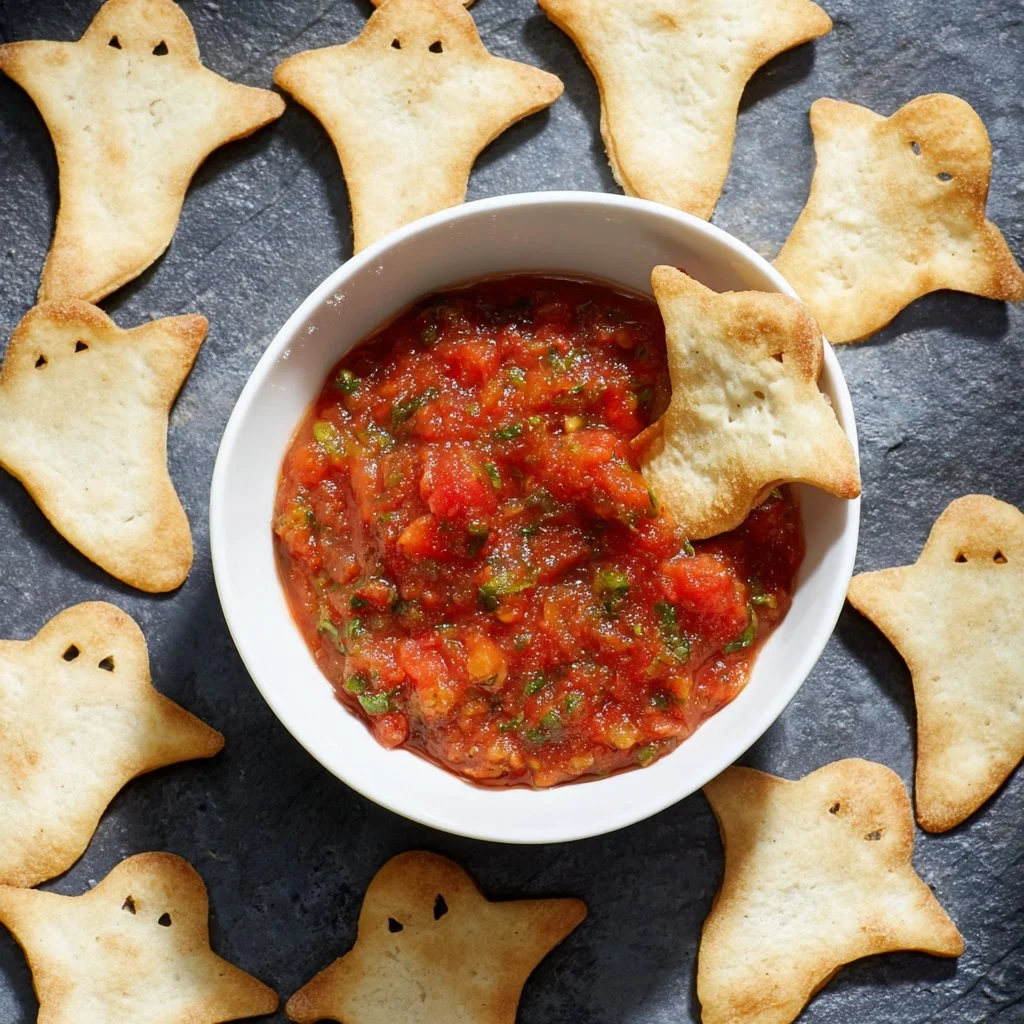
Step 3: Cut Out the Ghost Shapes
Working one tortilla at a time, grab your Halloween cookie cutter. Use it to cut out ghost shapes from the tortillas. I usually get about 5-6 ghosts per tortilla. Try to place the cuts as close together as possible so you minimize waste. Set the cutouts aside for a moment.
Step 4: Transfer and Spray
Transfer the ghost-shaped cutouts onto the prepared baking sheet. Be sure to space them out a little; they need room to puff up slightly when baking. Lightly mist the tops of the chips with your olive oil or avocado spray. Follow it up by sprinkling a little salt over the top to enhance the flavor.
Step 5: Bake the Chips
Place the baking sheet in the oven and bake at 375 degrees for 5-7 minutes. Keep a close eye on them, as cooking times may vary slightly depending on your oven. Remove them when they’re crisp and golden brown.
Step 6: Serve and Enjoy
Once baked, let the chips cool for a minute. Serve them warm alongside your favorite dips like salsa, guacamole, or that delicious pumpkin taco soup that’s always a hit in our household. Enjoying these spooky chips is the perfect way to kick off a haunted night of Halloween fun!
Common Mistakes to Avoid
Even the simplest recipes can trip us up sometimes. Here are a few common mistakes to avoid when making your Spooky Baked Halloween Chips.
Not Preheating the Oven
Preheating might seem like a small step, but it’s essential for achieving that perfect crunch. Baking chips in a cold oven can lead to uneven cooking and soggy results.
Using Too Much Oil
While a light mist of oil makes for perfectly crispy chips, too much can make them greasy. Remember, you’re looking for a delicate coating to enhance flavor, not saturate the chips.
Cutting Shapes Too Close Together
If you cut your shapes too close together, you might end up with a lot of leftover scrap that can’t be reused. Try to maximize your tortilla space, and if you have scraps left, consider crumbling them to make tortilla croutons for salads!
Baking for Too Long
Every oven is different, and these chips can turn from perfect to overdone quickly. Set a timer and check them often, especially as they approach that 5-minute mark.
Easy Variations for Spooky Baked Halloween Chips
These Spooky Baked Halloween Chips are incredibly versatile. Here are a few easy variations you might consider.
Sweet Chips
For a fun twist, sprinkle a little cinnamon sugar instead of salt before baking. This creates a sweet alternative that pairs beautifully with apple pie dip or cinnamon-flavored yogurt.
Cheesy Ghosts
Add a sprinkle of nutritional yeast or grated cheese on top of the chips before baking. If you’re a cheese lover, this variation will elevate your chips to another level of deliciousness!
Rainbow Chips
Have some fun with colors! Use colored tortillas (like blue corn or spinach tortillas) for different ghost shapes. Not only does it add a fun visual appeal, but it also introduces new flavors!
Herb Seasoned Chips
Mix it up with fresh or dried herbs! A sprinkle of rosemary, oregano, or Italian seasoning on the chips can bring a more savory aspect to this treat. Pair it with a creamy dip to make it even more delightful.
Serving Suggestions for Spooky Baked Halloween Chips
wonderful snacks are even better with a few delicious sides. Here are some serving suggestions to take your spooky chips to the next level.
Dipping Ideas
Pair your Spooky Baked Halloween Chips with a variety of dips. Besides the usual salsa and guacamole, you could try:
- Creamy Avocado Dip: Blend avocados, garlic, lime juice, and seasonings for a healthy dip.
- Spicy Black Bean Hummus: This flavorful dip adds a twist with protein-packed goodness.
- Pumpkin Cream Cheese Dip: Mix cream cheese, pumpkin puree, and spices for a sweeter dip experience.
As a Salad Topping
Crush your baked chips and sprinkle them over a fall salad. The crunch adds a delightful texture and complements roasted vegetables like sweet potato and kale perfectly.
With Soup
As mentioned earlier, my favorite way to serve these spooky chips is with Pumpkin Taco Soup. The crispy texture contrasts wonderfully with the creamy soup, making for a cozy meal.
Halloween-Themed Platter
Create a festive platter by combining your spooky chips with other treats like carrot shapes, celery ghosts, and a few candy corn pieces for decoration. This makes for great presentation and encourages kids to try something new!
Conclusion
As you can see, making Spooky Baked Halloween Chips is easier than it looks! Not only are they fun to prepare, but you can customize them in numerous ways to suit your family’s tastes. This recipe is cozy, classic, and beginner-approved, making it perfect for anyone looking to create festive snacks without stress. So, gather your family, grab some tortillas, and let’s create some delicious memories together!
If you try these Spooky Baked Halloween Chips, let me know how they turned out! I’d love to hear your variations and stories about Halloween cooking adventures. Happy baking!
FAQs About Spooky Baked Halloween Chips
1. Can I use corn tortillas for this recipe?
Absolutely! Corn tortillas will give a different texture and flavor, but they work wonderfully. Just follow the same steps, and enjoy!
2. Are these chips gluten-free?
Yes, if you use gluten-free tortillas, your Spooky Baked Halloween Chips will be completely gluten-free.
3. How long can I store the baked chips?
Store your baked chips in an airtight container at room temperature for up to two days. If they start to get soft, just pop them back in the oven for a couple of minutes to crisp up again!
4. Can I make these chips ahead of time?
While they’re best eaten fresh, you can prepare the ghost shapes ahead and bake them when you’re ready to serve. Just keep the cutouts in the refrigerator until baking.
5. What other shapes can I use for cookie cutters?
Feel free to use any Halloween-themed cookie cutters you have on hand, like pumpkins, bats, or witches’ hats! The possibilities are endless for festive fun!