Last updated on September 3, 2025
Nothing brings me back to my cozy kitchen moments quite like Halloween and the aroma of freshly baked cookies. I remember the first time I decided to make these Spooky Ghost Brown Butter Pumpkin Cookies. It was a cool October evening, and I wanted to create something festive for my family. I had a mix of excitement and nervousness, unsure if my vision would turn out as enchanting as I hoped. But with this recipe in hand, I quickly realized that the process was not just achievable; it was a source of joy! I promise this post will guide you through each step, making this sweet and spooky treat simple and stress-free—even if it’s your first time baking.
Table of Contents
Why I Love This Recipe of Spooky Ghost Brown Butter Pumpkin Cookies
These Spooky Ghost Brown Butter Pumpkin Cookies are close to my heart. The combination of brown butter and pumpkin creates a rich, nutty flavor that’s simply irresistible. The soft, chewy texture makes them perfect for dunking in a hot cup of cider or tea during those chilly fall evenings. What I love most about this recipe is that it invites creative expression. The ghost shapes add a fun, whimsical element that is sure to delight not just the kids, but anyone with a sweet tooth. For beginner cooks, this recipe is a perfect balance of simple techniques and delightful results. You don’t need to be a baking expert to create something magical in your kitchen.
Ingredients You’ll Need for Spooky Ghost Brown Butter Pumpkin Cookies
Print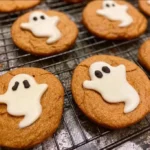
Spooky Ghost Brown Butter Pumpkin Cookies
- Total Time: 32 minutes
- Yield: 18 cookies 1x
Description
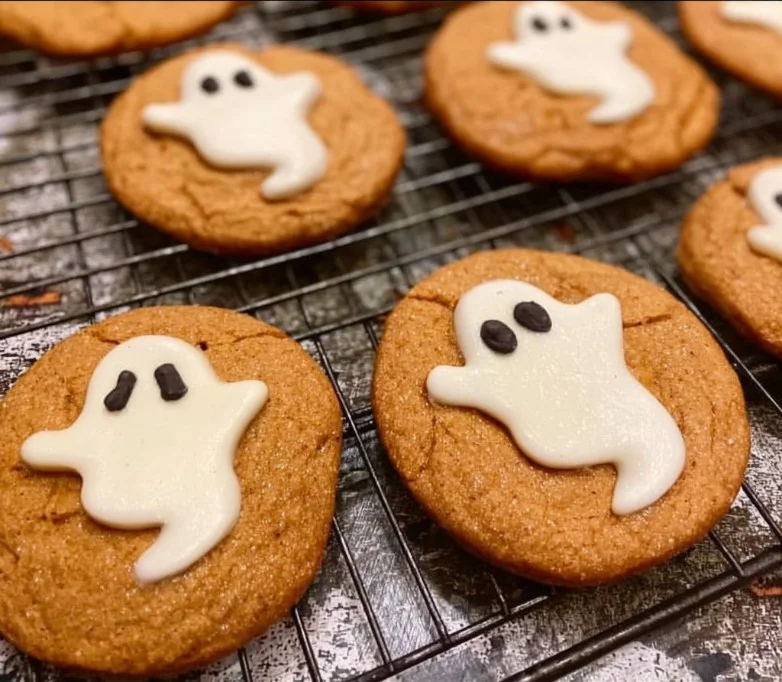
These Spooky Ghost Brown Butter Pumpkin Cookies are soft, cozy fall cookies with nutty brown butter, pumpkin puree, and maple syrup — decorated with white chocolate ghosts and black candy melt faces for a festive Halloween twist.
Ingredients
- Brown Butter: 1/2 cup (1 stick) unsalted butter, browned
- 1/2 cup maple syrup
- 3/4 cup pumpkin puree
- 2 cups all-purpose flour
- 1 tsp baking powder
- 1/2 tsp baking soda
- 1/2 tsp salt
- 1 cup white chocolate (melted, for ghost coating)
- 1/4 cup black candy melts (for eyes and mouths)
Optional Add-Ons:
- 1 tsp ground cinnamon or nutmeg
- 1/2 cup chopped nuts (pecans or walnuts)
Instructions
- Brown the butter: In a medium saucepan over medium heat, cook butter until golden brown and nutty (about 4–5 minutes). Remove from heat and cool slightly.
- Mix wet ingredients: In a large bowl, whisk browned butter, pumpkin puree, and maple syrup until smooth. Add eggs one at a time, mixing well.
- Mix dry ingredients: In a separate bowl, whisk flour, baking powder, baking soda, salt, and spices (if using).
- Combine: Gently fold dry mixture into wet until just combined — do not overmix.
- Scoop dough: Drop spoonfuls (or use a medium cookie scoop) onto parchment-lined baking sheets, leaving space between cookies.
- Bake: Preheat oven to 350°F (180°C). Bake cookies 10–12 minutes, until edges are set and centers look slightly soft. Cool on pans, then transfer to wire racks.
- Decorate with ghosts: Melt white chocolate in short microwave intervals until smooth. Spoon a dollop on each cooled cookie, dragging downward to create a ghost shape.
- Add spooky faces: Melt black candy melts, transfer to piping bag or ziplock, and pipe eyes + mouths onto each ghost.
- Set: Let chocolate harden at room temperature (or refrigerate briefly) before serving.
Notes
- Practice ghost shapes on parchment before applying to cookies.
- Store cookies in an airtight container at room temp for 3–4 days.
- Refrigeration helps set chocolate faster if you’re short on time.
- Prep Time: 20 minutes
- Cook Time: 12 minutes
- Category: Dessert, Halloween Treat
- Method: Baking
- Cuisine: American
Nutrition
- Serving Size: 1 cookie
- Calories: 150
- Sugar: 10g
- Sodium: 85mg
- Fat: 7g
- Saturated Fat: 4g
- Unsaturated Fat: undefined
- Trans Fat: undefined
- Carbohydrates: 20g
- Fiber: 1g
- Protein: 2g
- Cholesterol: 20mg
Keywords: Halloween cookies, ghost cookies, pumpkin cookies, spooky fall treats, decorated cookies
Essentials
- Brown Butter: Made by gently cooking unsalted butter until it turns a beautiful golden-brown color, giving your cookies a deep, nutty flavor.
- Maple Syrup: Provides natural sweetness and a hint of flavor that complements the pumpkin.
- Pumpkin Puree: Essential for that cozy fall flavor, ensuring your cookies stay moist.
- All-Purpose Flour: A baking staple for structure.
- Baking Powder & Baking Soda: To help the cookies rise beautifully.
- Salt: Balances the sweetness and enhances the flavors.
- White Chocolate: Used for creating the ghostly shapes.
- Black Candy Melts: Perfect for the spooky eyes and mouth, adding a fun twist to your cookies.
Optional Add-Ons
- Spices: A pinch of cinnamon or nutmeg can enhance the fall flavors.
- Chopped Nuts: Pecans or walnuts can add a delightful crunch, if you desire some texture in your cookies.
Substitutions and Shortcuts
- Butter: You can use margarine if needed, though it may change the flavor slightly.
- Pumpkin Puree: If you can’t find canned pumpkin, you can bake and puree your own pumpkins.
- Maple Syrup: Honey can be used as a substitute in a pinch.
- White Chocolate: Any brand of melting chocolate works, not just Ghirardelli.
How to Make Spooky Ghost Brown Butter Pumpkin Cookies Step-by-Step
Step 1: Brown the Butter
Start by placing the unsalted butter in a medium saucepan over medium heat. Stir frequently until the butter foams and turns a lovely golden brown, which will take about 4-5 minutes. Be careful not to let it burn! Once browned, remove it from the heat and let it cool slightly.
Step 2: Combine Wet Ingredients
In a large mixing bowl, whisk together the brown butter, pumpkin puree, and maple syrup until smooth. You’ll want to let the butter cool a bit so your eggs don’t cook when added. Crack in the eggs one at a time, mixing well after each addition.
Step 3: Mix Dry Ingredients
In another bowl, whisk together the flour, baking powder, baking soda, and salt. If you’re adding spices, mix those in, too.
Step 4: Combine Mixtures
Gradually fold the dry ingredients into the wet mixture until just combined. Be careful not to overmix, as this can toughen your cookies.
Step 5: Scoop the Dough
Using a medium cookie scoop, drop generous portions of the dough onto light-colored baking pans lined with parchment paper. Leave space between each scoop as they will spread a bit while baking.
Step 6: Bake
Preheat your oven to 350°F (180°C) and bake the cookies for 10-12 minutes, or until the edges are set and the centers look slightly underbaked. Remove them from the oven and let them cool on the pans for a few minutes before transferring them to a wire rack to cool completely.
Step 7: Prepare the White Chocolate
While the cookies are cooling, melt the white chocolate in a microwave-safe bowl. Heat in short intervals, stirring in between, until smooth.
Step 8: Create the Ghostly Shapes
Once the cookies are completely cooled, spoon a small dollop of melted white chocolate on the top of each cookie. Using the back of a small spoon, gently press down and drag it downward to create the ghost shape. If you’re unsure, practice your technique on parchment paper first!
Step 9: Let the White Chocolate Set
Allow the white chocolate to harden at room temperature or refrigerate the cookies for a faster set.
Step 10: Add the Eyes and Mouth
Now it’s time for the spooky details! Melt the black candy melts in a microwave-safe container and pour the melted candy into a piping bag or a small ziplock bag with a corner snipped off. Pipe little dots for the eyes and a small mouth on each ghostly cookie.
Step 11: Final Touches
Let the candy melts dry completely. Once they are set, your Spooky Ghost Brown Butter Pumpkin Cookies are ready to be enjoyed!
Common Mistakes to Avoid When Making Spooky Ghost Brown Butter Pumpkin Cookies
Overbaking the Cookies
One common mistake is letting the cookies bake for too long. These cookies should retain a slight softness in the center, as they will continue to cook as they cool. Keep a close eye on them, especially the first time you bake them!
Not Cooling the Cookies Completely
For the white chocolate ghost to maintain its shape, it’s crucial that the cookies are fully cooled. If they’re still warm, the chocolate will melt and not hold the ghost shape.
Skipping the Brown Butter Process
Some may think that melting butter is just as good as browning it, but skipping the browning step robs the cookies of that rich flavor. Don’t rush this process—it’s what makes these cookies special.
Incorrect Measurements
Baking is a science, and accurate measurements matter. Using too much flour or not enough pumpkin can alter the texture drastically. Make sure to measure carefully!
Serving Suggestions for Spooky Ghost Brown Butter Pumpkin Cookies
Perfect Pairings
These cookies are amazing on their own, but they shine even more when served with a hot beverage. Pair them with a steaming cup of apple cider or a rich pumpkin spice latte for a cozy autumn experience.
Halloween Treats
Set them out at your Halloween party as delightful treats. They’ll be a hit with both kids and adults alike, making them a festive addition to your dessert table.
Gifting
Wrap these spooky cookies in clear cellophane bags and tie them with some twine for a sweet homemade gift for friends and family. It’s a lovely way to share the Halloween spirit and deliciousness.
Lunchbox Surprises
Slide one or two into lunchboxes for a fun surprise that adds a touch of whimsy to an ordinary day. The ghostly design will surely bring a smile to your little ones’ faces.
Pro-Level Tips for When You’re Ready
Experiment with Flavors
Once you’ve mastered the original recipe, try adding different spices or extracts to tailor the taste. A dash of cinnamon can enhance that fall flavor, or a hint of vanilla can create a lovely depth.
Make it Gluten-Free
For those who are gluten-intolerant, swap out all-purpose flour with a gluten-free flour blend. Ensure it has a binding agent or add a teaspoon of xanthan gum for better texture.
Cookie Decorations
Get creative with your ghost designs! Instead of just eyes and a mouth, try adding small candy pieces or edible glitter for an extra festive touch.
Storage Tips
To keep your cookies fresh, store them in an airtight container at room temperature for up to a week. You can also freeze them for longer storage; just thaw them at room temperature before enjoying.
Conclusion & Next Steps
Baking Spooky Ghost Brown Butter Pumpkin Cookies may look like a daunting task, but I assure you it’s much easier than it seems. You’ve learned that you can customize the flavors to make it your own, and it’s cozy, classic, and perfectly beginner-approved. Why not gather the family and create a baking tradition? You could even make this recipe as a fun weekend activity. Don’t forget to share your ghostly creations with me—I would love to see how they turn out!
Looking for more delicious recipes? Follow us on Pinterest and Facebook!
FAQs About Spooky Ghost Brown Butter Pumpkin Cookies
What makes Spooky Ghost Brown Butter Pumpkin Cookies different from regular pumpkin cookies?
These cookies use brown butter, which gives them a unique, nutty flavor that sets them apart from traditional pumpkin cookies.
How can I ensure my cookies turn out soft and chewy?
Avoid overbaking your cookies, as they will continue to cook slightly after being removed from the oven. Letting them cool completely before adding decorations is also crucial for maintaining their texture.
Can I make these cookies without pumpkin?
While pumpkin is a key ingredient in the cookies, you can substitute it with applesauce for a different flavor, though the texture will change.
Are the decorations on the cookies easy to do?
Yes! The ghost shapes are simple to create, and once you practice on parchment paper, you’ll find it becomes fun to design each cookie uniquely.
How should I store my Spooky Ghost Brown Butter Pumpkin Cookies?
Store them in an airtight container at room temperature for up to a week. You can also freeze them if you want to make them ahead of time.
With this step-by-step guide, you’re all set to create these whimsical treats. Happy baking!