Last updated on July 6, 2025
Have you ever found yourself longing for a dessert that captures the essence of summer? The kind of treat that reminds you of sun-soaked picnics and laughter shared with friends and family? For me, nothing embodies that dreamy nostalgia quite like a Summer Berry Trifle. As I recall the first time I made it, I remember being nervous about whether I could pull it off. Would I be able to layer everything just right? Would it taste as heavenly as it looked in the photos? Well, I’m here to tell you that you can absolutely do this, and it’ll be so much simpler than you think.
You might be feeling a little hesitant, wondering if you’re up for the challenge of making a trifle. Maybe you’re worried about ruining the delicate layers or even confused about what ingredients to use. But don’t fret! In this post, I’ll guide you through every step with ease, reassuring you that making a Summer Berry Trifle is not only simple but totally stress-free, no matter if it’s your first attempt or you’re just brushing up on your skills.
Table of Contents
Ingredients You’ll Need for Summer Berry Trifle
Print
Summer Berry Trifle
- Total Time: 3 hours 30 minutes
- Yield: 12 servings 1x
- Diet: Vegetarian
Description
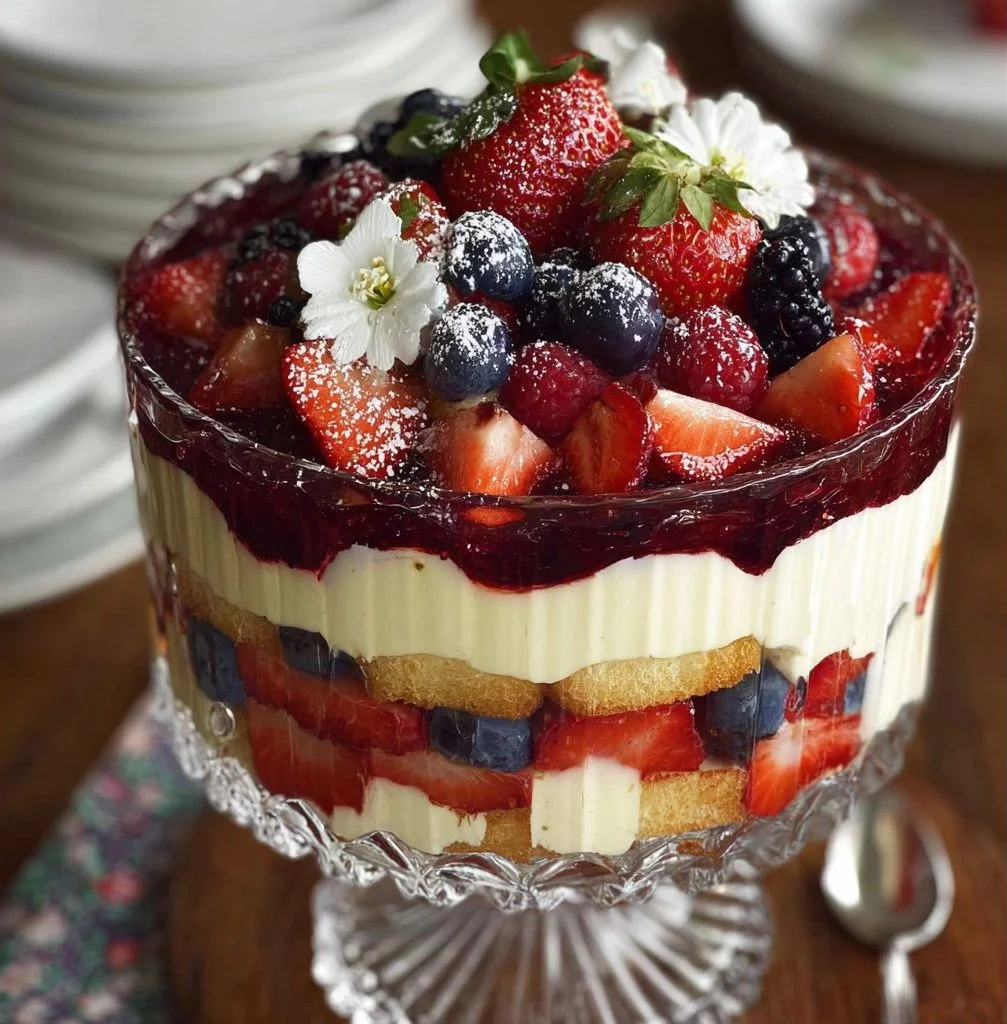
This vibrant Summer Berry Trifle features layers of fresh strawberries, blueberries, creamy vanilla pudding, whipped topping, and fluffy pound cake. It’s the perfect no-bake dessert for warm weather gatherings, picnics, or celebrations.
Ingredients
Essentials:
- 16 ounces fresh strawberries, sliced
- 2 tablespoons sugar (divided)
- 1 tablespoon lemon juice (divided)
- 16 ounces fresh blueberries
- 1 (5.9 ounce) package instant vanilla pudding mix
- 3 cups cold whole milk (or preferred milk)
- 12 ounces whipped topping, thawed
- 2 loaves pound cake, cut into 1-inch cubes
Optional Add-Ons:
- Raspberries or blackberries
- Fresh mint leaves for garnish
- Almond slivers for crunch
- Chocolate shavings for indulgence
Substitutions and Shortcuts:
- Honey, agave syrup, or sugar substitutes instead of sugar
- Dairy-free milk and whipped topping alternatives
- Gluten-free pound cake for a gluten-free version
- Store-bought pudding and whipped topping to save time
Instructions
- Macerate the berries: In two separate bowls, combine strawberries with 1 tbsp sugar and lemon juice, and blueberries with the other 1 tbsp sugar and lemon juice. Let sit for 30 minutes.
- Prepare the pudding: In a large bowl, beat instant vanilla pudding mix with cold milk until smooth. Let it rest for 5 minutes, then gently fold in the whipped topping.
- Start layering: In a trifle bowl or deep glass dish, layer ⅓ of the pound cake cubes at the bottom.
- Add fruit and cream: Top with ⅓ of the strawberries, ⅓ of the blueberries, then ⅓ of the pudding mixture. Repeat layers until all ingredients are used, ending with pudding on top.
- Chill: Cover and refrigerate for at least 2–3 hours, preferably overnight, to allow the flavors to meld.
- Serve: Scoop out with a large spoon, ensuring you get every layer. Store leftovers covered in the refrigerator for up to 3 days.
Notes
- Use a clear glass bowl for the prettiest presentation.
- Garnish with mint leaves or fresh berries right before serving.
- To prevent sogginess, layer and chill just a few hours before serving if using very juicy fruits or a very soft cake.
- Prep Time: 30 minutes
- Cook Time: 0 minutes (no bake)
- Category: Dessert
- Method: No-Bake
- Cuisine: American
Nutrition
- Serving Size: 1 cup
- Calories: 280
- Sugar: 25g
- Sodium: undefined
- Fat: 10g
- Saturated Fat: 6g
- Unsaturated Fat: undefined
- Trans Fat: undefined
- Carbohydrates: 40g
- Fiber: 2g
- Protein: 4g
- Cholesterol: undefined
Keywords: summer berry trifle, no bake dessert, fresh berry trifle, easy trifle recipe, fruit pudding trifle, patriotic dessert, Fourth of July trifle
Essentials
To create a beautiful Summer Berry Trifle, you will need a handful of key ingredients that sing with flavor and color:
- 16 ounces fresh strawberries (sliced): Sweet and juicy, these berries are crucial for that fresh summer taste.
- 2 Tablespoons sugar (divided): Sugar helps to macerate the fruit, enhancing its natural sweetness.
- 1 Tablespoon lemon juice (divided): A little bit of acidity brightens the flavor of the berries.
- 16 ounces fresh blueberries: Their deep blue color adds visual appeal and a burst of flavor.
- 1 (5.9 ounce) package instant vanilla pudding mix: This creates the creamy layer in your trifle.
- 3 cups whole milk (or milk of choice, cold): This is needed to prepare the pudding mixture.
- 12 ounces whipped topping (thawed): Adds that delightful light, airy texture to your cream layer.
- 2 loaves pound cake (cut into 1-inch squares): The heartiness of pound cake serves as your base and helps to absorb the flavors.
Optional Add-Ons
While this recipe is absolutely divine as is, feel free to get creative! You could add:
- Other berries: Raspberries or blackberries can give your trifle an exciting twist.
- Mint leaves: A sprinkle on top would add a refreshing touch.
- Almond slivers: For added crunch and a nutty flavor.
- Chocolate shavings: If you want to indulge your chocolate cravings.
Substitutions and Shortcuts
- Sugar alternatives: If you’re watching your sugar intake, you can substitute with honey, agave syrup, or a sugar substitute.
- Dairy-free options: Opt for almond milk, coconut cream, or a non-dairy whipped topping.
- Gluten-free option: Use gluten-free pound cake to make this dessert accessible for everyone.
- Pre-made options: For those short on time, you can use pre-made pudding cups or store-bought whipped topping.
How to Make Summer Berry Trifle Step-by-Step
Now that we have everything we need, let’s dive into the fun part—making the Summer Berry Trifle! Follow these steps, and you’ll have a stunning dessert ready to impress your family and friends.
Step 1: Macerate the Berries
First, we want to bring out the natural sweetness of our strawberries and blueberries. In a large bowl, add the sliced strawberries along with 1 tablespoon of sugar and a squeeze of lemon juice. In a separate bowl, do the same with the blueberries. Set both bowls aside for about 30 minutes. This will allow the berries to release their juicy goodness.
Step 2: Whip Up the Pudding
While the berries are macerating, grab your mixer—either a hand mixer or a stand mixer will do the trick. In a large mixing bowl, combine the instant vanilla pudding mix and the cold milk. Beat it until it’s smooth. After that, allow it to stand for about 5 minutes until the mixture thickens a bit. Once it has thickened, gently fold in the whipped topping, mixing until everything is smooth and combined.
Step 3: Assemble the Berry Trifle
Now for the fun assembly part! Grab a large trifle bowl (or a deep glass dish if you don’t have one). Start by placing one-third of the pound cake squares at the bottom of the bowl.
Step 4: Layer the Ingredients
On top of the pound cake, layer one-third of the strawberries followed by one-third of the blueberries. Next, add one-third of your pudding mixture over the berries. Just repeat this process—cake, strawberries, blueberries, pudding—until you’ve used all your ingredients, finishing off with a luxurious layer of the pudding on top.
Step 5: Chill in the Fridge
Cover your assembled trifle with plastic wrap or a lid and pop it in the refrigerator. It’s best to chill for at least 2-3 hours, but overnight is ideal. This helps the flavors to meld beautifully.
Step 6: Serve
Once the trifle has chilled, it’s ready to serve! Cut through the layers delicately with a large spoon to keep those beautiful colors intact, and enjoy immediately. If you have any leftovers, store them in the fridge for up to three days (if it lasts that long!).
Common Mistakes to Avoid
Making your Summer Berry Trifle should be a joy, but there are a few common pitfalls to dodge:
Overwhelmingly Sweet
One common mistake is adding too much sugar while macerating the berries. Remember, you’re looking for balance. The natural sweetness from the strawberries and blueberries should shine, so don’t go overboard with sugar.
Soggy Layers
Letting the trifle sit for not enough time can lead to a messy dessert. Without enough chilling time, the layers won’t set properly and could become soggy. Patience is key!
Incorrect Mixing of Pudding
Don’t be in too much of a rush when mixing the pudding and milk. Beating it for the recommended time ensures the pudding thickens to the right consistency.
Skipping the Chill
Certainly, it’s tempting to dig right in, but skipping the chilling step means you’ll miss out on the best texture experience. Chilling allows the flavors to meld and enhances the overall taste.
Quick Wins for Beginner Cooks
If you’re new to the kitchen, here are some quick tips to set you up for success:
Keep It Simple
You can definitely make this trifle easier by sticking to basic ingredients. The fewer ingredients you have to juggle, the more manageable it will feel.
Prepare Ahead of Time
Do some prep beforehand, like slicing the strawberries and preparing the pudding mix earlier in the day. This way, when it comes time to assemble, you won’t feel rushed.
Gather All Tools First
Before you start creating, gather all your tools and ingredients. Having everything at hand can make the process smoother and more enjoyable.
Learn the Layering Technique
Practice your layering technique using dry ingredients to get a feel for how it looks. The visual aspect is part of the fun, and a little practice can boost your confidence.
Pro-Level Tips for When You’re Ready
Once you’ve mastered the basics, here are a few pro tips to elevate your Summer Berry Trifle game:
Experiment with Flavors
Don’t be afraid to try different pudding flavors or additional ingredients. A chocolate pudding base or a layer of lemon curd could add a delicious twist!
Decorative Finishes
Garnish the top with fresh mint, extra sliced berries, or even a drizzle of chocolate syrup to give your trifle that pro touch.
Make it Personal
Consider personalizing each serving with individual cups instead of a large bowl for a unique presentation that feels special.
Layer in Some Crunch
Introducing a layer of granola or crushed cookies between some of the layers can add an exciting textural contrast to your dessert.
Conclusion & Next Steps
You did it! By following this guide, you’ve learned that making a Summer Berry Trifle is not only easier than it appears but also a highly customizable dessert that can fit perfectly for any occasion. With its beautiful layers and harmonious flavors, it promises to bring smiles to the faces of everyone who tastes it. Feel confident to adjust the ingredients to your liking and make it your own.
Now that you’ve got this recipe under your belt, consider sharing your creation with friends and family. It’s the perfect way to celebrate summer and create lasting memories together. Don’t forget to ask about their favorite variations—it can be a fun conversation starter!
I’d love to hear about your journey making this Summer Berry Trifle! Share your experiences, tips, and any twists you tried in the comments below. Happy cooking!
FAQs About Summer Berry Trifle
Can I prepare my Summer Berry Trifle a day ahead?
Absolutely! In fact, preparing it the night before and letting it chill overnight allows the flavors to meld perfectly.
What can I do if I don’t have a trifle bowl?
No worries! You can use any large glass dish or even individual cups or jars for serving. Just make sure you can see those beautiful layers.
How long can I store the Summer Berry Trifle?
Your trifle can be stored in the fridge for up to three days, but it’s best enjoyed within the first day or two for the freshest taste.
Can I use frozen berries for this recipe?
Fresh berries yield the best results for texture and flavor, but if using frozen berries, make sure to thaw them first and drain any excess liquid.
What if I’m allergic to dairy?
You can easily make this dessert dairy-free by using dairy-free milk and whipped topping substitutes. Enjoy this delicious treat without worry!
Looking for more delicious recipes? Follow us on Pinterest and Facebook!


