Last updated on February 4, 2026
After-school Rescue: Valentine Cookie Cups for Busy Families
The kids are home, backpacks dumped, and dinner still a ways off — I get that chaotic, tired-parent feeling. When weeknights are stacked and everyone wants something sweet, Valentine Cookie Cups are my go-to: quick, forgiving, and something both kids and adults smile about. I’ll show you a fast, family-friendly version that’s easy to pull together, keeps cleanup minimal, and fits right into a busy schedule. If you like simple holiday cookie ideas, you might also enjoy a fun 4th of July cookie recipe I use for other celebrations.
A Quick Look at This Valentine Cookie Cups Recipe
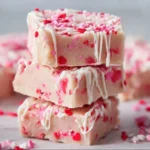
This recipe uses butter and sugar — two ingredients kids and adults both love — plus a basic flour base that turns into soft, scoopable cookie cups. They bake quickly in a muffin tin, so you get a batch in about 20 minutes of hands-on time. These cookie cups are forgiving: you can fold in fresh strawberries or a spoonful of red velvet cake mix to add color without extra fuss. Perfect for weeknights because they bake fast, require minimal cleanup, and hold up well if you make them a few hours ahead.
Ingredients You’ll Need for Valentine Cookie Cups
I keep the ingredient list short and pantry-friendly so you can shop quickly or grab what’s on hand.
Essentials
- 1 cup (2 sticks) unsalted butter, softened — soft but not melty makes creamiest dough
- 1 cup granulated sugar
- 1 cup packed brown sugar
- 2 large eggs
- 1 teaspoon vanilla extract
- 3 cups all-purpose flour
- 1 teaspoon baking soda
- 1/2 teaspoon salt
- Creamy sugar cookie icing (for topping) — store-bought tubes work great for speed
These are common, easy-to-find grocery items that team up to make soft, buttery cookie cups.
Optional Add-ons
- 1 cup chopped fresh strawberries — adds bright flavor and color
- 1 packet (or a few tablespoons) red velvet cake mix — use a little for a richer red hue and subtle cocoa note
- Sprinkles, mini chocolate chips, or heart-shaped candies for decorating
- A squeeze of lemon zest for brightness if using berries
These extras let you tailor the cups for Valentine’s Day or just a colorful treat without changing the base method.
Substitutions and Shortcuts
- Butter substitute: Use equal parts salted butter (skip added salt) or a buttery baking stick if that’s what you have.
- Sugar shortcut: Swap half white sugar for more brown sugar for a chewier texture.
- Ready-made shortcut: Use pre-made sugar cookie dough (refrigerated tube dough) to save mixing time — press and shape into muffin tin to form cups, then bake.
- Icing shortcut: Grab a can of ready-to-spread buttercream or a squeeze tube of creamy sugar cookie icing to skip mixing your own.
- Mix-ins: Use frozen diced strawberries straight from the freezer (don’t thaw) to keep the dough from getting too wet.
- Kid-friendly swap: Add mini chocolate chips instead of fruit for picky eaters.
If you want a seasonal spin, try a warm-spice mix-in and serve with a cream-cheese frosting. For another fun twist I recommend checking an apple-inspired cookie idea I use when apples are in season: apple pie cookies recipe.
How to Make Valentine Cookie Cups Step-by-Step
I keep the steps short and practical so you can move quickly without worrying about perfection. These tips save time and dishes, and you can relax if a teaspoon here or there is off — this recipe is forgiving.
- Heat and prep. Preheat your oven to 350°F (175°C). Lightly grease a standard muffin tin or use liners for easy cleanup. Preheating first saves overall time.
- Cream the base. In a large bowl, beat the softened butter with the granulated and brown sugar until the mixture looks lighter and a bit fluffy — 2 to 3 minutes by hand, faster with a mixer. This step gives the cookies tenderness; you don’t need perfect peaks.
- Add eggs and vanilla. Beat in the eggs one at a time, then stir in the vanilla. Scrape the bowl so everything combines. If you’re short on time, you can whisk eggs and vanilla in a small cup first and pour into the butter mixture.
- Mix dry ingredients. In a separate bowl, whisk together the flour, baking soda, and salt. This keeps the leavening even so the cups bake uniformly.
- Combine wet and dry. Add the dry mix to the wet in batches, stirring until just combined. Dough should be soft but not sticky; if it feels dry, add a teaspoon of milk. No need to overmix — a few streaks of flour are fine.
- Add mix-ins (optional). Fold in chopped strawberries or a spoonful of red velvet cake mix now. If using fruit, keep the pieces small so they don’t make the dough too wet.
- Scoop into tin. Use a cookie scoop or two spoons to portion dough into the prepared muffin tin, filling each cup about two-thirds full. Press lightly to create a shallow “cup” in the center if the dough is dense. Liners make serving and cleanup faster.
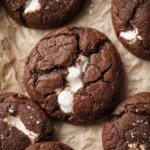
- Bake briefly. Bake 10–12 minutes, or until edges are lightly golden. The centers will still be soft — that’s okay because they firm up while cooling. Set a kitchen timer so you don’t overbake and produce dry cups.
- Cool before topping. Let the cookie cups cool in the pan for 3–5 minutes, then transfer to a wire rack to cool completely. If you try to ice them while warm, the icing will slide.
- Top and decorate. Once cool, pipe or spread creamy sugar cookie icing into each cup and add sprinkles, a small strawberry piece, or a candy heart. Serve right away or store as directed below.
Tips that save time: grease one pan while the dough mixes, use liners to skip scrubbing, and keep a bowl for scraps to reuse if little pieces fall off. I promise the recipe isn’t picky about exact timing — a minute or two won’t ruin it.
Common Mistakes to Avoid
A few small missteps can slow you down or create extra cleanup. Avoid these to keep weeknight baking stress-free.
Mistake 1: Overmixing the dough
Overmixing tightens the gluten and makes cookie cups denser and chewier than you want. Mix until ingredients are just combined and stop.
Mistake 2: Filling tins unevenly
If one cup has twice the dough of another, you’ll get inconsistent bake times and messy presentation. Use a scoop or measure portions to save time and stress.
Mistake 3: Icing them too soon
Icing warm cookie cups makes frosting melt and slide off. Cool completely on a wire rack before topping, or the decorations won’t stay put and you’ll need extra cleanup.
Serving Suggestions for Valentine Cookie Cups
These cookie cups pair well with simple, kid-friendly sides and take minimal prep. They’re great for after-school snacks, dessert after a quick family meal, or a treat to assemble together.
I like to keep sides and add-ons simple so the treat feels special without adding work.
Kid-friendly sides
Serve the cookie cups with apple slices, baby carrots, or a small glass of milk. The fruit or veggie adds balance so the kids feel like it’s a snack with something wholesome too.
Easy add-ons
Keep a small topping station: extra icing, sprinkles, and mini chocolate chips let kids personalize their cups. This takes two minutes and makes the dessert feel festive.
Minimal prep
Make the dough earlier in the day and bake just before serving. You can also bake ahead and top when needed. Use liners to minimize washing — just toss them when you’re done.

Conclusion
I know busy nights don’t leave much room for fussy desserts, and Valentine Cookie Cups are the kind of recipe I rely on when time is tight — fast to make, forgiving if you’re not a baker, and flexible enough for picky eaters. If you want a visual guide or another take on heart-shaped cookie cups, I like this clear tutorial from Design Eat Repeat’s easy heart cookie cups for inspiration and decoration ideas.
FAQs About Valentine Cookie Cups
Q1: How long do Valentine Cookie Cups keep fresh?
A: Valentine Cookie Cups stored in an airtight container at room temperature will stay fresh for about 2 days. If you want them to last longer, refrigerate for up to 5 days; bring to room temperature before serving for best texture.
Q2: Can I freeze Valentine Cookie Cups?
A: Yes. Freeze baked and cooled cookie cups in a single layer on a tray, then transfer to a freezer-safe bag. They’ll keep for up to 2 months. Thaw at room temperature and add icing just before serving.
Q3: Are Valentine Cookie Cups kid-friendly for baking projects?
A: Absolutely. The dough is safe to handle (no raw-addition-only components) and kids can scoop, press, and decorate. I recommend letting an adult handle the oven steps and showing kids how to pipe icing.
Q4: Can I make Valentine Cookie Cups gluten-free or dairy-free?
A: For gluten-free, use a 1-to-1 gluten-free flour blend and check that optional mix-ins are gluten-free. For dairy-free, swap the butter for a stick of dairy-free margarine and use a dairy-free icing. Results will vary slightly but remain tasty and family-friendly.
Q5: How do I speed up Valentine Cookie Cups for busy nights?
A: Use pre-made sugar cookie dough or refrigerated dough, bake in liners to save cleanup, and use store-bought icing tubes to skip extra steps. You can also mix the dough the night before and bake fresh when you’re ready.
I hope this gives you the confidence to pull together Valentine Cookie Cups even on the busiest weeknights — they’re one of my favorite quick desserts that feel special without the fuss. Enjoy baking with your family, and don’t worry about perfection — taste beats a perfect shape any day.
Print
Valentine Cookie Cups
- Total Time: 27 minutes
- Yield: 12 servings 1x
- Diet: Vegetarian
Description
Quick and forgiving cookie cups perfect for busy families to make after school or for a sweet treat.
Ingredients
- 1 cup unsalted butter, softened
- 1 cup granulated sugar
- 1 cup packed brown sugar
- 2 large eggs
- 1 teaspoon vanilla extract
- 3 cups all-purpose flour
- 1 teaspoon baking soda
- 1/2 teaspoon salt
- Creamy sugar cookie icing (for topping)
- 1 cup chopped fresh strawberries (optional)
- 1 packet red velvet cake mix (optional)
- Sprinkles or mini chocolate chips (for decorating)
- A squeeze of lemon zest (optional)
Instructions
- Preheat your oven to 350°F (175°C) and lightly grease a standard muffin tin.
- In a large bowl, beat the softened butter with granulated and brown sugar until fluffy.
- Beat in the eggs one at a time, then stir in the vanilla.
- In a separate bowl, whisk together flour, baking soda, and salt.
- Add the dry mix to the wet in batches, stirring until just combined.
- Fold in chopped strawberries or red velvet cake mix if desired.
- Scoop dough into the prepared muffin tin, filling each cup about two-thirds full.
- Bake for 10–12 minutes until edges are lightly golden.
- Let cool for 3–5 minutes, then transfer to a wire rack to cool completely.
- Once cool, top with icing and add sprinkles or candy as desired.
Notes
These cookie cups are forgiving and can be prepared ahead of time. They can also be frozen for up to 2 months.
- Prep Time: 15 minutes
- Cook Time: 10-12 minutes
- Category: Dessert
- Method: Baking
- Cuisine: American
Nutrition
- Serving Size: 1 cup
- Calories: 250
- Sugar: 12g
- Sodium: 200mg
- Fat: 10g
- Saturated Fat: 6g
- Unsaturated Fat: 3g
- Trans Fat: 0g
- Carbohydrates: 35g
- Fiber: 1g
- Protein: 3g
- Cholesterol: 30mg
Keywords: Valentine, cookies, dessert, family-friendly, baking