Last updated on March 3, 2026
##Introduction
Do you ever get a sudden craving for something sweet-and-salty that takes you right back to childhood snack time—maybe a rainy afternoon at home with a movie and a handful of treats? I love those tiny, cozy food memories, and making Chocolate-Covered Pretzel Nests always brings a little smile. If you’re a beginner who worries about melted chocolate or shaping treats that look cute, don’t fret—this recipe is forgiving and wonderfully simple. If you’ve tried quick pretzel snacks before, you might like my take on the fluffy air fryer version as a different kind of salty-sweet snack: fluffy air fryer pretzel bites recipe.
##A Quick Look at This Chocolate-Covered Pretzel Nests Recipe
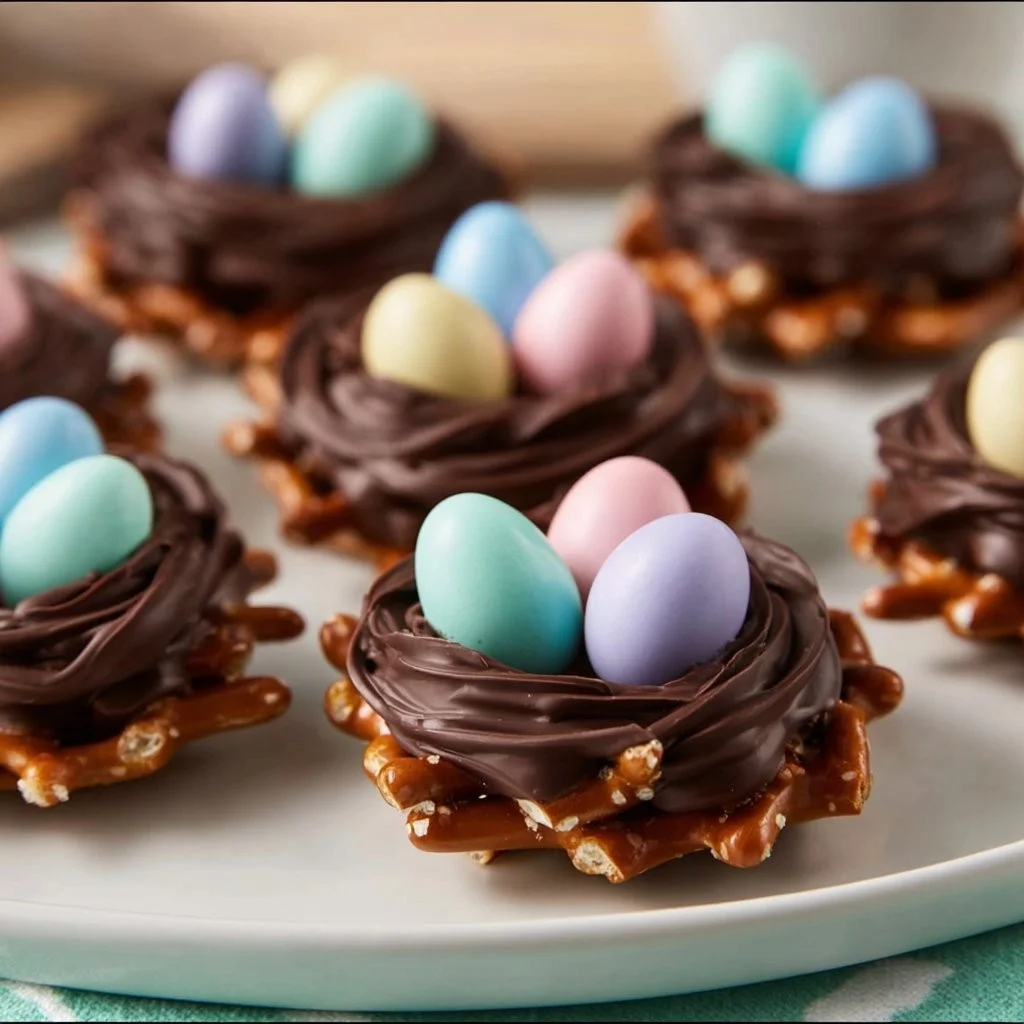
These Chocolate-Covered Pretzel Nests are built around two delightful ingredients: crunchy pretzel sticks and melty chocolate chips. They’re a fast, no-bake treat that offers a satisfying contrast of salty and sweet—a simple comfort snack that’s also a crowd-pleaser. The recipe is perfect for home cooks and beginners because it doesn’t require special tools or baking knowledge, only a microwave-safe bowl and a baking sheet. Keep reading to learn how a few easy steps turn basic pantry items into little nests perfect for parties, gifts, or a cozy evening snack.
##Ingredients You’ll Need for Chocolate-Covered Pretzel Nests
Essentials
- 4 cups pretzel sticks — regular thin sticks work best for weaving and structure. Choose salted ones for that classic sweet-salty balance.
- 1 ½ cups chocolate chips — pick milk, dark, or white chocolate depending on your preference. I often use semi-sweet for a reliable melt and balanced flavor.
- 1 cup mini candy eggs — Cadbury mini eggs or jellybean eggs give each nest a playful, springtime look and provide a crunchy candy shell.
Optional add-ons
- ½ cup shredded coconut — adds a snowy look and a touch of chew.
- Sprinkles — colorful or themed sprinkles for parties or seasonal decorations.
- Melted peanut butter drizzle — for extra richness and a nuttier flavor; drizzle after nests set.
- A pinch of sea salt — enhances the chocolate and emphasizes the sweet-salty contrast.
- Mini marshmallows — tuck a few into the center for a soft, pillowy contrast.
- Parchment paper or a silicone baking mat — not an edible ingredient, but essential for clean release and mess-free chilling.
Substitutions and shortcuts
- Pretzel alternative: Use pretzel sticks of different thicknesses or even broken pretzel twists for a rustic look. If you prefer lower sodium, choose unsalted pretzels and add a tiny finishing sprinkle of flaky salt.
- Chocolate swaps: Instead of chips, you can use chocolate melting wafers, almond bark, or chocolate bars chopped into small pieces. Wafers melt smoothly and are often easier for beginners.
- Candy egg options: If mini candy eggs aren’t available, use M&M’s, jellybeans, or even little chocolate chips. For an allergen-free option, pick candy labeled nut-free.
- Speed shortcut: Melt the chocolate in a heatproof bowl set over a pot of simmering water (double boiler) if you don’t like microwaves. It takes a few minutes longer but offers very even heat.
- Make-ahead hack: Prepare the nests and freeze them for quick treats later. They keep well in the freezer for several weeks when stored properly.
##How to Make Chocolate-Covered Pretzel Nests Step-by-Step
I like to walk through this recipe the way I would when I’m showing a friend—clear, relaxed, and a little chatty so you don’t feel rushed. Below are detailed steps with tips and tricks to make shaping and setting the nests easy.
- Prep your workspace
- Line a baking sheet with parchment paper or a silicone baking mat. This will keep the nests from sticking and makes cleanup a breeze.
- Set out your candy eggs and any optional toppings in small bowls so everything is within reach. Organization makes the process go smoothly, especially when the chocolate is melted and ready.
- Melt the chocolate
- Place 1 ½ cups chocolate chips in a microwave-safe bowl. Microwave in 20-second intervals, stirring well between each interval. Usually three to four cycles are enough; stop once the chocolate is mostly melted and then stir until it’s glossy and smooth.
- If you prefer a double boiler, fill a small pot with an inch or two of water, bring it to a gentle simmer, then place a heatproof bowl over the pot (not touching the water). Stir the chocolate until fully melted.
- Tip: Add a teaspoon of neutral oil (like vegetable or coconut) if the chocolate seems too thick. That helps it coat pretzels more evenly.
- Coat the pretzel sticks
- You have two easy methods: toss or drizzle. For tossing, add a handful of pretzel sticks to the melted chocolate and use a fork or tongs to turn them until evenly coated. Lift them out and let excess chocolate drip back into the bowl.
- For a lighter coating and less mess, drizzle chocolate over a pile of pretzel sticks spread on parchment, then gently turn them with a fork to combine.
- Work quickly but calmly—chocolate will begin to set as it cools, so coat in small batches if needed.
- Form the nests
- On the lined baking sheet, create ring shapes with the coated pretzels. I typically use three to five pretzel sticks per nest, overlapping them slightly to build a little wall. Form a circle with a small hole in the center, like a bird’s nest.
- Press a few small pretzel bits or broken pieces into the center to add stability, especially if you used longer sticks that want to pop out of the ring.
- If the chocolate has thickened too much, briefly reheat it in the microwave for 5–10 seconds to loosen it.
- Top each nest
- Place 2–3 mini candy eggs in the center of each nest while the chocolate is still tacky so they adhere. If you like, sprinkle shredded coconut or sprinkles around the edges or on top.
- For a decorative finish, use a piping bag or a small spoon to drizzle melted peanut butter over the top in a thin zigzag. Add a tiny pinch of sea salt to bring out the flavors if you like savory-sweet contrasts.
- If you want a marshmallow version, press 2–3 mini marshmallows in with the candy eggs for a softer bite.
- Chill to set
- Transfer the baking sheet to the refrigerator for 20–30 minutes until the chocolate is firm. If you’re in a hurry, pop the sheet into the freezer for 10–15 minutes—but watch closely so nothing cracks from sudden temperature change.
- Once fully set, gently lift the nests off the parchment. If a few pieces stick, use the tip of a knife to loosen them.
- Store or serve
- Serve the nests on a pretty plate for guests or stack them in an airtight container for later. If you’re stacking, layer with parchment paper between layers to prevent sticking.
- They’ll keep at room temperature for a day or two in a cool kitchen, in the fridge for up to a week, or in the freezer for several weeks.
Extra tips I use when making these:
- Use room-temperature pretzels so the chocolate doesn’t seize when it hits them.
- Work on a cool surface if possible; it helps chocolate set in a neat, shiny way.
- If you’re making these with kids, set up a station for dipping and another for decorating to keep things orderly and fun.
If you enjoy a chocolate-based treat with different textures, you might also like my chocolate-covered cookie idea for a more bakery-style snack: chocolate-covered strawberry cookie recipe.
##Common Mistakes to Avoid
Making Chocolate-Covered Pretzel Nests is straightforward, but a few common mistakes can change the final look or texture. I’ll walk you through what to watch for so your nests turn out pretty and delicious every time.
Mistake 1: Overheating the chocolate
If you zap the chocolate too long in the microwave, it can become grainy or burn. I always melt in short bursts and stir between each to keep the heat even. If you see any signs of burning—dark spots or a burnt smell—start over with fresh chocolate. It’s a small setback but worth avoiding for a smooth coating.
Mistake 2: Trying to work with cold or wet pretzels
Moisture is chocolate’s enemy. If pretzels are damp or have been in a humid place, the chocolate can seize and clump. Always make sure pretzels are dry and at room temperature. Also, don’t handle the pretzels too long with warm, sweaty hands—oil from fingers can affect chocolate adhesion.
Mistake 3: Rushing the setting process
Pulling nests off the parchment too soon can lead to smudged edges or broken shapes. Give the chocolate time to firm up in the fridge or freezer. If you’re impatient like I sometimes am, do short checks rather than pulling them out early—10 minutes in the freezer generally does the trick without harming texture.
##Serving Suggestions for Chocolate-Covered Pretzel Nests
These little nests are versatile—cute enough for a party but easy enough for a weekday treat. Here are three serving ideas that suit different occasions.
I like to present nests in a way that highlights their homey charm. Arrange them on a cake stand, scatter a few loose candy eggs around for color, or package them in cellophane bags tied with ribbon for gifts.
As a party platter treat
Place the nests on a tiered platter alongside other small sweets like chocolate-dipped pretzel rods, fruit, and bite-sized cookies. The variety makes a lovely dessert table display and invites guests to nibble.
With afternoon tea or coffee
These nests pair beautifully with a warm mug. The crunchy-salty bite complements tea or coffee, and the small size means one or two is just right for a cozy snack.
Packaged as a homemade gift
Layer the nests carefully in a small box lined with parchment, or wrap stacks in clear cellophane tied with twine. They make a thoughtful, homemade gift for neighbors, teachers, or anyone who appreciates a little homemade sweetness.

##Conclusion
I hope you feel ready to make your own batch of Chocolate-Covered Pretzel Nests—they’re easier than they look, endlessly customizable, and perfect for cozy afternoons or festive tables. If you want more inspiration for seasonal nest-style treats, I recommend checking out this lovely take on similar chocolate pretzel nests for Easter: Chocolate Pretzel Easter Bird Nests – It’s Not Complicated Recipes. Try the recipe, have fun with toppings, and please tell me which combo you loved best.
##FAQs About Chocolate-Covered Pretzel Nests
Q1: How long do Chocolate-Covered Pretzel Nests keep at room temperature?
A1: Chocolate-Covered Pretzel Nests will keep at room temperature in a cool, dry place for about 1–2 days. If your kitchen is warm, I recommend storing them in the refrigerator to prevent the chocolate from getting soft.
Q2: Can I use Chocolate-Covered Pretzel Nests for large parties or events?
A2: Absolutely. Chocolate-Covered Pretzel Nests are great for parties because they’re easy to make in batches. Prepare several baking sheets at once, chill them together, and layer them carefully in containers for transport. They’re a light, shareable snack that people can pick at.
Q3: Are Chocolate-Covered Pretzel Nests suitable for kids to help make?
A3: Yes—these are a fun and safe kid-friendly activity. Kids can help drizzle chocolate, place the candy eggs, and add sprinkles. I recommend supervising the melting step and using a spoon to drizzle chocolate so little hands don’t get too close to heat.
Q4: Can I make Chocolate-Covered Pretzel Nests ahead of time for holidays?
A4: You can make them ahead and store them in an airtight container. They keep well in the fridge for up to a week and in the freezer for several weeks. For best texture, let frozen nests sit at room temperature for 10–15 minutes before serving.
Q5: How do I prevent the chocolate on Chocolate-Covered Pretzel Nests from blooming (white streaks)?
A5: Blooming can happen when chocolate goes through temperature changes. To reduce the risk, chill the nests in the refrigerator rather than the freezer and avoid returning them to room temperature repeatedly. Using good-quality chocolate and tempering lightly (or adding a teaspoon of neutral oil) can also help keep the surface glossy.

Chocolate-Covered Pretzel Nests
- Total Time: 25 minutes
- Yield: 24 nests 1x
- Diet: Vegetarian
Description
Delicious no-bake Chocolate-Covered Pretzel Nests that combine salty pretzel sticks with sweet chocolate and candy eggs, perfect for any occasion.
Ingredients
- 4 cups pretzel sticks
- 1 ½ cups chocolate chips
- 1 cup mini candy eggs
- ½ cup shredded coconut (optional)
- Sprinkles (optional)
- Melted peanut butter drizzle (optional)
- A pinch of sea salt (optional)
- Mini marshmallows (optional)
Instructions
- Line a baking sheet with parchment paper or a silicone baking mat.
- Set out your candy eggs and any optional toppings in small bowls.
- Melt the chocolate chips in a microwave-safe bowl, microwaving in 20-second intervals.
- Coat the pretzel sticks by tossing or drizzling them with melted chocolate.
- Form ring shapes with the coated pretzels on the baking sheet.
- Top each nest with mini candy eggs and any additional toppings.
- Chill in the refrigerator for 20–30 minutes until firm.
- Serve the nests on a plate or store in an airtight container.
Notes
Use room-temperature pretzels to prevent chocolate from seizing. These nests are versatile and can be made ahead of time.
- Prep Time: 15 minutes
- Cook Time: 10 minutes
- Category: Dessert
- Method: No-Bake
- Cuisine: American
Nutrition
- Serving Size: 2 nests
- Calories: 200
- Sugar: 15g
- Sodium: 300mg
- Fat: 10g
- Saturated Fat: 5g
- Unsaturated Fat: 3g
- Trans Fat: 0g
- Carbohydrates: 25g
- Fiber: 1g
- Protein: 2g
- Cholesterol: 5mg
Keywords: chocolate, pretzels, no-bake, dessert, snacks, easy recipe