Last updated on October 16, 2025
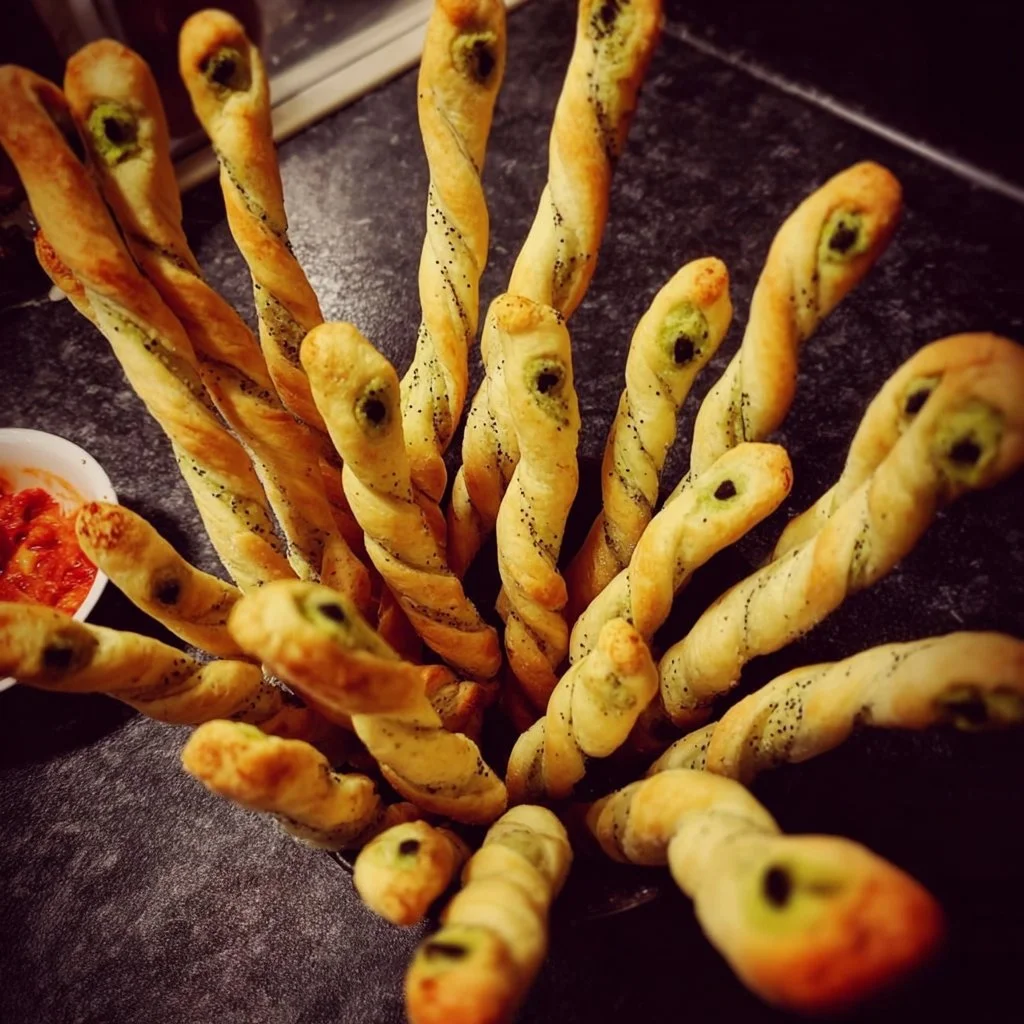
As Halloween approaches, the excitement of creating festive treats often sparks a blend of nostalgia and creativity. One memorable year, I attempted to cook up a storm for a Harry Potter-themed party, and the idea of snake-shaped breadsticks came to me. I envisioned them slithering across the table, perfect for kids and adults alike. And while my initial attempts were delightfully chaotic, the end results were not just delicious but also a hit among my friends. This post is here to help you make these scrumptious Snake Breadsticks effortlessly, even if you find yourself in the kitchen for the first time.
Table of Contents
Why I Love This Recipe of Snake Breadsticks – Party Food for Halloween
These Snake Breadsticks hold a special place in my heart because they’re not just a visual showstopper; they are incredibly simple to make! For beginner cooks, this is the perfect recipe to hone your skills in a fun and engaging way. There’s something uniquely satisfying about kneading dough, watching it rise, and then transforming it into a whimsical shape. Plus, when you present these creepy-crawly treats at a gathering, you’ll not only impress your guests, but you’ll also create an atmosphere filled with laughter and joy. They’re comforting in their familiarity, yet delightfully surprising in their presentation—just like the magic of Halloween itself!
Ingredients You’ll Need for Snake Breadsticks – Party Food for Halloween
Print
Creepy Snake Breadsticks
- Total Time: 1 hour 45 minutes
- Yield: 10–12 snake breadsticks 1x
Description
These Snake Breadsticks are the ultimate Halloween party food! Made from soft, homemade bread dough, these golden, snake-shaped breadsticks are both spooky and delicious. With olive eyes, bell pepper tongues, and a green-tinted finish, they’re the perfect savory treat to impress your guests this Halloween.
Ingredients
Essentials:
- 5 g (1 tsp) dried active yeast
- 170 ml (⅔ cup) warm water
- 4 tbsp olive oil
- 330 g (2 ⅔ cups) plain flour
- 1 tsp salt
For Decorating:
- 2 olives, finely chopped (for eyes)
- ⅓ orange bell pepper (for tongues)
- 6 drops green food coloring gel
- 3 tbsp water (for mixing with food coloring)
- 1 tbsp sesame or nigella seeds (optional, for texture and garnish)
Optional Add-Ons:
- Use colored bell peppers for variety in the snakes’ tongues.
- Add garlic powder or dried herbs to the dough for extra flavor.
Substitutions & Shortcuts:
- Substitute olive oil with melted butter or vegetable oil if preferred.
- Use spinach purée instead of food coloring for a natural green hue.
- Short on time? Use store-bought breadstick or pizza dough to save time.
Instructions
- Activate the Yeast: In a bowl, mix warm water with the dried yeast. Let it rest for 5–10 minutes until foamy — that’s your yeast coming alive!
- Combine the Wet Ingredients: Add olive oil to the activated yeast mixture and stir gently.
- Prepare the Dry Ingredients: In a separate bowl, sift flour and salt together to evenly distribute the salt.
- Mix the Dough: Combine wet and dry ingredients using a dough hook or by hand. Knead for 5 minutes with a mixer (or 10 by hand) until smooth and elastic.
- First Rise: Cover the bowl with cling film and let the dough rise in a warm spot for about 1 hour, or until doubled in size.
- Knead Again: Once risen, gently knead the dough to remove air bubbles. Add a dusting of flour if it’s too sticky.
- Shape the Snakes: Divide the dough into 50 g portions. Roll each into a long snake shape, tapering one end for the tail and keeping the other end thicker for the head.
- Skewer and Arrange: Wrap each dough snake around a wooden kebab stick and place them on a parchment-lined baking tray, leaving space to rise and bake evenly.
- Preheat the Oven: Set your oven to 425°F (220°C).
- First Bake: Bake the snakes for about 15 minutes, until lightly golden.
- Prepare the Paint: Mix green food coloring with water to create your “snake paint.”
- Color and Decorate: Remove breadsticks from the oven, brush them with the green food color mixture, and sprinkle seeds if using.
- Second Bake: Return to the oven for 5 minutes to set the color and deepen the golden hue.
- Add Faces: After cooling slightly, poke holes for eyes and mouths using a skewer. Press in olive pieces for eyes and thin orange pepper strips for tongues.
- Serve: Gently twist to remove the breadsticks from the skewers and serve warm with dips like marinara sauce or garlic aioli for a spooky party hit!
Notes
- For extra crunch, brush with olive oil before the second bake.
- If using natural spinach puree as a dye, reduce added water slightly.
- Store leftovers in an airtight container and reheat in the oven for 5 minutes before serving.
- Prep Time: 25 minutes
- Cook Time: 20 minutes
- Category: Appetizer, Halloween Party Food
- Method: Bake
- Cuisine: American
Nutrition
- Serving Size: 1 breadstick
- Calories: 140
- Sugar: 0g
- Sodium: 220mg
- Fat: 5g
- Saturated Fat: 1g
- Unsaturated Fat: undefined
- Trans Fat: undefined
- Carbohydrates: 21g
- Fiber: 1g
- Protein: 3g
- Cholesterol: 0mg
Keywords: snake breadsticks, halloween breadsticks, spooky party food, halloween appetizer, halloween kids snacks, halloween finger food, savory halloween recipes
Creating these charming Snake Breadsticks requires a handful of easy-to-find ingredients. Let’s break them down into categories so you can gather everything you need before diving into the baking process.
Essentials
- 5 grams (1 tsp) Dried Active Yeast: This is crucial for the breadsticks to rise and achieve that airy, fluffy texture.
- 170 ml (⅔ cup) Warm Water: The warm water activates the yeast, so make sure it’s not too hot or too cold!
- 4 tbsp Olive Oil: Adds moisture and contributes to the dough’s overall richness.
- 330 grams (2 ⅔ cup) Plain Flour: The base for your dough.
- 1 tsp Salt: Essential for flavor.
For Decorating
- 2 Olives, chopped small: These will serve as the eyes of our snakes, adding a cute, scary touch.
- ⅓ Orange Pepper (Bell Pepper): This provides a pop of color for the snakes’ tongues.
- 6 drops Extra Strong Food Colour Gel (green): Gives that authentic snake-like appearance.
- 3 tbsp water: Used to mix with food coloring for painting the snakes.
- 1 tbsp sesame or nigella seeds (optional): Add these for a textural contrast or more visual appeal.
Optional Add-Ons
Feel free to get creative! You can use different colored bell peppers for a range of snake tongues or even add spices like garlic powder to the dough for an extra kick.
Substitutions and Shortcuts
If you find yourself lacking some ingredients, don’t fret! You can substitute the olive oil for melted butter or another vegetable oil if preferred. In lieu of green food coloring, consider using spinach puree for a natural alternative, and if you’re low on time, store-bought breadstick dough can cut the prep time significantly.
How to Make Snake Breadsticks – Party Food for Halloween Step-by-Step
Now that we have our ingredients ready, let’s get to the step-by-step process of making these delightful breadsticks. Follow along, and I promise you’ll have fun!
Step 1: Activate the Yeast
Start by mixing the warm water with the dried active yeast in a bowl. Stir gently and let it sit for about 5-10 minutes, or until it starts bubbling and foaming. This is a good sign that your yeast is alive and ready to help make your dough fluffy.
Step 2: Combine the Wet Ingredients
Once your yeast is activated, add the 4 tablespoons of olive oil into the mixture. This adds a lovely moisture to your dough and enriches the flavor.
Step 3: Prepare the Dry Ingredients
In a separate bowl, sift 330 grams of plain flour and stir in 1 teaspoon of salt. This ensures that your ingredients are well combined.
Step 4: Mix the Dough
Using a hand mixer with a dough hook, combine the wet and dry ingredients on a low speed until they form a rough dough. Once combined, increase the speed to medium and mix for 5 minutes. If you opt to knead by hand, expect to spend about 10 minutes until the dough is smooth and elastic.
Step 5: First Rise
Cover the dough with cling film and set it aside in a warm place for about 1 hour, or until it doubles in size. This step is easy and hands-off—use the time to prepare your decorations or sip on a warm drink.
Step 6: Knead the Dough
Once the dough has risen, lightly flour a clean surface and gently knead the dough to remove any excess air—add a bit more flour if it’s too sticky.
Step 7: Shape the Snakes
Divide the dough into 50-gram pieces. Roll each piece into a snake shape, tapering the end for the tail and keeping the other end thicker for the head.
Step 8: Skewering the Snakes
Carefully wrap the dough snake around a wooden kebab stick and place it upright on a baking tray lined with parchment paper. Make sure to leave space between each snake for them to rise and bake evenly.
Step 9: Preheat the Oven
While you finalize shaping your snakes, preheat your oven to 200°C fan / 220°C / 425°F / Gas mark 7.
Step 10: First Bake
Place the trays in the oven and bake for about 15 minutes, or until golden brown.
Step 11: Create the Paint Mixture
While the snakes are baking, mix 3 tablespoons of water with the green food coloring in a small bowl.
Step 12: Add Color
After 15 minutes, remove the snakes from the oven and brush them with the green food coloring mixture. If you’re using seeds, sprinkle them on at this point for added texture and flavor.
Step 13: Second Bake
Return the snakes to the oven for an additional 5 minutes to set the color and give them an even more vibrant look.
Step 14: Prepare the Snake Features
Once your breadsticks have cooled slightly, use a sharp end of a kebab stick to poke small holes for the eyes and mouth. Place the chopped olives for eyes and orange bell pepper pieces for tongues into each snake.
Step 15: Serve
Carefully twist the kebab sticks to gently remove the snakes. They’re now ready to serve! Pair them with your favorite dips, like marinara sauce or garlic aioli, and watch your guests delight in both the presentation and taste!
Common Mistakes to Avoid Snake Breadsticks – Party Food for Halloween
Creating these Snake Breadsticks can be a fun and rewarding experience, but like any recipe, a few common pitfalls can trip up even the most enthusiastic cooks. Here are some vital tips to help you dodge them.
1. Yeast Activation Mishaps
Be cautious with your water temperature. If it is too hot, it can kill the yeast; if it’s too cold, it won’t activate. Aim for a gentle warmth that feels comfortable to the touch.
2. Over-Kneading or Under-Kneading
Look out for the dough’s texture. It should be elastic and slightly tacky. If it’s too dry or too sticky, you may not have kneaded it enough or added too much flour. Trust your instincts; it’s about finding that perfect texture!
3. Forgetting the Space
When placing your snakes on the baking tray, give them enough space. Dough expands a lot while baking, and you definitely don’t want your snakes to merge into one giant breadstick!
4. Skipping the Second Bake
Ensure you perform the second bake after applying the food color mixture. This step not only enhances the appearance but also sets the color into the dough.
Serving Suggestions for Snake Breadsticks – Party Food for Halloween
When it comes to serving your creepy creations, the options are delightful and endless!
1. Dip Delight
Serve these Snake Breadsticks with a variety of dips. Try marinara sauce for a classic Italian flair, or a creamy ranch dressing for a tangy contrast. You could even whip up a simple pesto for something a bit more gourmet.
2. Themed Platter
Create a whimsical Halloween platter by placing your Snake Breadsticks on a dark board surrounded by fake cobwebs, plastic spiders, or even little pumpkins to set the scene.
3. Pair with Drinks
Consider serving these breadsticks with themed drinks, like a spooky punch or a themed cocktail that complements the flavors of your dips.
4. Picnic Idea
These Snake Breadsticks can also make for a fun picnic snack. Pack them up with your favorite cheeses, meats, and spreads, and watch as they become the highlight of your outing.
Pro-Level Tips for When You’re Ready
Once you’ve mastered the basics of making Snake Breadsticks, here are some pro tips to elevate your experience.
1. Experiment with Flavors
Don’t hesitate to fold in spices or herbs into your dough. A little garlic powder or finely chopped fresh herbs like rosemary can add a delightful surprise to your breadsticks.
2. Play with Colors
Experiment with different food color gels to create snakes of various hues. How about a rainbow of snakes? Perfect for a vibrant party display.
3. Make Mini Snakes
For an appetizer portion, consider making smaller versions of these breadsticks. They’ll be perfect for dipping and easy to munch on.
4. Store Leftovers Properly
If you happen to have any leftovers (though I doubt it!), store them in an airtight container. They can easily be reheated in the oven for 5-7 minutes to bring back that lovely crispy texture.
Conclusion & Next Steps
Making Snake Breadsticks for your next Halloween gathering or Harry Potter-themed party is easier than you may think! With just a handful of ingredients and a few simple steps, you’re destined to impress friends and family with your fun, magical creations. Remember, you can customize it all—from the shape and color to the dips you choose to serve alongside. So roll up those sleeves, get creative, and dive into your next culinary adventure!
If you enjoyed this recipe, I encourage you to try it out and share your versions. What fun twists did you add? Or do you have any questions about the process? Let’s keep the conversation going!
Looking for more delicious recipes? Follow us on Pinterest and Facebook!
FAQs About Snake Breadsticks – Party Food for Halloween
What are Snake Breadsticks – Party Food for Halloween or Harry Potter?
Snake Breadsticks are whimsical, snake-shaped breadsticks that are perfect for Halloween parties or Harry Potter-themed events. They are fun to make and delicious to eat, and the decorating allows for creativity.
Can I make Snake Breadsticks in advance?
Yes, you can prepare the dough ahead of time and store it in the fridge for up to 24 hours. Shape and bake them the next day.
How do I store leftover Snake Breadsticks?
Store any leftover Snake Breadsticks in an airtight container at room temperature. Reheat them in the oven to restore their crispy texture.
Can I use gluten-free flour for this recipe?
Yes, you can experiment with a gluten-free flour blend. However, the texture may vary slightly, so keep that in mind.
What other themes can I use these Snake Breadsticks for?
Aside from Halloween or Harry Potter, these breadsticks can suit any animal-themed party or even a whimsical snack for kids! Just switch up the colors and toppings for different occasions.
Now, gather those ingredients and let your creativity soar—your party guests will thank you!

