Last updated on July 9, 2025
If you’re anything like me, the very mention of chocolate cake brings a wave of cozy nostalgia. I can almost hear the joyous giggles of family gatherings, where every slice of cake shared is wrapped in laughter and sweet memories. There’s something about a cake dressed in the rich allure of cocoa and topped with creamy frosting that seems to turn an ordinary day into an extraordinary celebration. It’s a fantastic excuse to gather your loved ones and indulge.
Now, let’s be honest—when I first decided to try my hand at baking a cake, I was met with a good dose of anxiety. Would my cake rise? Would it be dry? What if my frosting turned into a gooey mess? The mere thought of it sent shivers down my spine. I felt overwhelmed by all the steps and the delicate precision baking seemed to require.
But I’m here to tell you this: making an Oreo Chocolate Cake doesn’t have to be daunting. In fact, I can assure you that with a bit of guidance, it can be as simple as mixing a few ingredients, pouring them into a pan, and letting the oven do most of the work. So grab your apron and join me on this cozy journey into the world of baking!
TABLE OF CONTENTS
Ingredients You’ll Need for Oreo Chocolate Cake
Print
Oreo Chocolate Cake
- Total Time: 50 minutes
- Yield: 9 servings 1x
- Diet: Vegetarian
Description
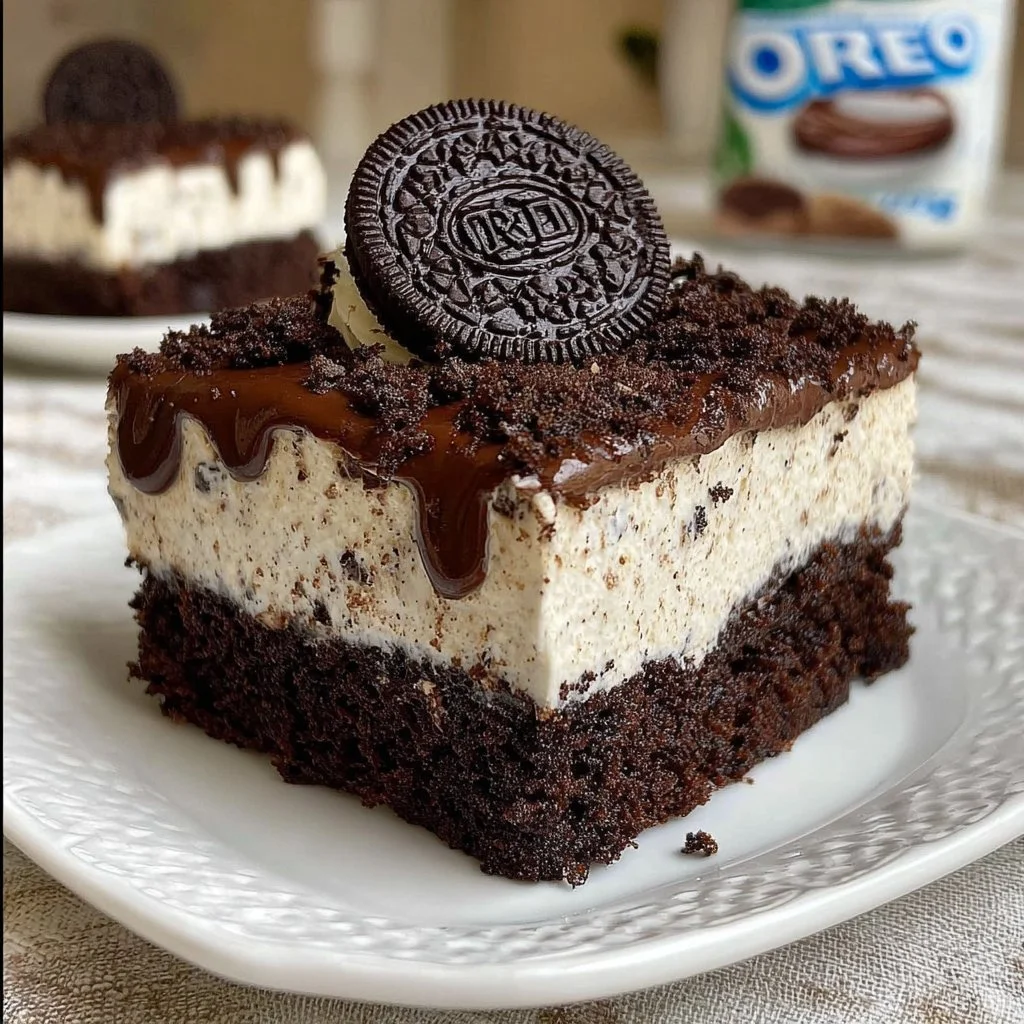
A rich, moist chocolate cake topped with cookies-and-cream Oreo buttercream. Perfect for birthdays, celebrations, or anytime you crave something sweet and indulgent!
Ingredients
Essentials:
- 125 g plain flour (1 cup)
- 200 g caster sugar (1 cup)
- 65 g cocoa powder (¾ cup)
- ¾ tsp baking powder
- ½ tsp bicarbonate of soda (baking soda)
- ½ tsp salt
- 1 large egg (room temperature)
- 60 ml vegetable oil (¼ cup)
- 125 ml milk (room temperature) (½ cup)
- 1 tsp vanilla extract
- 125 ml warm water (½ cup)
Optional Add-ons for Frosting:
- 150 g unsalted butter, softened (¾ cup)
- 200 g icing sugar (1⅓ cups)
- 1–2 tbsp milk
- 3 Oreo biscuits, finely crushed
- 9 whole Oreos (optional, for decoration)
Substitutions and Shortcuts:
- Use all-purpose flour if plain flour isn’t available
- Substitute cocoa powder with melted dark chocolate for a richer flavor
- Butter alternatives: margarine or dairy-free spreads
- Try brown sugar for deeper caramel-like notes
- Replace egg with mashed banana or applesauce for a vegan version
Instructions
- Whisk the Dry Ingredients: In a large bowl, whisk together the flour, caster sugar, cocoa powder, baking powder, bicarbonate of soda, and salt.
- Add the Wet Ingredients: Add the egg, oil, milk, and vanilla extract. Whisk until smooth, then mix in the warm water. The batter will be thin and glossy.
- Bake the Cake: Line an 8×8-inch baking tin with parchment. Pour in the batter and bake at 175°C (350°F) for 30 minutes or until a toothpick comes out with moist crumbs. Let cool completely in the tin.
- Make the Buttercream: Whip softened butter until smooth. Gradually beat in icing sugar, adding 1–2 tbsp milk for desired consistency.
- Fold in Crushed Oreos: Gently fold in the finely crushed Oreos to create a cookies-and-cream frosting.
- Decorate: Spread the Oreo buttercream evenly over the cooled cake. Top with whole Oreo cookies for extra flair, if desired.
Notes
- Ensure the cake is fully cooled before frosting to prevent the buttercream from melting.
- For a layered version, double the recipe and bake in two tins.
- Store leftovers in an airtight container at room temperature for up to 3 days or in the fridge for longer freshness.
- Prep Time: 20 minutes
- Cook Time: 30 minutes
- Category: Dessert
- Method: Baking
- Cuisine: American
Nutrition
- Serving Size: 1 slice
- Calories: 410
- Sugar: 34g
- Sodium: undefined
- Fat: 22g
- Saturated Fat: 10g
- Unsaturated Fat: undefined
- Trans Fat: undefined
- Carbohydrates: 50g
- Fiber: 2g
- Protein: 4g
- Cholesterol: undefined
Keywords: oreo chocolate cake, cookies and cream cake, easy chocolate cake, birthday cake, chocolate dessert, Oreo frosting
Essentials:
- 125 g plain flour (1 cup): The foundation of our cake. It’ll provide the necessary structure.
- 200 g caster sugar (1 cup): This will sweeten the cake, helping it to rise and create a tender texture.
- 65 g cocoa powder (¾ cup): For that deep, rich chocolate flavor.
- ¾ tsp baking powder: This helps our cake rise.
- ½ tsp bicarbonate of soda (baking soda): Another leavening agent that gives our cake its lift.
- ½ tsp salt: Enhances the flavor of our cake.
- 1 large egg (room temperature): Binds everything together and provides moisture.
- 60 ml vegetable oil (¼ cup): Adds moisture and richness.
- 125 ml milk (room temperature) (½ cup): Contributes to the cake’s tenderness.
- 1 tsp vanilla extract: For a warm, inviting flavor.
- 125 ml warm water (½ cup): Keeps the batter nice and moist.
Optional Add-ons:
- 150 g unsalted butter (softened) (¾ cup): This is for the frosting that’ll take our cake over the top.
- 200 g icing sugar (1⅓ cups): Sweetens our buttercream for that perfect finish.
- 1-2 tbsp milk: Helps to adjust the consistency of our frosting.
- 3 Oreo biscuits (finely crushed): To be folded into the frosting for added crunch.
- 9 whole Oreos (optional, for decoration): Because what’s an Oreo cake without a few whole Oreos on top?
Substitutions and Shortcuts:
- Flour: You can substitute plain flour with all-purpose flour for a similar texture.
- Cocoa Powder: If you don’t have cocoa powder, dark chocolate melted and mixed in can create a unique rich flavor.
- Butter: You can use margarine or a dairy-free alternative if you’re dairy-free.
- Sugar: Brown sugar can be used instead of caster sugar for a deeper flavor.
- Egg: If you’re looking for a vegan option, try using mashed bananas or unsweetened applesauce.
With your ingredients gathered, let’s dive into how to make this delightful Oreo Chocolate Cake step-by-step!
How to Make Oreo Chocolate Cake Step-by-Step
Step 1: Whisk the Dry Ingredients
First things first, we need to mix our dry ingredients together. In a large mixing bowl, add the plain flour, caster sugar, cocoa powder, baking powder, bicarbonate of soda, and salt. Use a whisk to combine them well.
This step is crucial as it helps to distribute the leavening agents evenly throughout the flour, ensuring that your cake rises uniformly without any odd pockets of dry ingredients. It takes just a couple of minutes, and it’s a great way to get your muscles moving!
Step 2: Add the Wet Ingredients
Now that our dry ingredients are well-mixed, it’s time to add the wet ones! Crack in that large egg, followed by the vegetable oil, room temperature milk, and the lovely splash of vanilla extract.
Give it a good whisk until the batter is smooth and well-combined. But be careful not to overmix—this can lead to a dense cake. We want it light and fluffy, so just mix until you see no more lumps of dry ingredients.
Next, pour in the warm water and give it one last gentle whisk. The batter will now be runny and glossy—this is exactly what we want!
Step 3: Prepare the Tin and Bake
Now, let’s get the cake into the oven. Start by lining your 8×8-inch tin with non-stick baking paper. This will ensure the cake comes out easily once it’s baked.
Pour in the batter, then give the tin a gentle shake to level it out. It’s important for even baking. Pop it into the center of your preheated oven and bake for about 30 minutes.
To check if it’s done, insert a toothpick into the center. If it comes out with just a few moist crumbs, then you’re good to go!
As tempting as it might be, allow the cake to cool fully in the tin before decorating. This step is vital; if you frost it too soon, your delicious frosting might just melt away!
Step 4: Whisk the Butter
While the cake is cooling, we can whip up some delicious buttercream for our frosting. Grab a large mixing bowl and add your softened unsalted butter. Using an electric whisk, beat it until it’s super smooth and creamy. This will give us that perfect base for our frosting.
Step 5: Add the Icing Sugar and Milk
Now, let’s sweeten things up! Gradually whisk in the icing sugar. You might want to do this in batches to avoid an icing sugar cloud in your kitchen. Add a tablespoon of milk to loosen up the mixture as you go.
If it’s too thick for your liking, don’t hesitate to add another tablespoon of milk. You’re looking for a spreadable yet thick consistency that will sit beautifully on your cake.
Step 6: Fold in the Crushed Oreos
Now for the fun part! Using a rubber spatula, gently fold in those finely crushed Oreos into your buttercream. This will give it an irresistible cookies-and-cream flavor. You should end up with a lovely pale grey buttercream, speckled with those delightful Oreo pieces.
Step 7: Decorate the Cake
Once the cake has completely cooled, transfer it onto a serving plate or board. Now scoop your Oreo buttercream on top and spread it out evenly.
For that finishing touch, you can decorate with whole Oreo biscuits—one for each slice, if you like! This bit is optional, but it sure makes for a beautiful presentation.
Common Mistakes to Avoid
Overmixing the Batter
One of the biggest mistakes beginner bakers make is overmixing the cake batter. While it’s essential to combine your ingredients thoroughly, too much mixing can develop the gluten in flour, leading to a dense cake. Remember: Just mix until you don’t see any dry flour.
Not Measuring Ingredients Accurately
Baking is a science, and accurate measurements are crucial! Use a kitchen scale for dry ingredients if you have one, and be sure to level off your measuring cups. Too much flour or sugar can significantly affect the cake’s texture.
Skipping the Cooling Process
I get it—impatience can take over sometimes! But skipping the cooling process before frosting can lead to melted buttercream and a messy cake. Patience is key; let it cool completely for the best results.
Not Checking the Oven Temperature
Not all ovens are created equal, and your baking time may vary depending on your oven’s heat. Always preheat your oven and, if possible, use an oven thermometer to ensure you’re baking at the right temperature.
Quick Wins for Beginner Cooks
Use Ready-Made Ingredients
If you’re feeling unsure, why not pick up some pre-made or ready-to-use ingredients, like store-bought frosting? It can save time and still result in a delicious cake. Once you gain confidence, you can start making your frosting from scratch!
Bake in Smaller Portions
If you’re worried about your baking skills, consider baking in smaller portions. Instead of one large cake, try making cupcakes. They bake faster and are really forgiving. Plus, who doesn’t love a mini version of their favorite dessert?
Adorn with Store-Bought Toppings
Want a little flair without the fuss? Grab some premade decorations—think icing, edible glitter, or sprinkles. They add a professional touch without overwhelming you in the kitchen.
Utilize Magnetic Measuring Spoons
One of the handiest tools for beginner cooks is a set of magnetic measuring spoons. This nifty little tool keeps everything organized and available, so you can stick one into each ingredient without losing track of them!
Pro-Level Tips for When You’re Ready
Experiment with Flavors
Once you’ve mastered the basic recipe, don’t be afraid to play with flavors! Add a pinch of espresso powder to boost the chocolate flavor, or spice things up with a dash of cinnamon for a warm twist.
Try Different Frosting Techniques
Level up your decorating skills by exploring different frosting techniques. Try piping with a star tip for that bakery-style finish or use a spatula for a rustic look—both are excellent choices!
Incorporate Other Ingredients
Want to take your cake to the next level? Mix in some chocolate chips, nuts, or even a layer of fruit preserves between your cake layers. It’s all about making the cake your own.
Learn the Art of Layering
Feeling ambitious? Once you’ve perfected the single-layer cake, consider mastering the art of layering. Bake multiple layers and stack them with your creamy frosting in between. It creates a stunning presentation and adds more deliciousness!
Conclusion & Next Steps
Congratulations! You’ve made it to the end of this guide, and I hope you feel more confident in your ability to create a gorgeous, delectable Oreo Chocolate Cake. Remember, it’s easier than it looks! With just a few ingredients and some patience, you can whip up a cake that will impress friends and family alike.
And don’t forget: baking is all about customization! Feel free to put your personal spin on the recipe and make it uniquely yours. So go ahead, gather your ingredients and start baking your warm, cozy masterpiece today!
FAQs About Oreo Chocolate Cake
Can I make Oreo Chocolate Cake without eggs?
Absolutely! You can substitute eggs with natural substitutes like unsweetened applesauce, mashed bananas, or a commercial egg replacement for the same binding effect.
How can I make the cake moister?
Using room temperature ingredients, incorporating more liquid like milk or oil, and adding an extra egg can enhance moisture in your cake.
What’s the best way to store left-over cake?
To keep your cake fresh, store it covered at room temperature for up to three days. If your cake has frosting, it’s best in the fridge to keep it from spoiling.
Can I freeze the Oreo Chocolate Cake?
Yes, you can freeze the cake! Wrap it tightly in plastic wrap and foil. It can last up to three months in the freezer. Just remember to thaw it overnight in the fridge before serving.
What should I do if my cake spills over while baking?
If your cake spills over, don’t panic! Just place a baking tray underneath to catch any drips. You can also adjust your oven temperature to make sure it bakes evenly next time.
Now that you’re armed with all the knowledge you need, it’s time to get baking! Enjoy the process, indulge in the delicious result, and—most importantly—have fun!
Looking for more delicious recipes? Follow us on Pinterest and Facebook!