Last updated on January 18, 2026
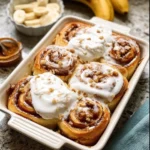
##Introduction A warm, cinnamon-scented swirl sliding apart under a glossy veil of cream cheese frosting—that tender, indulgent moment is why I return to cinnamon rolls for every celebration. I know many home cooks hesitate: dough worries, timing concerns, or the fear that a bakery-style roll is out of reach. I promise this Red Velvet Valentine’s Day Cinnamon Rolls recipe gives you the same elevated, ribboned interior and velvety cocoa note without complicated technique. If you love reimagined classics, you might also enjoy my take on banana bread cinnamon rolls, which use similar methods for reliably beautiful results.
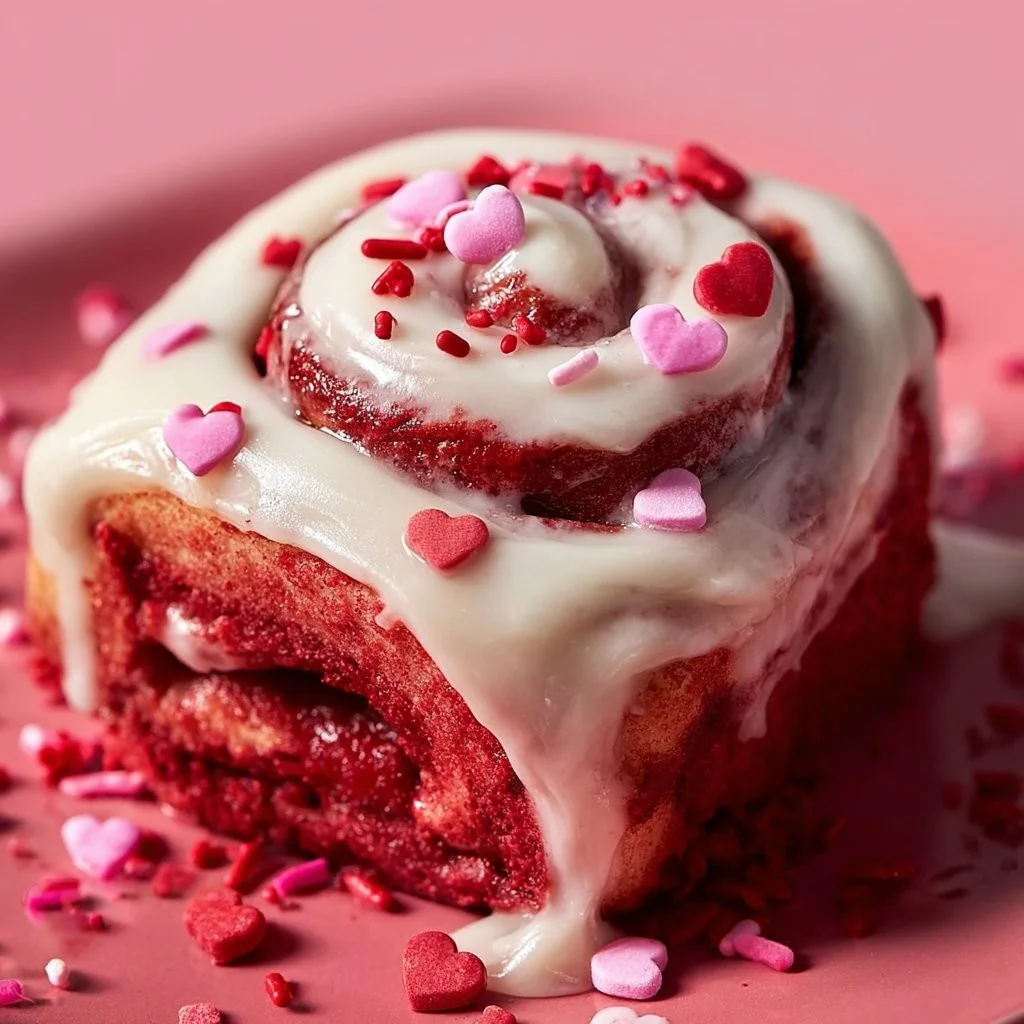
##A Quick Look at This Red Velvet Valentine’s Day Cinnamon Rolls Recipe These Red Velvet Valentine’s Day Cinnamon Rolls marry unsweetened cocoa and a tender, slightly tangy cream-cheese frosting for irresistible contrast. Key ingredients—cocoa powder and cream cheese—define the flavor and ensure a luxurious, moist crumb. The recipe yields show-stopping presentation with the classic spiral and deep red-brown hue that feels festive and romantic. It’s a surprisingly achievable project: simple pantry ingredients, an unobtrusive rise time, and approachable shaping make this a perfect at-home specialty. Stick around and I’ll share the small technique details that make them feel restaurant-quality.
##Ingredients You’ll Need for Red Velvet Valentine’s Day Cinnamon Rolls
Essentials
- 2 cups all-purpose flour — Use a spoon-and-level measurement for accuracy; fresh flour gives the best structure and tenderness.
- 1/2 cup unsweetened cocoa powder — Provides the red-velvet backbone; choose a Dutch-processed cocoa for a smoother, deeper flavor.
- 1/4 cup granulated sugar — Balances the cocoa and feeds the yeast slightly.
- 1 packet (2 1/4 tsp) active dry yeast — Ensure it’s within its best-by date; proofing a portion in warm milk confirms activity.
- 1/2 cup milk — Whole milk gives the richest crumb; warm it gently to wake the yeast and melt butter.
- 1/4 cup butter, melted — Adds richness and yields a tender dough.
- 1 large egg — Gives structure and richness; room temperature yields a smoother dough.
- 1 teaspoon vanilla extract — Elevates the cocoa and rounds the flavor.
- 1 teaspoon baking powder and 1/2 teaspoon baking soda — Small leavening lift and tender crumb; they also support the cocoa’s texture.
- 1/4 teaspoon salt — Balances sweetness and amplifies flavor.
- 1/2 cup brown sugar — The soft, molasses notes create deeper caramelized pockets in the filling.
- 2 teaspoons ground cinnamon — For that classic cinnamon roll warmth; fresh ground is best.
- 1/4 cup butter, softened (for the filling) — Soft, spreadable butter creates an even, luscious filling layer.
- 1 cup cream cheese — Full-fat, softened cream cheese makes the frosting silky and tangy.
- 2 cups powdered sugar — For a silky, smooth frosting that sets to brighten and balance the roll.
- 1 teaspoon vanilla extract — Adds warmth and complexity to the frosting.
- Milk, as needed — To thin the frosting to your preferred drapey consistency.
Notes on quality: I favor whole milk, unsalted butter (so I can control seasoning), and fresh cream cheese. These small choices translate into an unmistakably refined final bite.
Optional Add-ons
- A pinch of instant espresso powder in the dough or frosting to intensify cocoa flavor without adding coffee taste.
- A handful of finely chopped toasted pecans or walnuts in the filling for crunch and toasty depth.
- A teaspoon of beet powder if you want a brighter red hue while keeping flavors neutral.
- A scattering of freeze-dried raspberries over the finished rolls for a vivid color contrast and bright acidity.
- Flaky sea salt (a light pinch) on top of the frosting for a subtle, sophisticated contrast.
These add-ons elevate appearance and flavor without introducing extra technique or long prep.
Substitutions and Shortcuts
- Milk: Swap with an equal amount of almond or oat milk for a dairy-free option, though the texture will be slightly lighter.
- Butter: Use neutral-flavored oil (like light olive or vegetable) only in the dough if you’re in a bind; the butter flavor will be less pronounced.
- Cream Cheese Frosting: For a quicker finish, blend 8 ounces of whipped cream cheese spread with 1 1/2 cups powdered sugar and 1 tsp vanilla—slightly sweeter but faster.
- Cocoa: If you only have natural cocoa, reduce baking soda to 1/4 teaspoon and add 1/2 teaspoon baking powder to maintain lift.
- Yeast: Instant yeast can replace active dry yeast without proofing; mix it directly with the dry ingredients and reduce the water/milk temperature slightly.
- Make-ahead shortcut: Assemble rolls the evening before, place them in a covered pan in the fridge, and bake in the morning—this slow proof builds flavor and fits busy schedules.
If you need gluten-free inspiration while keeping the swirl technique intact, I sometimes refer to alternatives like this easy gluten-free blueberry cinnamon rolls for ideas on adjusting hydration and flour blends.
##How to Make Red Velvet Valentine’s Day Cinnamon Rolls Step-by-Step I’ve rewritten the process to keep you confident and calm. Read through once, then follow along—small attentions create impressive results.
- Prepare the dry mix. In a large mixing bowl, whisk together 2 cups all-purpose flour, 1/2 cup unsweetened cocoa powder, 1/4 cup granulated sugar, 1 teaspoon baking powder, 1/2 teaspoon baking soda, 1/4 teaspoon salt, and the packet of active dry yeast. Combining these ingredients first ensures an even distribution of leavening and cocoa so your dough rises uniformly.
- Warm the milk and melt the butter. In a small saucepan, warm 1/2 cup milk with 1/4 cup butter until the butter is melted and the mixture is pleasantly warm to the touch—about 100–110°F (slightly warmer than body temperature). This temperature wakes the yeast without killing it and helps the butter incorporate smoothly.
- Bring the wet and dry together. Stir the warm milk-butter mixture into the dry ingredients, then add 1 large egg and 1 teaspoon vanilla extract. Mix until the dough forms a shaggy mass. The egg adds richness and structure that make the rolls tender and substantial.
- Knead until smooth. Turn the dough onto a lightly floured surface and knead gently for about 6–8 minutes until it becomes smooth and slightly elastic. You’re not aiming for intensely stretchy bread dough—just a cohesive, soft ball. Kneading develops just enough gluten to hold the spiral shape while keeping the crumb delicate.
- First rise. Place the dough in a lightly oiled bowl, cover with a clean towel or plastic wrap, and let it rise in a warm, draft-free place until roughly doubled in size—about 45–60 minutes. A properly risen dough will spring back slowly when gently poked.
- Prepare the filling and roll out the dough. On a lightly floured surface, roll the risen dough into a rectangle roughly 12 x 9 inches. Spread 1/4 cup softened butter evenly over the surface, leaving a small margin at the far edge. Mix 1/2 cup brown sugar with 2 teaspoons ground cinnamon, then sprinkle it in an even layer over the butter. This even layering guarantees consistent pockets of caramelized filling in each spiral.
- Tightly roll and slice. Beginning from the long side, roll the dough up tightly into a compact log. The tighter the roll, the more defined and beautiful your spirals will be. Use a sharp, serrated knife or dental floss to slice the log into 9 to 12 even rolls—dental floss gives the cleanest cut without squashing the dough.
- Second rise on the baking sheet. Arrange the slices in a greased or parchment-lined baking sheet or round pan, leaving a little space between them. Cover and let rise for another 20–30 minutes until puffy. This final rest relaxes the dough and softens the shape for even baking.
- Bake to tender perfection. Preheat your oven to 350°F (175°C). Bake the rolls for 20–25 minutes until they are set and the tops are slightly firm but still pale—over-browning can dry them. The centers should feel soft and springy; a light pull-apart will reveal tender, steam-kissed layers.
- Make the cream cheese frosting. While the rolls bake or rest briefly, beat together 1 cup softened cream cheese, 2 cups powdered sugar, and 1 teaspoon vanilla extract until silky. Add a tablespoon or two of milk if you prefer a thinner, drapey frosting. The tang of the cream cheese offsets the cocoa and cinnamon, creating a harmonious balance.
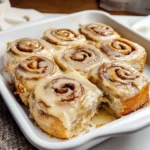
- Finish and serve. Spread the frosting over the rolls while they’re still warm so it melts into glossy ribbons over the spirals. Serve immediately for the most luxurious texture—warm, pillowy centers with glossy frosting. Leftovers are wonderful gently reheated; a 10–15 second zap in the microwave revives that just-baked warmth.
Throughout the process, I keep things simple and deliberate—measure well, watch temperatures, and give the dough the time it needs. The payoff is bakery-style rolls that feel like a special-occasion treat.
Common Mistakes to Avoid
Baking is practice, not perfection. I frame mistakes as simple lessons—little adjustments that take your results from good to remarkable. Below are the three pitfalls I see most often with cinnamon rolls and how to avoid them.
Mistake 1: Underproofed or Overproofed Dough
Skipping the proof or letting the dough overproof are common errors. Underproofed dough yields dense rolls with tight spirals; overproofed dough can collapse and lose definition in the oven. Watch for visual cues: the dough should roughly double and spring back slowly. Timing varies with kitchen temperature, so use feel over the clock.
Mistake 2: Rolling Too Loosely or Filling Leakage
A loose roll creates unruly spirals and allows the sugar-butter filling to leak during baking. Roll from the long edge and tuck gently as you go to create a compact log. Leave a small, butter-free margin at the far edge to seal the log. If the filling is too wet, briefly chill the log before slicing.
Mistake 3: Overbaking the Rolls
Overbaked cinnamon rolls become dry and lose their tender, pull-apart texture. They should be lightly golden and springy to the touch, not browned to a crust. Check a small center roll at the shortest baking time the first time you make this recipe—the goal is a soft interior rather than a browned exterior.
##Serving Suggestions for Red Velvet Valentine’s Day Cinnamon Rolls These rolls deserve a thoughtful presentation—simple touches make them feel effortlessly upscale.
Pair with gentle contrasts to balance richness: a bright fruit component and a textural element lift the experience. Present the pan straight from the oven, spooning extra frosting in the center for an English-tea elegance. For special occasions, garnish sparingly so each element shines.
Delicate Beverage Pairings
Serve with bright, slightly acidic drinks to cut through richness: a citrusy black tea, a sparkling raspberry spritzer, or a cold-brew iced tea with lemon. The effervescence or tannin helps cleanse the palate between each indulgent bite.
Garnishes and Visual Flourishes
Finish with a scatter of freeze-dried raspberry pieces, a few toasted almond slivers, or a light dusting of unsweetened cocoa. These accents add color, crunch, and a professional finish without complicating service.
Occasion Styling
For Valentine’s Day, arrange rolls in a heart-shaped pan or plate them in pairs on small dessert plates with a single halved strawberry. For brunch, serve alongside a small platter of sliced citrus and yogurt to keep the meal balanced and visually inviting.

Conclusion
I believe this Red Velvet Valentine’s Day Cinnamon Rolls recipe brings bakery-level finesse to your kitchen without demanding advanced techniques—just a little patience and care. It’s wonderfully flexible: adjust fillings, add textures, or make-ahead for a morning celebration. If you want an alternate take or another rendition for inspiration, consult Red Velvet Cinnamon Roll Recipe – Lynn’s Way of Life for additional ideas and variations. Try them this weekend; you’ll create something impressive, comforting, and utterly worth sharing.
FAQs About Red Velvet Valentine’s Day Cinnamon Rolls
Q1: How long does it take to make Red Velvet Valentine’s Day Cinnamon Rolls from start to finish? A1: For these Red Velvet Valentine’s Day Cinnamon Rolls, plan roughly 2 to 2.5 hours total—this includes mixing, two rises, and baking. Active hands-on time is about 30–40 minutes; most of the time is gentle proofing. If you prepare the dough the night before and refrigerate it, you can shorten the morning schedule considerably.
Q2: Can I make Red Velvet Valentine’s Day Cinnamon Rolls ahead of time? A2: Yes—Red Velvet Valentine’s Day Cinnamon Rolls are excellent for make-ahead. After shaping, place the unbaked rolls in the pan, cover tightly, and refrigerate overnight. In the morning, let them come to room temperature for 30–45 minutes and bake as directed. This slow proof develops flavor and makes the morning effortless.
Q3: How should I store leftover Red Velvet Valentine’s Day Cinnamon Rolls? A3: Store cooled Red Velvet Valentine’s Day Cinnamon Rolls in an airtight container at room temperature for up to 2 days. For longer storage, refrigerate up to 4 days—bring to room temperature or warm briefly before serving. You can also freeze un-frosted rolls (tightly wrapped) for up to 2 months; thaw and frost when ready.
Q4: Can I make Red Velvet Valentine’s Day Cinnamon Rolls gluten-free? A4: You can adapt this Red Velvet Valentine’s Day Cinnamon Rolls recipe to gluten-free by using a 1:1 gluten-free flour blend with xanthan gum and slightly increasing liquid if the dough feels dry. Baking times and textures will vary; for best results, look to tested gluten-free cinnamon roll recipes for hydration cues and handling tips.
Q5: How can I adjust the sweetness or frosting consistency for Red Velvet Valentine’s Day Cinnamon Rolls? A5: To reduce sweetness in Red Velvet Valentine’s Day Cinnamon Rolls, slightly cut the filling brown sugar or use less powdered sugar in the frosting. For frosting consistency, add milk one teaspoon at a time to thin it to a drapey consistency, or add a touch more powdered sugar to thicken—aim for a spreadable but not runny texture so it pools beautifully in the spirals.
Print
Red Velvet Valentine’s Day Cinnamon Rolls
- Total Time: 120 minutes
- Yield: 9-12 servings 1x
- Diet: Vegetarian
Description
Indulge in these tender Red Velvet Cinnamon Rolls with cocoa notes and a tangy cream cheese frosting, perfect for any celebration.
Ingredients
- 2 cups all-purpose flour
- 1/2 cup unsweetened cocoa powder
- 1/4 cup granulated sugar
- 1 packet (2 1/4 tsp) active dry yeast
- 1/2 cup milk
- 1/4 cup butter, melted
- 1 large egg
- 1 teaspoon vanilla extract
- 1 teaspoon baking powder
- 1/2 teaspoon baking soda
- 1/4 teaspoon salt
- 1/2 cup brown sugar
- 2 teaspoons ground cinnamon
- 1/4 cup butter, softened (for the filling)
- 1 cup cream cheese
- 2 cups powdered sugar
- 1 teaspoon vanilla extract (for frosting)
- Milk, as needed (for thinning frosting)
Instructions
- In a large mixing bowl, whisk together flour, cocoa powder, granulated sugar, baking powder, baking soda, salt, and yeast.
- In a small saucepan, warm the milk with melted butter until pleasantly warm (100–110°F).
- Stir the warm milk-butter mixture into the dry ingredients, then add the egg and vanilla extract. Mix until a shaggy dough forms.
- Knead the dough on a lightly floured surface for 6–8 minutes until smooth and elastic.
- Place the dough in an oiled bowl, cover, and let rise in a warm place until doubled in size (about 45–60 minutes).
- Roll the risen dough into a 12 x 9-inch rectangle and spread softened butter on top. Mix the brown sugar and cinnamon; sprinkle over the butter.
- Tightly roll the dough from the long side into a log and slice into 9-12 rolls.
- Arrange the rolls in a greased pan, cover, and let rise for another 20–30 minutes.
- Preheat oven to 350°F (175°C) and bake the rolls for 20–25 minutes until set and soft in the center.
- To make frosting, beat together cream cheese, powdered sugar, and vanilla extract until smooth. Thin with milk as desired.
- Spread frosting over warm rolls and serve immediately.
Notes
Use fresh ingredients for the best flavor and texture. Optional add-ins like nuts or espresso powder can enhance the rolls.
- Prep Time: 30 minutes
- Cook Time: 25 minutes
- Category: Dessert
- Method: Baking
- Cuisine: American
Nutrition
- Serving Size: 1 roll
- Calories: 320
- Sugar: 18g
- Sodium: 250mg
- Fat: 12g
- Saturated Fat: 7g
- Unsaturated Fat: 4g
- Trans Fat: 0g
- Carbohydrates: 45g
- Fiber: 3g
- Protein: 5g
- Cholesterol: 35mg
Keywords: cinnamon rolls, red velvet, cream cheese frosting, Valentine’s Day, dessert