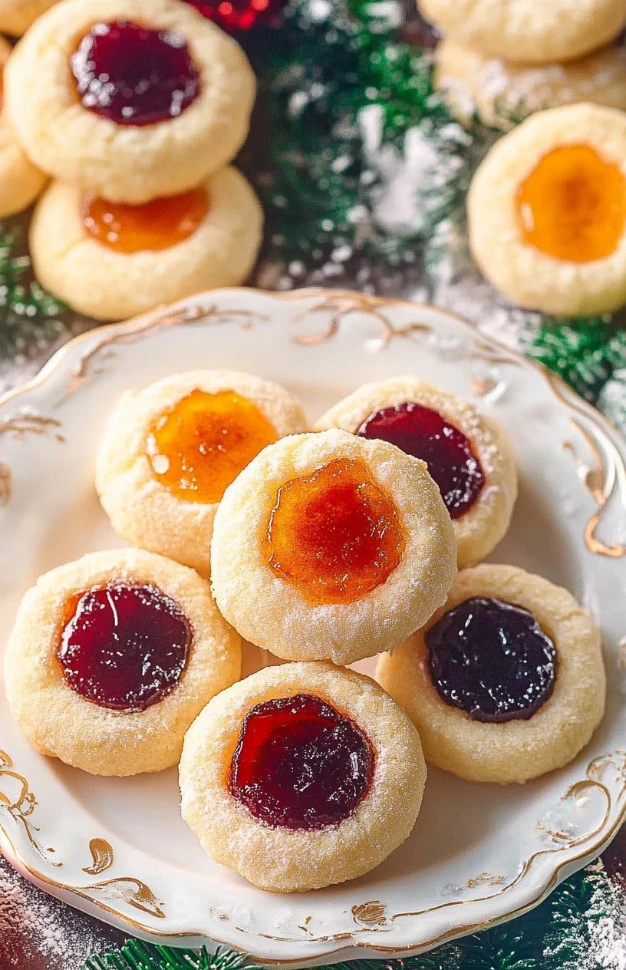
Thumbprint cookies are a delightful treat that many associate with warm family gatherings, cozy afternoons, and, of course, the aroma of freshly baked goods wafting through the house. This classic cookie features a soft and buttery dough with a deliciously sweet jam filling nestled in the center. They are not just a feast for the taste buds but also for the eyes, making them a favorite for cookie trays and festive occasions.
Everyone can appreciate these cookies, as they are easy to make and customizable to fit individual tastes. Impress your family and friends with these lovely bites of joy. Let’s explore how you can create these goodies right in your own kitchen!
Table of Contents
Why You’ll Love This Thumbprint Cookies Recipe
There are numerous reasons to adore thumbprint cookies! First and foremost, their versatility shines brightly. You can switch up the jam flavors to suit your personal preferences: whether you crave the tartness of raspberry, the sweetness of apricot, or even something a bit more exotic like fig or mango. Additionally, they can be easily tailored for various occasions, from holiday gatherings to casual dessert nights.
What really makes thumbprint cookies special is their delightful texture. The combination of a tender, buttery base with the gooeyness of the jam filling creates a mouthwatering experience in every bite. Not to mention, they look charming too! The little thumbprint dimple in the center invites you to take that first delicious bite. Prepare to experience a timeless recipe that blends simplicity with satisfaction in a delightful little package.
Ingredients You’ll Need for Thumbprint Cookies:
Essential Ingredients:
- 1 cup unsalted butter (room temperature): This forms the base of our cookies, providing a rich flavor and smooth texture.
- ¾ cup granulated sugar: This sweetener not only adds sweetness but also contributes to the cookie’s tender structure.
- 1 teaspoon vanilla extract (or almond extract): The hint of vanilla (or almond) enhances the overall flavor profile.
- ½ teaspoon kosher salt: A touch of salt helps balance the sweetness and heightens the flavors.
Dry Ingredients:
- 2 cups all-purpose flour: This provides the structure for the cookies and gives them the perfect crumble.
Toppings:
- ¼ cup jam (flavors like apricot and seedless raspberry jam are great): The filling, which is the star of the show, comes from jam of your choice!
- ⅓ cup granulated sugar (for rolling the cookie dough): This will add a little extra sweetness and a nice texture to the cookie exterior.
Optional Add-Ons:
While the classic thumbprint cookie is delicious on its own, you can consider adding:
- Nuts: Chopped walnuts or pecans in the dough for added flavor and crunch.
- Chocolate: A drizzle of melted chocolate over the jam-filled cookies for a touch of luxury.
- Spices: A hint of cinnamon or nutmeg in the dough can add warmth and coziness.
How to Make Thumbprint Cookies: A Step-by-Step Guide
Step 1: Creaming the Butter and Sugar
Begin by placing 1 cup of room-temperature unsalted butter and ¾ cup of granulated sugar into the bowl of a stand mixer fitted with a paddle attachment. Mix these together on medium speed for about two to three minutes. You are aiming for a light and airy texture, where the mixture becomes fluffy and pale in color.
Step 2: Adding Flavor
Once your mixture is light, it’s time to introduce 1 teaspoon of vanilla extract and ½ teaspoon of kosher salt. Blend this together until everything is fully combined. The scent of the vanilla should be wafting through the kitchen now!
Step 3: Incorporating the Flour
Next, reduce the mixer’s speed to low. Gradually sprinkle in the 2 cups of all-purpose flour, all while scraping down the sides and bottom of the mixing bowl as needed. Initially, the dough may seem crumbly and not come together immediately. Patience is key—if needed, you can use your hands to knead the ingredients lightly until the dough forms.
Step 4: Chilling the Dough
Once your dough is cohesive, roll it into a ball and wrap it in plastic wrap. Place the wrapped dough into the refrigerator and allow it to chill for about one hour. Chilling helps the flavors to meld and makes the dough easier to handle.
Step 5: Prepping for Baking
While the dough chills, preheat your oven to 350°F (180°C). Line two baking sheets with parchment paper to keep the cookies from sticking and make cleanup easier.
Step 6: Rolling the Dough
Once the dough has chilled, take it out of the refrigerator. Pour ⅓ cup of granulated sugar into a shallow bowl. Scoop about one tablespoon of dough and roll it into a ball. Roll each ball in the sugar to coat it evenly. Place the sugar-coated balls on the prepared baking sheets, leaving space between them for spreading.
Step 7: Creating the Thumbprint
Make a gentle indentation in the center of each cookie ball using your thumb. This will hold the jam filling later. Fill each indentation with about half a teaspoon of your chosen jam. It’s okay to overfill a little; the jam will spread as it bakes.
Step 8: Baking the Cookies
After preparing all the cookies, place them in the preheated oven and bake for 14 to 15 minutes. You want to watch for the edges to just begin to turn a light golden brown. Once they look perfect, allow the cookies to sit on the baking sheet for one additional minute before moving them to a wire rack to cool completely.
Step 9: Storing the Cookies
Once the cookies have cooled, transfer them to an airtight container for storage. This will keep them fresh and delicious for days to come.
Serving Suggestions for Thumbprint Cookies
Thumbprint cookies can be enjoyed in various ways! Here are some serving ideas:
- Coffee or Tea Pairing: Serve them alongside a warm cup of coffee, tea, or hot chocolate for a comforting snack.
- Dessert Platter: Arrange them on a decorative platter with other treats, like brownies or mini cupcakes, for a lovely dessert table.
- Gift Giving: Package them in a cute tin or box to present as homemade gifts during the holidays or for special occasions.
- Decorative Touch: Dust a little powdered sugar over the top just before serving for an elegant touch.
Pro Tips for Perfecting Your Thumbprint Cookies
- Room Temperature Ingredients: Ensure your butter is at room temperature for easy creaming. Cold butter can lead to dense cookies.
- Don’t Overmix: When adding flour, mix just until the dough forms. Overmixing can make cookies tough.
- Chill the Dough: Don’t skip chilling the dough, as it helps with texture and flavor and prevents the cookies from spreading too much.
- Use High-Quality Jam: The type of jam you use can elevate the flavor. Opt for quality jams that contain real fruit!
- Watch the Baking Time: Every oven is different. Start checking for doneness a minute or two before the time is up to avoid overbaking.
Easy Variations for Thumbprint Cookies
Feel free to get creative with thumbprint cookies! Here are a few easy variations you could try:
- Nut-Butter Filling: Instead of jam, fill the centers with peanut butter, almond butter, or Nutella for a different twist!
- Chocolate Ganache: Substitute the jam with chocolate ganache for an indulgent treat perfect for chocolate lovers.
- Citrus Zest: Add orange or lemon zest to the dough for a bright, fresh flavor.
- Coconut: Roll the cookie balls in shredded coconut for a tropical twist.
Storage Tips to Store Thumbprint Cookies
- Air-Tight Containers: Once cooled, store the cookies in an airtight container to keep them fresh. They can last up to a week at room temperature.
- Freezing: For longer storage, freeze the unbaked cookie dough balls or the baked cookies. Place them in a freezer-safe container or ziplock bag, and they will be good for up to three months. If freezing baked cookies, layer them with parchment paper to prevent sticking.
- Refreshing Cookies: If cookies become a bit hard, you can add a slice of bread to the container to help draw moisture back. The cookies will soften again.
Conclusion
Thumbprint cookies are a delightful creation that brings warmth, joy, and sweetness to any gathering. With a simple preparation and endless filling options, they cater to a variety of palates and occasions. This easy-to-follow recipe allows you to make these classic cookies at home, bringing a taste of nostalgia with each bite. So, gather your loved ones, enjoy some baking time, and let the delicious memories unfold with these irresistible thumbprint cookies!
FAQs About Thumbprint Cookies
1. Can I use gluten-free flour in thumbprint cookies?
Yes, you can substitute all-purpose flour with a gluten-free flour blend. Ensure that it’s a one-to-one replacement for the best results.
2. What type of jam is best for thumbprint cookies?
Any flavor of jam works well! Popular choices include raspberry, apricot, or strawberry. Feel free to experiment with your favorites!
3. Can I make thumbprint cookies ahead of time?
Absolutely! You can prepare the dough ahead of time, freeze it, and bake fresh cookies whenever you’re ready to enjoy them.
4. Why are my thumbprint cookies spreading too much while baking?
This can happen if the dough isn’t chilled enough before baking. Make sure to follow the chilling step and keep an eye on baking times.
5. How do I make my cookies extra chewy?
For a chewier texture, you can add an extra egg yolk to the dough. Also, ensure not to overbake them for maintaining moisture.
Enjoy your baking journey, and may your thumbprint cookies become a beloved favorite!
Print
Thumbprint Cookies
- Total Time: 28 minutes
- Yield: 24 cookies 1x
Description
These classic Thumbprint Cookies are tender, buttery, and filled with your favorite jam. Perfect for holidays or everyday treats, they’re easy to customize and fun to make. Each bite delivers a delightful contrast of textures and flavors!
Ingredients
Essential Ingredients:
- 1 cup unsalted butter, room temperature
- ¾ cup granulated sugar
- 1 teaspoon vanilla extract (or almond extract)
- ½ teaspoon kosher salt
Dry Ingredients:
- 2 cups all-purpose flour
Toppings:
- ¼ cup jam (apricot, raspberry, or your favorite flavor)
- ⅓ cup granulated sugar (for rolling the cookie dough)
Instructions
- Preheat oven: Set your oven to 350°F (175°C) and line a baking sheet with parchment paper.
- Cream butter and sugar: In a large bowl, beat the butter and ¾ cup sugar together until light and fluffy (about 2–3 minutes).
- Add flavoring and salt: Mix in the vanilla (or almond) extract and salt until well combined.
- Incorporate flour: Gradually add the flour and mix until a soft dough forms.
- Shape the cookies: Roll the dough into 1-inch balls, then roll each ball in the ⅓ cup granulated sugar.
- Create the thumbprint: Place the cookies on the baking sheet and gently press your thumb or the back of a spoon into the center of each ball to create an indentation.
- Fill with jam: Spoon about ½ teaspoon of jam into each indentation.
- Bake: Bake for 12–14 minutes, or until the edges are just turning golden.
- Cool: Let the cookies cool on the baking sheet for a few minutes before transferring to a wire rack to cool completely.
Notes
- Use seedless jam for a smoother filling texture.
- For perfectly shaped cookies, chill the dough for 15–20 minutes before baking.
- You can change the jam flavor to match the season or your personal taste!
- Prep Time: 15 minutes
- Cook Time: 13 minutes
- Category: Dessert
- Method: Baking
- Cuisine: American
Nutrition
- Serving Size: 1 cookie
- Calories: 120
- Sugar: 7g
- Sodium: 50mg
- Fat: 6g
- Saturated Fat: 4g
- Unsaturated Fat: 2g
- Trans Fat: 0g
- Carbohydrates: 14g
- Fiber: 0g
- Protein: 1g
- Cholesterol: 15mg
Keywords: thumbprint cookies, jam cookies, holiday cookies, butter cookies, easy cookie recipe