Last updated on January 21, 2026
I can still remember the first time I smelled that nutty, sweet aroma in my kitchen—my living room filled with guests and a fridge full of confidence. That moment stuck with me: a simple, no-fuss dessert that looked and tasted special, yet didn’t demand a ton of oven time or baking bravado. If you’ve ever stood in front of a recipe wondering “Can I really make this?”, you’re in the right place. Many home cooks worry about overcomplicating desserts, or about a cheesecake turning out too soft or too firm. I promise: this No-Bake Pistachio Cheesecake is simple, forgiving, and perfect for first-timers. I’ll walk you through every step so you can serve something pretty and delicious without the stress.
If you like easy no-bake cheesecakes, this one will soon be a favorite in your dessert rotation.
Why I Love This Recipe of No-Bake Pistachio Cheesecake
There’s a warmth to pistachio that feels both cozy and a little elegant. I love this recipe because it brings that gentle, nutty flavor into a dessert that’s wonderfully simple to make. No long oven baking, no water baths, and no last-minute panic—just good ingredients, a little patience while it chills, and a gorgeous result.
For beginner cooks, this recipe is a dream. The steps are straightforward and forgiving: if your whipped cream is a touch softer, it still sets; if your base is a little thick, it still tastes great. It’s also flexible for substitutions and quick shortcuts, which I’ll share. Emotionally, this cheesecake feels like a small celebration—perfect for when I want to make something special without spending all afternoon in the kitchen. The texture is silky, the color is inviting, and the pistachio topping makes it feel festive.
Ingredients You’ll Need for No-Bake Pistachio Cheesecake
Essentials
- 300g digestive biscuits (or plain tea biscuits) — crushed finely. You can use gluten-free biscuits if needed.
- 150g salted or unsalted butter, melted — helps bind the base and adds richness.
- 500g full-fat cream cheese, room temperature — for best texture, let it sit at room temp for 30–60 minutes.
- 300ml double cream (heavy cream in some countries) — to be whipped to stiff peaks.
- 120g icing sugar (confectioners’ sugar) — adds sweetness and smoothness.
- 100g pistachio spread — folded into the cream cheese filling (brands vary; use one you enjoy).
- 150g–200g pistachio spread, melted — for the glossy topping (use less if you prefer a thinner layer).
- 2 tbsp chopped pistachios — for garnish and a nice crunch.
Optional add-ons
- A teaspoon of vanilla extract mixed into the cream cheese for a rounded flavor.
- A pinch of sea salt sprinkled over the top to lift the flavors.
- Zest of a small lemon for a fresh lift (use sparingly—pistachio is the star).
- A few drops of green food coloring if you want a more vivid green (totally optional).
- Dark chocolate shavings or a drizzle for contrast.
Substitutions and Shortcuts
- Biscuits: Graham crackers, Maria biscuits, or gluten-free digestive alternatives work well.
- Butter: Use unsalted if you prefer and add a pinch of salt to the base mixture if needed.
- Cream cheese: Full-fat gives the best texture and flavor. Low-fat cream cheese may make the cheesecake less stable.
- Double cream: Heavy whipping cream is the same thing in many places. If you only have single cream, this won’t whip properly—don’t substitute.
- Pistachio spread: If you don’t have a commercial pistachio spread, you can make a quick homemade version by blitzing roasted pistachios with a touch of oil and a little icing sugar until smooth. It won’t be exactly the same but will work in a pinch.
- Icing sugar: Powdered sugar is the same thing; sift it if it’s lumpy.
- Tin size: This recipe is written for an 8-inch (20cm) springform tin. If you use a larger tin, your cheesecake will be thinner and may need less chilling time.
A few quick shortcuts:
- Use pre-crushed biscuit crumbs from the store if you’re in a rush.
- If you forget to set cream cheese out to soften, pop it in the microwave for 8–10 seconds (be careful!)—just to take the chill off.
- Make the base ahead and keep it chilled while you prepare the filling.
Tip: I like to measure and arrange ingredients before I start. It makes the process calm and tidy.
For other easy, no-bake treats, I keep a few recipes ready that follow the same relaxed, make-ahead approach.
How to Make No-Bake Pistachio Cheesecake Step-by-Step
Before you start
- Line the base and sides of an 8-inch (20cm) springform tin with baking paper. This makes removal and clean-up much easier.
- Bring the cream cheese to room temperature. It should be soft enough to beat smoothly.
- Chill your mixing bowl and whisk for whipping the cream if you want the quickest, firmest whipped cream.
Step 1 — Make the biscuit base
- Crush the biscuits finely. I like to use a food processor for a fine, even crumb. If you don’t have one, put the biscuits in a strong zip-top bag, seal it, and crush with a rolling pin until fine. Aim for crumbs, not big chunks.
- Mix the crushed biscuits with the melted butter in a bowl until all the crumbs are evenly coated and the mix holds together when pressed.
- Press the mixture firmly and evenly into the base of the lined springform tin. Use the base of a glass or a flat-bottomed measuring cup to press down and compact it well. A neat, compact base helps the cheesecake hold its shape.
- Chill the base in the fridge for 10–15 minutes while you prepare the filling. This helps it set and reduces crumbs in the filling.
Step 2 — Make the cream cheese mixture
- Place the room-temperature cream cheese in a mixing bowl. Add the icing sugar and the 100g of pistachio spread.
- Using an electric mixer on medium speed, whisk until the mixture is just combined and smooth. Don’t overmix. Overworking can warm the cheese and make the filling too soft or even slightly runny.
- Taste and adjust sweetness if needed. If your pistachio spread is already sweet, you may not need more icing sugar.
Step 3 — Whip the cream
- In a chilled bowl, whip the double cream to stiff peaks. That means when you lift the whisk, peaks stand up straight without folding over.
- Be careful not to overwhip to the point of turning buttery. Stop as soon as the peaks are firm and glossy.
Step 4 — Fold and assemble
- Gently fold about a third of the whipped cream into the cream cheese mixture to loosen it.
- Fold in the remaining whipped cream in two additions, using gentle motions from bottom to top. Keep as much air as possible—this keeps the filling light.
- Spoon the filling onto the chilled biscuit base. Smooth the top with a spatula or the back of a spoon. Try to get a level surface; it looks nicer and makes topping easier.
Step 5 — Chill until set
- Cover the tin with cling film or a tight lid and refrigerate for at least 6 hours. I prefer overnight—this gives the flavors time to meld and the filling time to firm up.
- If you need it ready quicker, chilling for 4 hours may work but it will be softer.
Step 6 — Prepare the topping and garnish
- Melt the 150–200g of pistachio spread carefully. I microwave it at 500W in 30-second bursts, stirring between bursts until smooth. Don’t overheat; you want it pourable but not too hot.
- Finely chop the 2 tbsp of pistachios for garnish.
- Remove the cheesecake from the tin gently. Run a thin palette knife around the edge first if needed.
Step 7 — Top and finish
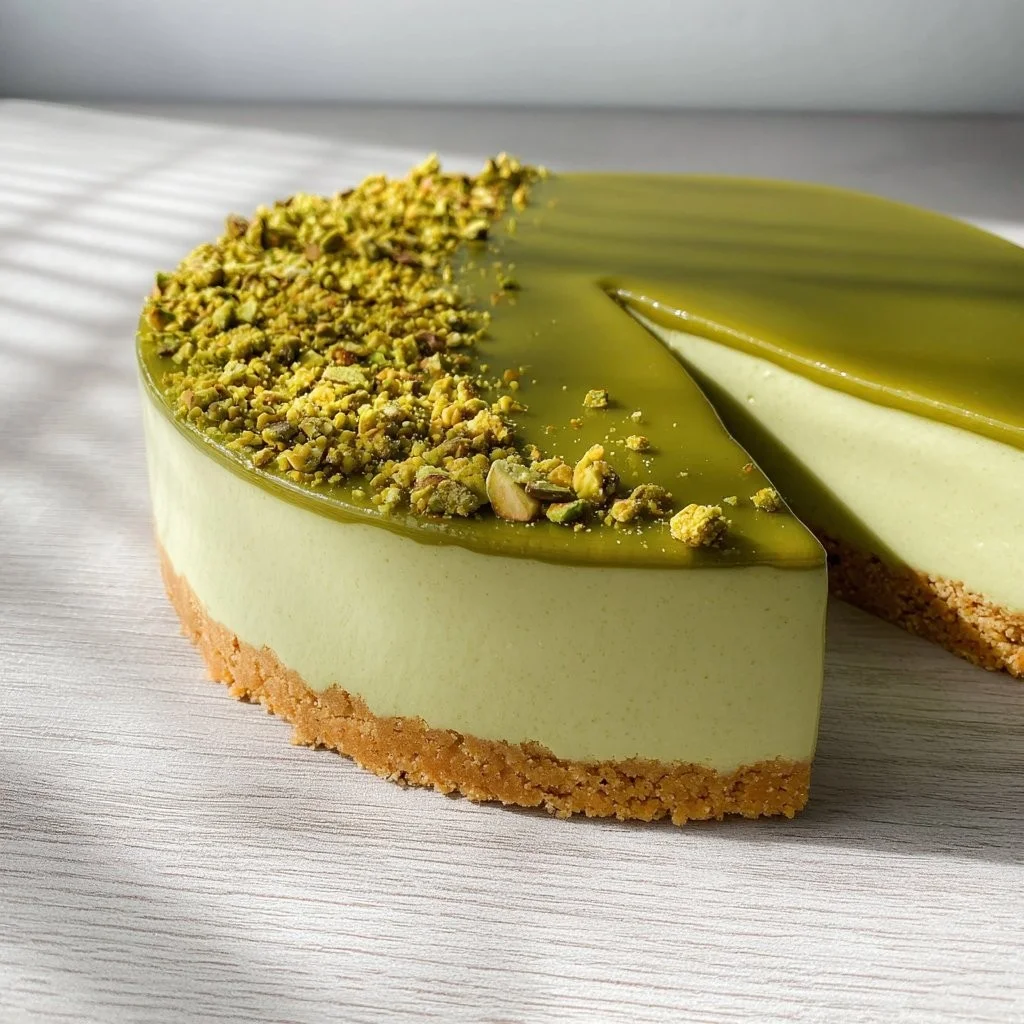
- Pour the melted pistachio spread over the top, letting it flow naturally toward the edges. You can spoon it gently or pour from a small jug—either way, smooth it with a spatula if needed so it reaches the edge.
- Sprinkle the chopped pistachios around the edge or over the whole cake for a pretty finish.
- Return the cheesecake to the fridge for 30 minutes to allow the topping to set and any melted spread to firm up.
Step 8 — Slice and serve
- For clean slices, chill the cheesecake well, then run a sharp knife under hot water, wipe dry, and slice. Repeat between slices if you want perfectly neat edges.
- Store leftovers covered in the fridge for up to 3–4 days. The texture is best within the first 48 hours.
Helpful tips for the process
- Room temperature cream cheese mixes smoother and avoids lumps.
- If your filling seems loose after folding, pop the cheesecake back in the fridge for a few hours to firm up rather than trying to fix it by adding more whipped cream.
- Use good-quality pistachio spread for the best flavor. Homemade pistachio paste can be used but may result in a slightly different color and texture.
Common Mistakes to Avoid
Overmixing the cream cheese
It’s easy to think that mixing longer equals smoother results, but with cream cheese, that can backfire. If you beat cream cheese too much, it warms and becomes loose—this makes the filling less stable and prone to sinking. Mix just until combined and smooth. If you see the texture thinning, stop. The whipped cream you fold in will lighten and help set the mixture.
Not chilling long enough
A no-bake cheesecake relies on time in the fridge to firm up. I’ve seen many cooks try to rush this step and serve a cheesecake that’s too soft to slice. The minimum in this recipe is 6 hours, but overnight is best. If you try to unmold it too early, it may collapse or leave the tin messy. Patience yields the prettiest slices.
Whipping cream errors
Whipping cream to the right point takes attention. Underwhipped cream leads to a filling that’s too soft and can weep; overwhipped cream can turn grainy and start to separate. Aim for stiff peaks—lift the whisk and the peaks should stand up—and fold gently to keep the air in the mixture. Chilling the bowl and whisk briefly helps the cream whip faster and more reliably.
Serving Suggestions for No-Bake Pistachio Cheesecake
Simple and elegant
Serve slices on their own with a small scatter of extra chopped pistachios and a dusting of icing sugar. The cheesecake is rich, so a small slice goes a long way. Add a couple of thin lemon slices on the side if you like a hint of bright acidity.
With fruit and sauces
Pistachio pairs beautifully with berries and citrus. Try serving the cheesecake with:
- A small spoon of raspberry coulis on the plate for contrast.
- Fresh sliced strawberries or poached pears for a softer, warmer pairing.
These fruit additions add color and a fresh counterpoint to the creamy texture.
For gatherings and parties
Lay the cheesecake on a pretty cake stand and surround each slice with a small portion of whipped cream and a few toasted pistachios. If you want to be clever, set up a small topping station with chopped pistachios, chocolate shavings, and citrus zest so guests can customize their slice. This cheesecake is perfect for potlucks because you can make it the day before and transport it chilled.
Storage and make-ahead tips
- Make this cheesecake up to 48 hours ahead for best flavor and texture. Keep it covered in the fridge.
- For longer storage, you can freeze it (whole or in slices) wrapped tightly. Thaw overnight in the fridge before serving.
- If the topping is very thick, allow it to soften at room temperature for 10–15 minutes before slicing for cleaner cuts.
Conclusion
You’ve learned that making a No-Bake Pistachio Cheesecake is simpler than it looks. With a solid biscuit base, a smooth cream cheese and pistachio filling, and a glossy pistachio topping, you get a dessert that feels special but is beginner-friendly. You can tweak sweetness, try small flavor additions, or keep it classic—either way, it’s cozy, elegant, and forgiving. If you want another take on a no-bake pistachio version or inspiration for plating and variations, this recipe guide from Sam has some lovely ideas: No Bake Pistachio Cheesecake | Buttermilk by Sam.
FAQs About No-Bake Pistachio Cheesecake
Q1: How long does No-Bake Pistachio Cheesecake need to chill before serving?
A1: Chill it for at least 6 hours, but I recommend overnight for the best texture and flavor. This allows the filling to firm up and the flavors to meld.
Q2: Can I use low-fat cream cheese for this No-Bake Pistachio Cheesecake?
A2: You can, but I don’t recommend it. Full-fat cream cheese gives the best texture and stability. Low-fat varieties often make the filling softer and less satisfying.
Q3: How can I make a nut-free version of No-Bake Pistachio Cheesecake?
A3: If you need nut-free, swap the pistachio spread for a similar-flavored spread without nuts (rare, but possible) or use white chocolate tinted and flavored with a tiny bit of natural extract—though the classic pistachio flavor will change. For the base, keep the digestives; use seeds like roasted sunflower seeds blended into a paste for a crunchy topping instead of pistachios.
Q4: My No-Bake Pistachio Cheesecake is too soft—what can I do to fix it?
A4: If it’s slightly soft, return it to the fridge for a few more hours. If it’s very loose, next time reduce the amount of pistachio spread in the filling slightly or ensure your whipped cream reaches firm peaks before folding. Also, make sure the cream cheese was room temperature but not warm when you mixed it.
Q5: Can I make this No-Bake Pistachio Cheesecake gluten-free?
A5: Yes. Use gluten-free digestive-style biscuits for the base. Everything else in the recipe is naturally gluten-free, but always check labels on pistachio spread and icing sugar for possible cross-contamination if you’re cooking for someone with celiac disease.
This No-Bake Pistachio Cheesecake has become one of my go-to desserts when I want something that looks and tastes like a treat without a complicated process. It’s great for weeknight celebrations, relaxed weekend baking, or for when you want to impress without stress. Make it your own with small tweaks, and enjoy the cozy, nutty flavors with people you love.
Print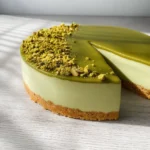
No-Bake Pistachio Cheesecake
- Total Time: 360 minutes
- Yield: 8 servings 1x
- Diet: Vegetarian
Description
A simple and elegant no-bake pistachio cheesecake that’s perfect for first-time bakers and requires no complicated techniques.
Ingredients
- 300g digestive biscuits, crushed finely
- 150g salted or unsalted butter, melted
- 500g full-fat cream cheese, room temperature
- 300ml double cream, whipped to stiff peaks
- 120g icing sugar
- 100g pistachio spread
- 150g–200g pistachio spread, melted for topping
- 2 tbsp chopped pistachios, for garnish
- Optional: 1 tsp vanilla extract, pinch of sea salt, zest of small lemon, drops of green food coloring, dark chocolate shavings
Instructions
- Line the base and sides of an 8-inch (20cm) springform tin with baking paper.
- Crush the biscuits finely and mix with the melted butter. Press into the base of the lined springform tin and chill for 10–15 minutes.
- In a mixing bowl, beat the room-temperature cream cheese with icing sugar and pistachio spread until smooth.
- Whip the double cream to stiff peaks and gently fold into the cream cheese mixture.
- Spoon the filling onto the chilled biscuit base and smooth the top. Cover and refrigerate for at least 6 hours or overnight.
- Melt the pistachio spread and pour over the top of the cheesecake. Garnish with chopped pistachios.
- Chill for an additional 30 minutes before serving.
- Slice and serve cold, enjoying with optional fruit or sauces.
Notes
For best texture and flavor, chill overnight. This cheesecake can be made gluten-free by using gluten-free biscuits.
- Prep Time: 30 minutes
- Cook Time: 0 minutes
- Category: Dessert
- Method: No-Bake
- Cuisine: International
Nutrition
- Serving Size: 1 slice
- Calories: 400
- Sugar: 25g
- Sodium: 300mg
- Fat: 28g
- Saturated Fat: 16g
- Unsaturated Fat: 12g
- Trans Fat: 0g
- Carbohydrates: 32g
- Fiber: 3g
- Protein: 7g
- Cholesterol: 55mg
Keywords: cheesecake, dessert, no-bake, pistachio, easy dessert