Summer days are perfect for a treat that is both cool and delicious. If you’re ready to impress your friends and family with something special, then making No Churn Biscoff Ice Cream can be a delightful choice. This creamy, dreamy dessert combines the rich flavors of cookie butter and Biscoff cookies, creating a sweet indulgence that anyone will love. Plus, it’s super easy to make because you won’t need an ice cream maker. Just a few simple ingredients and a bit of time in the freezer will lead to homemade goodness that tastes better than store-bought!
Table of Contents
Why You’ll Love This No Churn Biscoff Ice Cream
This No Churn Biscoff Ice Cream is not just another dessert; it is a treat filled with flavor and texture. Here are a few reasons why you’ll fall in love with this recipe:
No Ice Cream Maker Needed: You can whip up this delicious ice cream without fancy equipment. Just mix the ingredients and freeze!
Rich and Creamy Texture: With its base of heavy cream and sweetened condensed milk, this ice cream is wonderfully smooth and indulgent.
Flavor Explosion: The unique blend of cookie butter and crumbled Biscoff cookies will delight your taste buds with each spoonful.
Easy to Customize: You can add your favorite toppings or mix-ins to make this ice cream even more special.
Perfect for Any Occasion: Whether it’s a summer barbecue, birthday party, or a cozy night in, this ice cream fits right in.
Now, let’s dive into what you’ll need to make this delightful dessert!
Ingredients You’ll Need for No Churn Biscoff Ice Cream
To get started on your No Churn Biscoff Ice Cream, gather the following ingredients:
Essential Ingredients:
- 3 cups heavy cream: This provides the rich, creamy base for our ice cream.
- 14 ounces sweetened condensed milk: This adds sweetness and creaminess without the need for churning.
- 2 teaspoons vanilla extract: A touch of vanilla enhances the overall flavor.
- 1 1/2 cups cookie butter: This is the star ingredient. The spread adds a rich and spiced flavor that is irresistible.
- 1 1/2 cups coarsely chopped Biscoff cookies: These cookies bring crunch and additional flavor to the ice cream.
Optional Add-Ons:
- Extra crumbled Biscoff cookies: For added texture on top.
- Drizzle of caramel or chocolate sauce: For a gourmet touch when serving.
- Chopped nuts: Such as almonds or pecans for extra crunch.
- Whipped cream: For serving, if you want to make it extra special.
How to Make No Churn Biscoff Ice Cream: Step by Step
Now that you have all the ingredients ready, it’s time to make your No Churn Biscoff Ice Cream! Follow these simple steps:
Prepare Your Mixing Bowl: Start by taking a large mixing bowl. Make sure it’s clean and dry to ensure your ingredients whip nicely.
Combine Base Ingredients: Pour in 3 cups of heavy cream and 14 ounces of sweetened condensed milk into the bowl. Add in 2 teaspoons of vanilla extract and 1 cup of cookie butter. The mixture will be rich and thick.
Beat the Mixture:
- Using an electric mixer, beat the mixture on medium speed.
- Keep mixing until soft peaks begin to form. This means the mixture will hold its shape but is still fluffy.
Layer the Ice Cream:
- Grab a loaf pan (or any freezer-safe container).
- Start by adding a layer of the ice cream mixture to the bottom of the pan. Spread it evenly.
- Next, drizzle 1/4 cup of cookie butter over this layer.
- Sprinkle in some crumbled Biscoff cookies for added crunch.
Repeat Layers:
- Add another layer of the ice cream mixture, followed by another drizzle of cookie butter and more crumbled cookies.
- Continue this layering process until all your ingredients are used.
Finish On a Sweet Note: Add any remaining crumbled cookies and a bit more cookie butter on top for a beautiful finish.
Freeze: Cover the loaf pan with plastic wrap or aluminum foil. Place it in the freezer overnight or until completely frozen solid.
And that’s it! You’ve successfully made your own No Churn Biscoff Ice Cream. Now comes the fun part: serving and enjoying!
Serving Suggestions for No Churn Biscoff Ice Cream
When it’s time to serve your No Churn Biscoff Ice Cream, here are some delightful ideas:
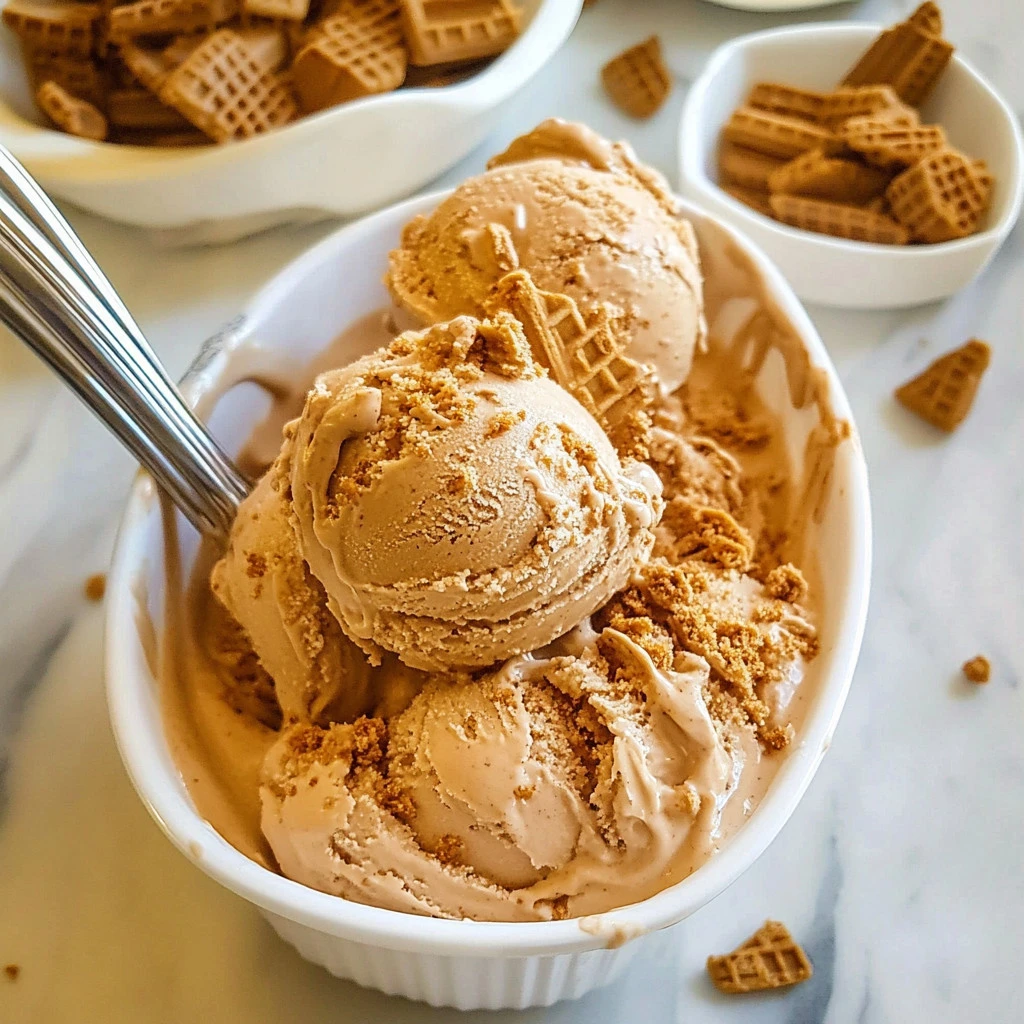
Simple Scoops: Just scoop out the ice cream using a large ice cream scoop. Place it in a bowl or on a cone for classic enjoyment.
Garnish with Crumbs: Add some extra crumbled Biscoff cookies on top for a crunchy garnish.
Drizzle with Sauce: A little drizzle of caramel or chocolate sauce can take it to the next level of decadence.
Serve with Whipped Cream: A dollop of whipped cream on top will make for an indulgent presentation.
Pair with Fruit: Fresh berries or banana slices can add a refreshing contrast to the rich ice cream.
Pro Tips for Perfecting Your No Churn Biscoff Ice Cream
Here are a few expert tips to ensure your ice cream is perfectly creamy and delicious:
Use Heavy Cream: Always opt for heavy cream, as it provides the best texture for homemade ice cream. Avoid lighter creams that may result in a less creamy outcome.
Don’t Overmix: When whipping the cream mixture, stop as soon as soft peaks form. Overmixing can lead to a grainy texture.
Layer Wisely: Ensure that you layer evenly. This will help create beautiful swirls of cookie butter and cookie bits throughout the ice cream.
Freeze Properly: Make sure your container is well-sealed to avoid ice crystals forming in your ice cream. No one likes a grainy texture!
Let it Soften: If your ice cream is too hard when you take it out of the freezer, let it sit at room temperature for a few minutes before scooping.
Easy Variations for No Churn Biscoff Ice Cream
If you’re in the mood to change things up a bit, here are some easy variations you can try:
Storage Tips to Store No Churn Biscoff Ice Cream
To make sure your No Churn Biscoff Ice Cream stays fresh and delicious for as long as possible, follow these storage tips:
Use Airtight Container: Always store your ice cream in an airtight container to prevent freezer burn and maintain its creamy texture.
Freeze Quickly: Make sure to place your ice cream in the coldest part of your freezer for the best results.
Keep It Covered: If you’re using a loaf pan, cover it with plastic wrap before putting on the lid or foil. This protects it from absorbing any odors from the freezer.
Label and Date: If you plan to store it for a while, label and date the container. Homemade ice cream is best enjoyed within 2 to 3 weeks, but it can last a month if stored properly.
Re-scoop Safely: If your ice cream has hardened too much, let it sit at room temperature for a few minutes before trying to scoop. This allows it to soften slightly for easier serving.
Conclusion
Creating your own No Churn Biscoff Ice Cream is easier than you might think! With just a few simple ingredients and steps, you can enjoy this rich and flavorful dessert at home without the need for complicated equipment. Perfect for families, parties, or just to satisfy your sweet tooth, this ice cream is sure to impress everyone who tries it. So, gather your ingredients, follow this guide, and get ready to dive into a bowl of creamy, cookie goodness!
FAQs About No Churn Biscoff Ice Cream
1. Can I use another type of cookie instead of Biscoff?
Absolutely! You can use any flavored cookie or spread that you enjoy. Just keep in mind that the flavor might change slightly.
2. How long will this ice cream last in the freezer?
Homemade ice cream is best enjoyed within 2 to 3 weeks. If properly stored, it can last up to a month, but the texture may change over time.
3. Can I make this dairy-free?
Yes! You can replace heavy cream with coconut cream and use a dairy-free condensed milk alternative. The flavor will be different but still delicious!
4. Is this ice cream suitable for kids?
Yes! This ice cream is perfect for kids but be sure to check for any allergies related to the ingredients used.
5. Can I add alcohol to the ice cream mix?
While you can add a splash of flavored liqueur, keep in mind that too much liquid can affect the texture. Add it sparingly!
Enjoy your homemade No Churn Biscoff Ice Cream, and don’t hesitate to share the joy of making this dessert with family and friends!
Print
No Churn Biscoff Ice Cream
- Total Time: 6 hours 15 minutes
- Yield: 8 servings 1x
Description
No Churn Biscoff Ice Cream is a rich, creamy frozen dessert that combines cookie butter and chunks of Biscoff cookies—no ice cream maker required! This indulgent treat is perfect for summer or any time you’re craving something sweet and spiced.
Ingredients
Essential Ingredients:
- 3 cups heavy cream
- 14 ounces sweetened condensed milk
- 2 teaspoons vanilla extract
- 1 1/2 cups cookie butter
- 1 1/2 cups coarsely chopped Biscoff cookies
Optional Add-Ons:
- Extra crumbled Biscoff cookies (for topping)
- Drizzle of caramel or chocolate sauce
- Chopped nuts (e.g., almonds or pecans)
- Whipped cream (for serving)
Instructions
- Whip the cream: In a large mixing bowl, beat the heavy cream with a hand mixer or stand mixer until stiff peaks form.
- Combine sweetened condensed milk and flavorings: In another bowl, mix the sweetened condensed milk, vanilla extract, and cookie butter until smooth.
- Fold together: Gently fold the whipped cream into the cookie butter mixture in batches until fully combined and fluffy.
- Add cookies: Stir in the chopped Biscoff cookies, reserving a few for topping if desired.
- Transfer and freeze: Pour the mixture into a loaf pan or airtight container. Sprinkle any reserved cookies on top and cover.
- Freeze: Freeze for at least 6 hours or until firm.
- Serve: Scoop into bowls or cones and top with optional caramel drizzle or whipped cream.
Notes
- Make sure your heavy cream is very cold before whipping for best results.
- Use a spatula to fold gently—avoid deflating the whipped cream.
- This ice cream keeps well in the freezer for up to 2 weeks.
- Prep Time: 15 minutes
- Cook Time: undefined
- Category: Dessert
- Method: No Churn / Freezer
- Cuisine: American
Nutrition
- Serving Size: 1/2 cup
- Calories: 420
- Sugar: 28g
- Sodium: 120mg
- Fat: 30g
- Saturated Fat: 18g
- Unsaturated Fat: undefined
- Trans Fat: undefined
- Carbohydrates: 35g
- Fiber: 0g
- Protein: 4g
- Cholesterol: 95mg
Keywords: No Churn Biscoff Ice Cream, Cookie Butter Ice Cream, Easy Homemade Ice Cream, Biscoff Recipes, Summer Dessert