Last updated on January 26, 2026
A Valentine’s Moment in Your Kitchen
There’s a particular hush that settles over the kitchen when I melt chocolate—the warm, slightly floral aroma that fills the air, the glossy river of cocoa sliding from a spoon. It’s the kind of sensory memory that turns ordinary moments into something memorable, and that’s exactly why I love making Valentine’s Day Chocolate Bark: it feels indulgent, celebratory, and deeply personal. If you’ve ever hesitated because of time, technique, or a fear of tempering chocolate perfectly, I want to reassure you: this recipe gives restaurant-worthy results without requiring pastry school skills. For more ways to make holidays feel effortless in the kitchen, I often turn to gluten-free baking ideas that keep celebrations inclusive and simple.
A Quick Look at This Valentine’s Day Chocolate Bark Recipe
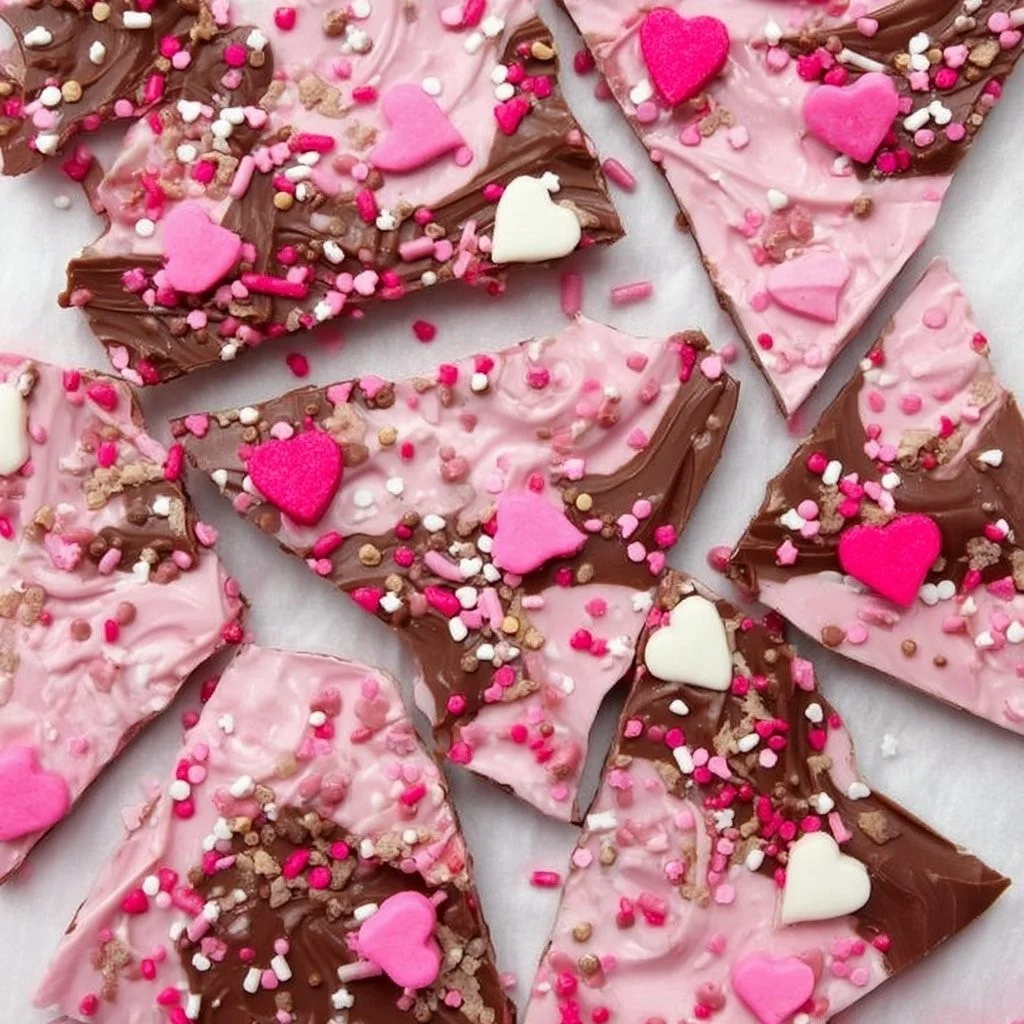
This Valentine’s Day Chocolate Bark layers semi-sweet chocolate with wisps of creamy white chocolate and a playful ribbon of pink candy melts, finished with a scattering of festive Valentine’s sprinkles. The semi-sweet chips provide a rich, balanced cocoa depth while the white chocolate and pink candy melts introduce sweetness and visual contrast. It’s a show-stopping presentation that’s deceptively easy to assemble and perfect for gifting, dessert tables, or a romantic snack. The technique keeps things forgiving—no tempering required—so you can create something elegant and whimsical in under an hour. Keep reading to learn the simple tricks that make the finished bark look artisanal.
Ingredients You’ll Need for Valentine’s Day Chocolate Bark
I always recommend taking a moment to gather everything before you begin—good ingredients make the difference between a pretty treat and an unforgettable one. Below I’ve organized what you’ll need into essentials, optional add-ons, and practical substitutions so you can adapt the recipe to what’s in your pantry.
Essentials
- Semi-sweet chocolate chips (10–12 ounces): Choose high-quality chips or a chopped bar for a deeper chocolate flavor and smooth melt. Semi-sweet keeps the bark balanced and not overly sweet.
- White chocolate chips (4–6 ounces): Use couverture or good-quality chips for a creamy, ivory contrast; they add a silky ribbon and help create that gourmet marbling effect.
- Pink candy melts (2–4 ounces): These provide vibrant color and are specifically formulated to melt smoothly and set with a glossy finish—perfect for Valentine’s styling.
- Valentine’s sprinkles (a few tablespoons): A mix of nonpareils, hearts, and jimmies adds texture and personality. Opt for decorations labeled for candy use so they hold up when pressed into chocolate.
Optional Add-ons
- Sea salt flakes: A light sprinkling of flaky sea salt brightens the chocolate and highlights layers of flavor.
- Crushed freeze-dried raspberries: For a tart counterpoint and lovely flecks of color.
- Chopped toasted almonds, pistachios, or hazelnuts: Add crunch and a nutty aroma; pistachios offer a pretty green contrast against the pink.
- Edible gold or pearl dust: Use sparingly for an elevated, romantic finish.
- A few drops of vanilla bean paste: Stirred into the melted white chocolate it deepens flavor without overwhelming the visual contrast.
Substitutions and Shortcuts
- Swap semi-sweet chips for dark chocolate (60–70% cocoa) if you prefer a more sophisticated bitterness; use milk chocolate if you want an easier, sweeter crowd-pleaser.
- If you don’t have pink candy melts, tint white candy melts or white chocolate with oil-based candy coloring (water-based dyes will seize chocolate).
- Use microwave-safe melting wafers or couverture chocolate for smoother results if you have them. Pre-chopping a chocolate bar is a quick shortcut to even melting if chips aren’t on hand.
- To make cleanup and timing easier, melt chocolates in separate microwave-safe bowls and use spoons or small offset spatulas to control drizzling rather than piping bags.
- If you’re pressed for time, set the bark in the refrigerator to firm up more quickly—but plan for a brief return to room temperature (5–10 minutes) before serving to lift flavors.
How to Make Valentine’s Day Chocolate Bark Step-by-Step
I like to think of making chocolate bark as painting with chocolate: each layer is deliberate but forgiving. Here’s how I guide home cooks through the process so the technique feels intuitive, not intimidating.
- Prepare your workspace
- Line a baking sheet with parchment paper, ensuring it lies flat with a slight overhang for easy removal. This protects the sheet and gives you a clean surface to shape the bark.
- Melt the semi-sweet chocolate
- Place the semi-sweet chocolate chips in a microwave-safe bowl. Heat in 30-second bursts, stirring between each interval to distribute the heat evenly and prevent scorching. You want a glossy, pourable consistency—if a few small bits remain, the residual heat will finish them without overcooking.
- Form the base layer
- Pour the melted semi-sweet chocolate onto the prepared parchment and use an offset spatula (or the back of a spoon) to spread it into an even layer about 1/8 to 1/4 inch thick. A slightly irregular edge looks artisanal, so don’t worry about perfect symmetry—texture adds charm.
- Melt and drizzle the white chocolate
- Warm the white chocolate chips in the same gentle microwave method until smooth. Transfer to a small spoon or a piping bag with the tip snipped. Drizzle the white chocolate over the dark base in thin, deliberate ribbons. The contrast will create soft marble veins when swirled.
- Melt and apply the pink candy melts
- Heat the pink candy melts until fluid and smooth. Drizzle them in a similar fashion, keeping the ribbons slightly separated so you can create a marbled, layered effect. For a more painterly look, use a toothpick or skewer to gently swirl the colors together—work quickly before the chocolate begins to set.
- Add sprinkles and finishing touches
- While the chocolate is still soft, scatter Valentine’s sprinkles, crushed freeze-dried raspberries, or a pinch of sea salt across the surface. Press lightly so the decorations adhere without sinking.
- Let it set
- Allow the bark to cool at room temperature until fully firm, which can take 45 minutes to an hour depending on ambient temperature. If you’re short on time, chill the sheet in the refrigerator for 15–20 minutes; remove it to room temperature for ten minutes before serving so the flavors bloom.
- Break into pieces and serve
- Lift the parchment and bend gently to crack the bark into irregular pieces. The irregular shapes are part of the charm—arrange them on a platter or wrap them individually for gifting.
Throughout, keep your tools dry—water is chocolate’s enemy, and even a small splash can cause seizing. I find that using bowls designated for chocolate keeps everything tidy and prevents flavor carryover.
Common Mistakes to Avoid
Everyone learns fastest when mistakes are framed as useful lessons. I’ve seen simple missteps undo hours of careful work, but they’re entirely avoidable with a little foresight. Below are the three most common errors I help home cooks correct, each presented with a quick explanation and an easy fix.
Mistake 1: Overheating the chocolate
The telltale signs of overheated chocolate are graininess and a dull sheen. Heat chocolate in short bursts and stir frequently; stop heating when most of the chocolate is melted and let residual heat finish the job. This preserves a glossy finish and a smooth texture.
Mistake 2: Introducing water
Even a single droplet can seize chocolate into a lumpy paste. Keep all utensils and bowls completely dry, and avoid steam above the melting bowl. If your chocolate does seize, gently fold in a teaspoon of neutral oil (coconut or vegetable) to loosen it as a last resort.
Mistake 3: Pushing the marbling too far
Aggressive swirling can blend the colors into a muddy mix. For an elegant marbled look, swirl sparingly—one or two gentle figure-eights or S-strokes with a skewer are usually enough. The goal is clear ribbons of contrasting chocolate, not a uniform blend.
Serving Suggestions for Valentine’s Day Chocolate Bark
The best presentations balance visual impact with ease—you want the bark to look curated, not contrived. Below are three ways I like to serve and pair this chocolate that highlight contrast, texture, and occasion.
Intimate Dessert Platter
Arrange irregular shards of bark on a small slate or white porcelain tray with a few fresh raspberries and sprigs of mint. The berry brightness complements the chocolate and the green adds a sophisticated pop.
Gift-Ready Packaging
Wrap pieces in cellophane bags tied with satin ribbon and a handwritten tag. For a luxe touch, layer pieces between sheets of decorative parchment inside a shallow box. This feels like a boutique confection without the boutique price tag.
Pairings and Beverage Notes
Serve the bark alongside lightly brewed coffee or unsweetened black tea to cut through the sweetness. For a non-alcoholic celebratory sip, try sparkling water infused with a lemon twist; the bubbles cleanse the palate and keep the focus on the chocolate layers. If you’re seeking matching snack ideas, I find that quick gluten-free lunches make for thoughtful, balanced meals to enjoy before or after indulging in sweets.

Conclusion
I love how Valentine’s Day Chocolate Bark turns a few pantry staples into something visually stunning and utterly delicious—no tempering, no complicated equipment, just thoughtful technique. Whether you gift it, share it over a coffee, or save a piece for a moment of quiet indulgence, it’s a flexible canvas: switch up toppings, explore different chocolate percentages, or add nuts and fruits to reflect your taste. If you’re curious about layered approaches and want another easy variation, I recommend checking out Easy Layered Valentine’s Day Chocolate Bark – Slow The Cook Down for additional inspiration. I can’t wait to hear how your bark turns out—there’s joy in the making, and even more in sharing it.
FAQs About Valentine’s Day Chocolate Bark
Q1: How long will Valentine’s Day Chocolate Bark keep? A1: Valentine’s Day Chocolate Bark will stay crisp and fresh in an airtight container at cool room temperature for up to two weeks. If your kitchen is warm or humid, store it in the refrigerator for up to three weeks, but allow it to come to room temperature briefly before serving so the flavors open.
Q2: Can I make Valentine’s Day Chocolate Bark ahead of time for a party? A2: Absolutely. I often make the bark 2–3 days ahead; store it in a single layer between sheets of parchment in an airtight tin. If stacking is necessary, separate layers with parchment to prevent sticking and preserve the crisp texture.
Q3: Is Valentine’s Day Chocolate Bark suitable for gifting? A3: Yes—this bark makes an elegant homemade gift. Piece it into varied sizes and wrap individually or arrange in a shallow box with tissue paper. Add a personalized note or ingredient list for friends with allergies.
Q4: Can I use couverture chocolate for Valentine’s Day Chocolate Bark? A4: You can, and it’s a wonderful option. Couverture melts beautifully and yields a glossy, snappy finish that feels especially professional. Just use the same gentle microwave method or a double boiler and avoid overheating.
Q5: How do I prevent Valentine’s Day Chocolate Bark from blooming (white streaks) in storage? A5: Blooming is caused by fat or sugar crystallization and is usually the result of temperature fluctuations. Store the bark in a consistently cool, dry place (ideally 60–68°F / 15–20°C). If refrigeration is necessary, keep it sealed and bring it to room temperature before serving to restore texture and flavor.