Last updated on July 6, 2025
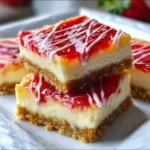
Have you ever taken a bite of something so rich and mouthwatering that you couldn’t help but close your eyes and savor the moment? That sensation is exactly what I experienced when I first indulged in salted caramel cheesecake bars—a memory I vividly cherish. Picture this: a generous layer of creamy cheesecake, a buttery biscuit base, and that luscious swirl of salted caramel sitting atop, just waiting to entice your taste buds. It’s pure bliss.
However, I remember my first attempt at making these little squares of heaven. I was eager yet a bit nervous. Would the filling be too lumpy? Would the biscuit base hold firm? These fears linger in the hearts of many beginners, and let me assure you, you’re not alone. The thought of ruining such a decadent dessert can be daunting.
But worry not! This post will guide you through the process step-by-step, making it simple and stress-free—even if this is your first culinary adventure. By the end, you’ll find that whipping up these salted caramel cheesecake bars is not only doable but incredibly enjoyable. Let’s embark on this delicious journey together!
Table of Contents
Ingredients You’ll Need for Salted Caramel Cheesecake Bars
Before diving into the recipe, let’s chat about the essential ingredients you’ll need to bring these mouthwatering bars to life.
Print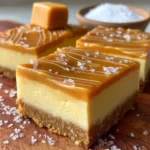
Salted Caramel Cheesecake Bars
- Total Time: 4 hours 20 minutes
- Yield: 16 bars 1x
- Diet: Vegetarian
Description
Indulgent, no-bake Salted Caramel Cheesecake Bars with a buttery biscuit base, creamy caramel-infused filling, and a luscious caramel topping. Perfect for make-ahead desserts that wow with every bite.
Ingredients
Base:
- 250 g (2 ¼ cups) digestive biscuits or graham crackers, crushed
- 125 g (½ cup) unsalted butter, melted
Filling:
- 500 g (2 cups) cream cheese, at room temperature
- 150 g (½ cup) thick salted caramel sauce
- 80 g (¼ cup) icing sugar (powdered sugar)
Topping:
- 250 g (1 cup) thick salted caramel sauce (for topping)
Decoration:
- Fudge chunks (optional)
- Flaky sea salt (to taste)
Optional Add-ons:
- Chocolate chips or chunks (for filling)
- Chopped pecans or walnuts (in base)
- Fresh fruit like raspberries or strawberries (layered in filling)
Substitutions:
- Graham crackers or crushed pretzels can replace digestive biscuits
- Low-fat cream cheese for a lighter option
- Blend granulated sugar if icing sugar is unavailable
Instructions
- Prepare the tin: Line an 8×8-inch square tin with parchment paper, leaving overhang for easy removal later.
- Make the base: Mix crushed biscuits and melted butter in a bowl until combined like wet sand. Press into the tin evenly and chill while preparing the filling.
- Make the filling: Beat cream cheese, 150 g salted caramel sauce, and icing sugar until smooth and lump-free. Spread evenly over the chilled biscuit base.
- Add the caramel topping: Gently melt the remaining 250 g caramel sauce until pourable (about 30 seconds in the microwave). Let cool slightly and pour over the filling. Spread evenly.
- Chill: Refrigerate for at least 4 hours or overnight until fully set.
- Decorate: Optional—place fudge chunks around the edge and sprinkle with flaky sea salt.
- Slice and serve: Lift from tin, slice into 16 bars with a clean knife between cuts. Serve and enjoy!
Notes
- Chill overnight for the best texture and easiest slicing.
- Flaky sea salt enhances caramel flavor—use sparingly if sensitive to salt.
- Store leftovers in the fridge for up to 5 days in an airtight container.
- Prep Time: 20 minutes
- Cook Time: 0 minutes (no bake)
- Category: Dessert
- Method: No-Bake
- Cuisine: American
Nutrition
- Serving Size: 1 bar
- Calories: 320
- Sugar: 22g
- Sodium: undefined
- Fat: 20g
- Saturated Fat: 12g
- Unsaturated Fat: undefined
- Trans Fat: undefined
- Carbohydrates: 30g
- Fiber: 1g
- Protein: 4g
- Cholesterol: undefined
Keywords: salted caramel cheesecake bars, no-bake cheesecake, caramel dessert, cream cheese bars, fudge topping, party dessert
Essential Ingredients
Digestive Biscuits (or Graham Crackers) – 250 g (2 ¼ cups)
- The base of our bars; they provide that wonderful crunch. If you’re in the U.S., graham crackers make a fantastic substitute!
Unsalted Butter – 125 g (½ cup, melted)
- This gives our biscuit base that buttery richness.
Cream Cheese – 500 g (2 cups, at room temperature)
- The star of the show! Cream cheese creates the creamy texture we all crave in cheesecakes.
Thick Salted Caramel Sauce – 150 g (½ cup) + 250 g (1 cup for the topping)
- This is what brings the salty-sweet balance. Use your favorite store-bought version or homemade if you’re feeling adventurous.
Icing Sugar (Powdered Sugar) – 80 g (¼ cup)
- This helps sweeten our filling and gives it a lovely smooth texture.
Fudge Chunks – For decoration
- These are an optional addition, but oh, do they take this dessert to the next level!
Flaky Sea Salt – For decoration
- Just a sprinkle adds that extra touch of salinity to enhance the flavors.
Optional Add-ons
- Chocolate Chips or Chunks: If you want a bit more sweetness and texture, you can mix in some chocolate chips into the cheesecake filling.
- Nuts: Chopped pecans or walnuts can be added to the biscuit base for that extra crunch.
- Fruit: A layer of fruit like raspberries or strawberries can complement the caramel beautifully.
Substitutions and Shortcuts
- If you’re out of digestive biscuits, graham crackers or even crushed pretzels can work as an excellent alternative.
- For a lighter version, consider using low-fat cream cheese. While the texture may vary slightly, it will still deliver on taste.
- If you don’t have icing sugar, you can blend granulated sugar until it’s a fine powder—just keep an eye out to ensure it doesn’t turn into syrup!
How to Make Salted Caramel Cheesecake Bars Step-by-Step
Now that we’ve gathered our ingredients, it’s time to dive into the fun part—making these delectable salted caramel cheesecake bars! Follow my detailed steps, and I promise you’ll be amazed at how simple this can be.
Step 1: Prepare the Tin
To start, we need to line our tin. This is a crucial step for easy removal after chilling.
- Line the tin: Grab an 8×8-inch baking tin and line it with parchment paper. Make sure to leave some overhang on the sides. This will help you lift the cheesecake out once it’s set.
Step 2: Make the Biscuit Base
This base is the foundation of our bars, offering that delightful crunch we all love.
Mix the base: In a large mixing bowl, combine your finely crushed digestive biscuits and melted butter. Stir until it resembles wet sand. This texture is key to holding everything together.
Spread it firmly: Press the biscuit mixture firmly into the base of the lined tin. You want to create an even layer here—this ensures that every bite of your bars has that satisfying crunch! Once pressed down, chill the base in the fridge while we prepare the cheesecake filling.
Step 3: Make the Cheesecake Filling
This is where the magic happens! The filling is creamy, sweet, and oh-so-satisfying.
Beat the filling: In a separate mixing bowl, add your room temperature cream cheese, 150 g of salted caramel sauce, and icing sugar. Using an electric mixer, beat these ingredients together until you achieve a smooth and creamy consistency, with no lumps in sight.
Spread it out: Once combined, gently spread the cheesecake filling over the chilled biscuit base. Use a spatula or the back of a spoon to smooth it out evenly. Take a moment to appreciate how delicious this already looks!
Step 4: Add the Caramel Topping
Now, let’s elevate our cheesecake bars with a luscious layer of caramel.
Melt the caramel: In a microwave-safe bowl, melt the remaining 250 g of salted caramel sauce for about 30 seconds. Stir until it’s smooth and pourable. Make sure to let it cool for a couple of minutes so it isn’t piping hot when you pour it over the cheesecake.
Pour it on: Once cooled slightly, gently pour the caramel topping over the cheesecake filling. Use a spatula to spread it evenly. If you’re a caramel lover, don’t be shy—add another layer for an indulgent treat!
Step 5: Chill and Decorate
Patience is key with this step. The chilling time allows everything to set perfectly.
Chill in the fridge: Now, return the tin to the fridge and chill for at least 4 hours, or even better, overnight. This will ensure the cheesecake and caramel are set properly.
Decorate before serving: If you want to make these bars look as good as they taste, place little fudge chunks around the edge of the cheesecake to create a delightful border. Then generously sprinkle flaky sea salt on top for that perfect finishing touch. If you’re sensitive to saltiness, feel free to skip this step!
Step 6: Slice and Serve
You’ve made it this far! Now for the most rewarding part—slicing and serving your delicious bars.
Remove from the tin: Carefully lift the cheesecake slab out of the tin using the overhanging parchment paper. This is where having lined the tin pays off!
Slice into bars: Using a sharp knife, slice the cheesecake into 16 squares. For a neat finish, I recommend wiping the knife clean between each cut.
Serve and enjoy: Present your beautiful salted caramel cheesecake bars to family or friends—or keep them all to yourself! Either way, they are sure to be a hit.
Common Mistakes to Avoid
Making salted caramel cheesecake bars might seem straightforward, but here are some common pitfalls to watch for:
1. Overmixing the Cream Cheese
Overmixing can lead to a runny filling, which isn’t what we want. Just mix until well combined.
2. Not Using Room Temperature Ingredients
Ensure your cream cheese is at room temperature to avoid lumps. Cold cream cheese won’t blend well and can ruin the smooth texture.
3. Inadequate Chilling Time
Skipping or shortening the chilling time can lead to a soft filling. Trust the process—let those bars set fully for the best results.
4. Not Pressing the Biscuit Base Firmly
If the biscuit base isn’t pressed down properly, it may crumble when you cut into it later. Take your time to get a solid foundation.
Quick Wins for Beginner Cooks
As a beginner cook, here are some quick tips to elevate your baking game with these bars:
1. Use Quality Ingredients
It sounds cliché, but using high-quality butter and cream cheese can make a significant difference in flavor.
2. Keep it Simple
Don’t feel pressured to make everything from scratch. A store-bought caramel sauce can save time without sacrificing too much taste.
3. Read Through the Recipe First
Take a moment to read the entire recipe before you begin. This will help you understand the steps and gather all your tools and ingredients.
4. Take Breaks
If you ever feel overwhelmed, take a moment. Baking should be fun. Breathe, enjoy the process, and focus on one step at a time.
Pro-Level Tips for When You’re Ready
Once you’re comfortable making these bars, consider these pro-level tips:
1. Flavor Variations
Experiment with flavorings! Add a splash of vanilla extract or some lemon juice to the cheesecake filling for a refreshing twist.
2. Make it a Layered Dessert
You can layer other flavors, maybe a chocolate layer or fruit puree, between the cheesecake layers for added complexity.
3. Customize Your Toppings
Play with different toppings—try crushed nuts, chocolate drizzle, or fruit to create unique combinations each time.
4. Batch and Freeze
These bars freeze well! Cut them into squares and freeze for later indulgence. Just be sure to wrap them tightly!
Conclusion & Next Steps
Making salted caramel cheesecake bars is indeed easier than it looks. With just a few simple steps, you can create a cozy, classic dessert that will impress your family and friends. And remember, you can customize this recipe to your heart’s content—whether it’s adding fudge, experimenting with flavors, or creating beautiful toppings.
Now that you’ve learned the ins and outs of creating these delightful bars, I encourage you to get started in the kitchen. Gather your ingredients, invite a friend over, and enjoy the magic of baking together. The warmth of these salted caramel cheesecake bars will surely entice anyone who takes a bite.
FAQ about Salted Caramel Cheesecake Bars
What’s the best way to store leftover salted caramel cheesecake bars?
Store them in an airtight container in the fridge for up to 5 days. You can also freeze them for up to 3 months!
Can I use low-fat cream cheese for this recipe?
Yes, low-fat cream cheese can be used! While the texture might not be as rich, it will still taste delicious.
What can I use if I can’t find digestive biscuits?
Graham crackers or crushed pretzels make excellent substitutes for digestive biscuits. Each will offer a different taste, but they’ll all work well.
How can I make homemade salted caramel sauce?
To make your own, slowly heat sugar in a saucepan until it melts and turns golden. Carefully add butter and heavy cream, then simmer until thickened.
Is it necessary to chill these bars overnight?
While chilling for at least four hours helps, overnight is ideal for the best texture. Patience pays off here!
With these tips, you are now equipped to create the most scrumptious salted caramel cheesecake bars, perfect for any gathering or just a cozy night in. Happy baking!
Looking for more delicious recipes? Follow us on Pinterest and Facebook!